PDF Press Tool Guide
Complete reference for all 42 imposition tools, 68 production recipes, ready-made templates, and a comprehensive prepress glossary.
Quick Start
1. Upload
Drag and drop your PDF or image files. Everything stays in your browser.
2. Pick a Tool
Browse 42 tools across Layout, Transform, Enhance, and Advanced categories.
3. Download
Export the imposed PDF, generate a JDF ticket, or send directly to your printer.
Navigation Walkthrough
Upload Your File
Load one or more PDF or image files. All processing runs locally in your browser. Nothing is uploaded to a server.
- Drag and drop files onto the canvas, or click the upload area to browse your file system.
- Upload multiple files at once for merge, mix, or gang-sheet workflows.
- Supported formats: PDF, PNG, and JPEG. Images are auto-converted to PDF on import.
- Your file appears in the preview pane immediately. No account or sign-up needed.

Choose a Tool
Browse the tool panel on the left. Tools are grouped into four categories: Layout, Transform, Enhance, and Advanced.
- Scan the four category tabs (Layout, Transform, Enhance, Advanced) to find the right tool.
- Use the search bar at the top of the tool panel to filter by name or keyword.
- Click a tool card to apply it as the active operation. Its options appear in the sidebar.
- Hover over any tool card to read a short description before selecting it.
Configure Options
Each tool has its own settings panel. Adjust paper size, units, margins, and other parameters while the live preview updates in real time.
- Pick a paper size preset (Letter, A4, Tabloid, etc.) or enter custom width and height values.
- Switch between inches, millimeters, and points using the unit selector on any dimension field.
- Tap the help icon next to any setting for a tooltip explaining what it controls.
- The live preview updates after each change. Processing runs in a background worker so the UI stays responsive.
Chain Multiple Tools
Build multi-step workflows by stacking tools. Each step feeds its output into the next, so you can combine imposition, marks, and finishing in one pipeline.
- Click Add Step at the bottom of the sidebar to append another tool to the pipeline.
- Drag step handles to reorder operations. The preview recalculates the entire chain.
- Remove a step by clicking its delete button. Downstream steps reconnect automatically.
- Save the entire chain as a custom tool via My Tools so you can reuse it on future jobs.
Preview & Navigate
The central preview area shows your imposed output at full fidelity. Use the toolbar to zoom, page through sheets, and toggle diagnostic overlays.
- Zoom in and out with the toolbar buttons or scroll wheel. Zoom steps by a factor of the square root of two.
- Toggle the X-ray overlay to see page boundaries, trim boxes, and bleed areas.
- Enable the checkerboard background to verify transparency on overlay and watermark operations.
- Navigate multi-sheet output with the page stepper. Fast-forward and fast-backward buttons appear for documents over 100 pages.
Download & Print
When the output looks right, export it. Download the imposed PDF, generate a JDF job ticket for your RIP, or send it straight to a printer.
- Click the download button to save the final imposed PDF to your file system.
- Use the JDF button to export a CIP4 Job Definition Format ticket alongside the PDF.
- Hit the print button to open the browser print dialog with the imposed output pre-loaded.
- For batch jobs, upload multiple files and download each result. All processing stays in the browser.

Use Templates
Pre-built templates let you jump-start common jobs. Each template loads a ready-made tool chain that you can customise before exporting.
- Browse six template categories: Booklets, Cards, Labels, Packaging, Large Format, and Specialty.
- Click any template card to load its tool chain into the sidebar.
- Adjust the loaded settings to match your stock size, bleed, and finishing requirements.
- Save a modified template as a new custom tool so it appears in My Tools for future jobs.
Tools Reference
All 42 professional imposition tools, grouped by category.
Layout Tools(6)
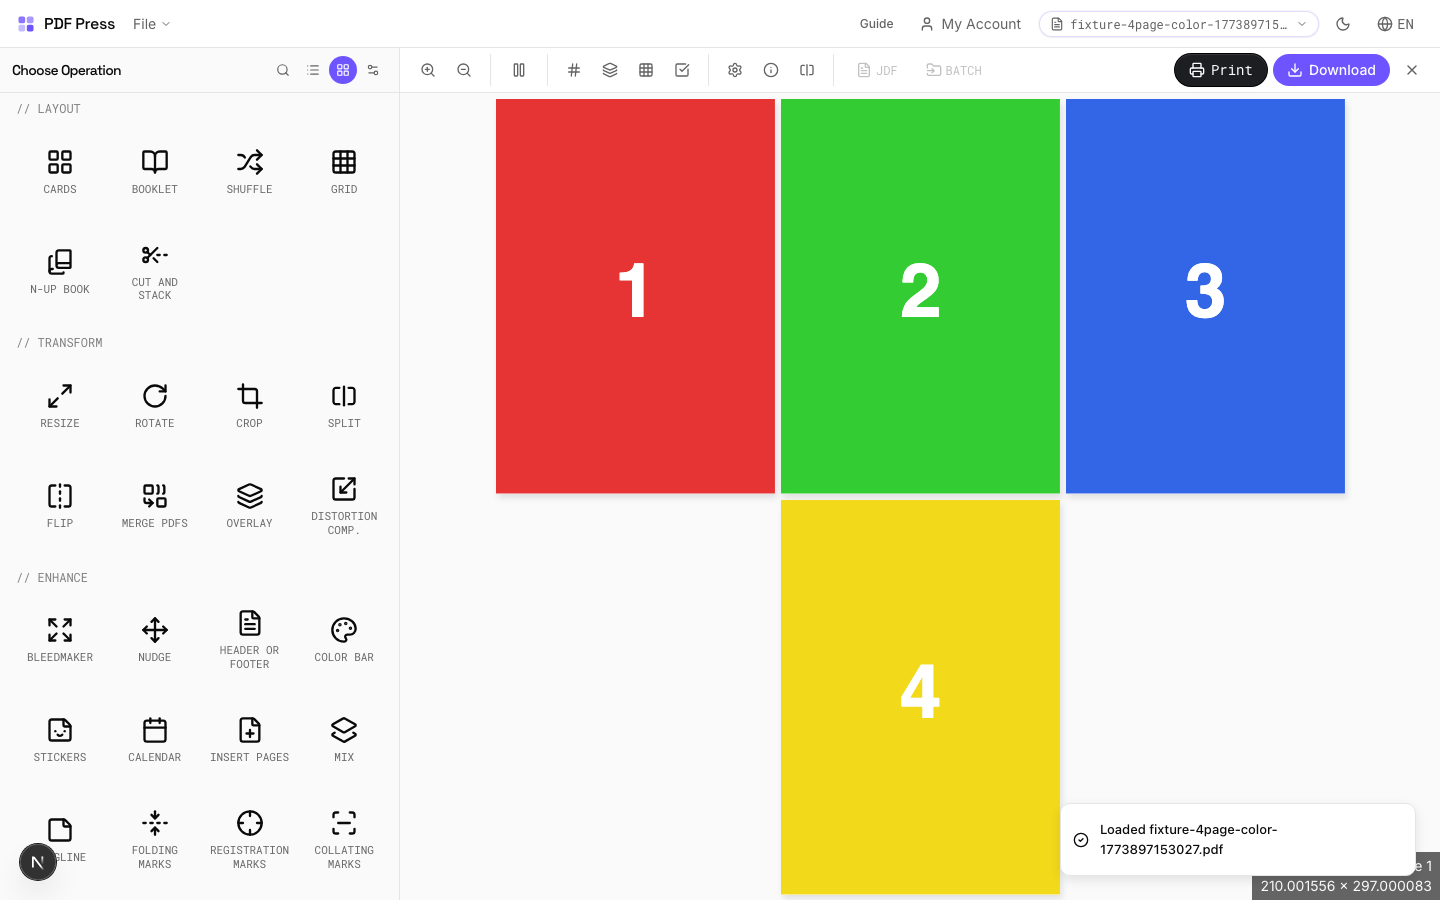
Cards
5 recipesTiles identical copies of your pages onto larger sheets for efficient cutting.
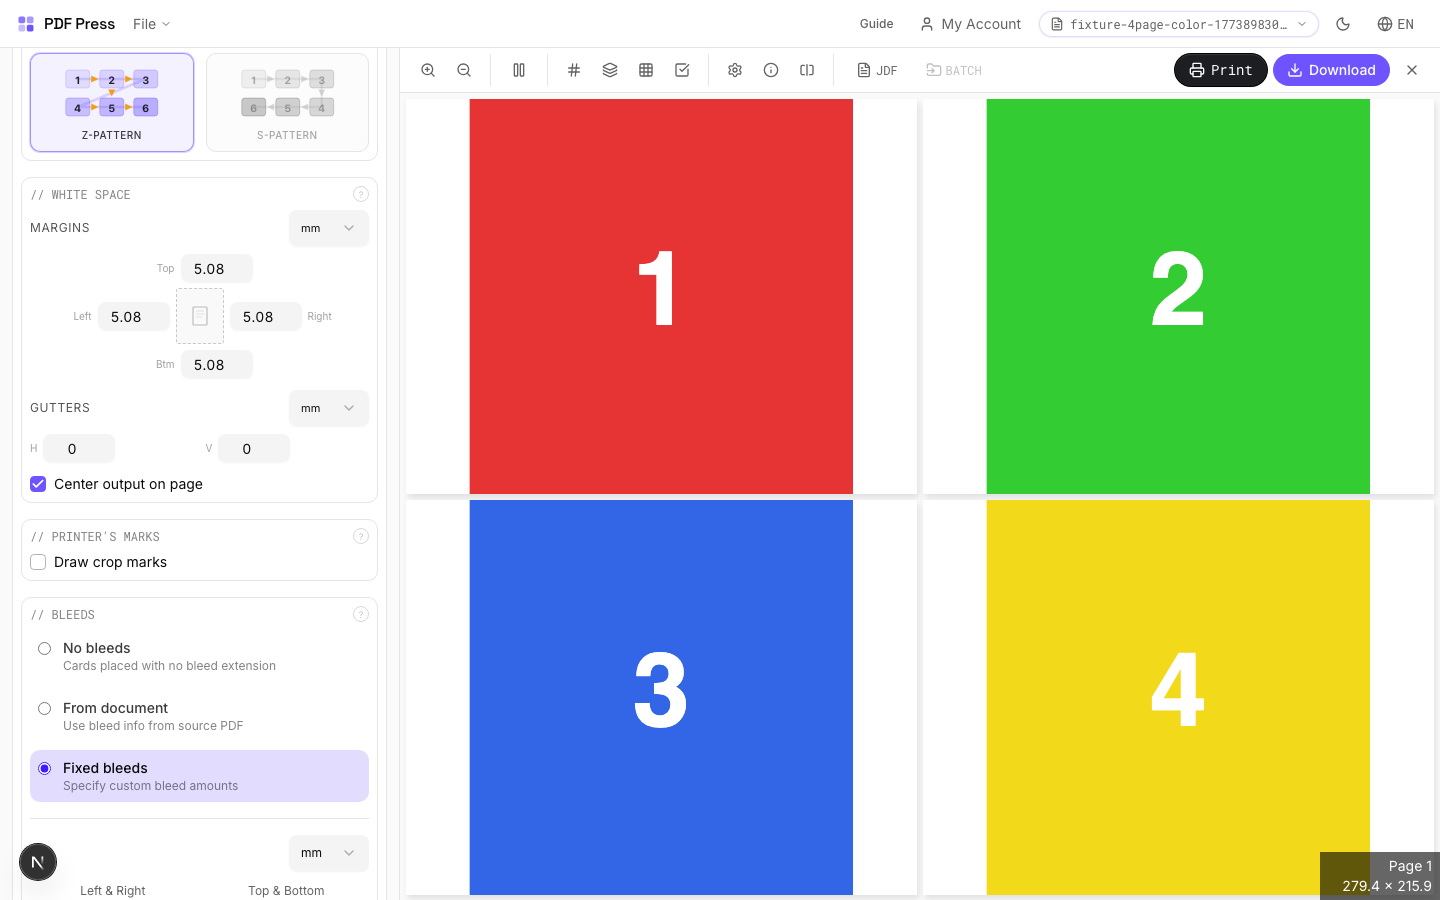
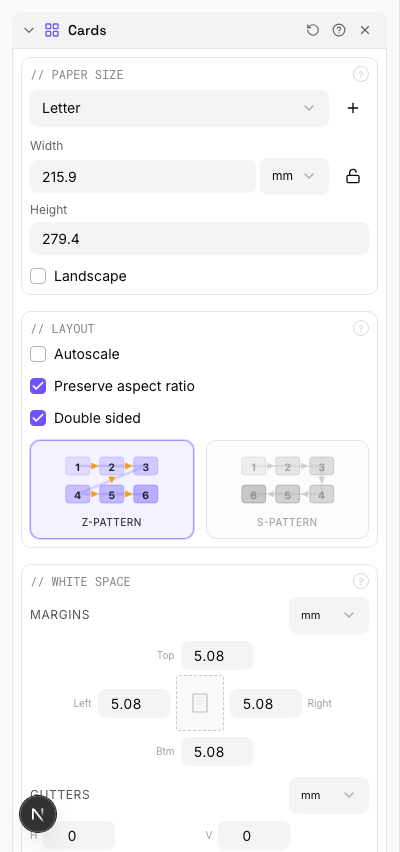
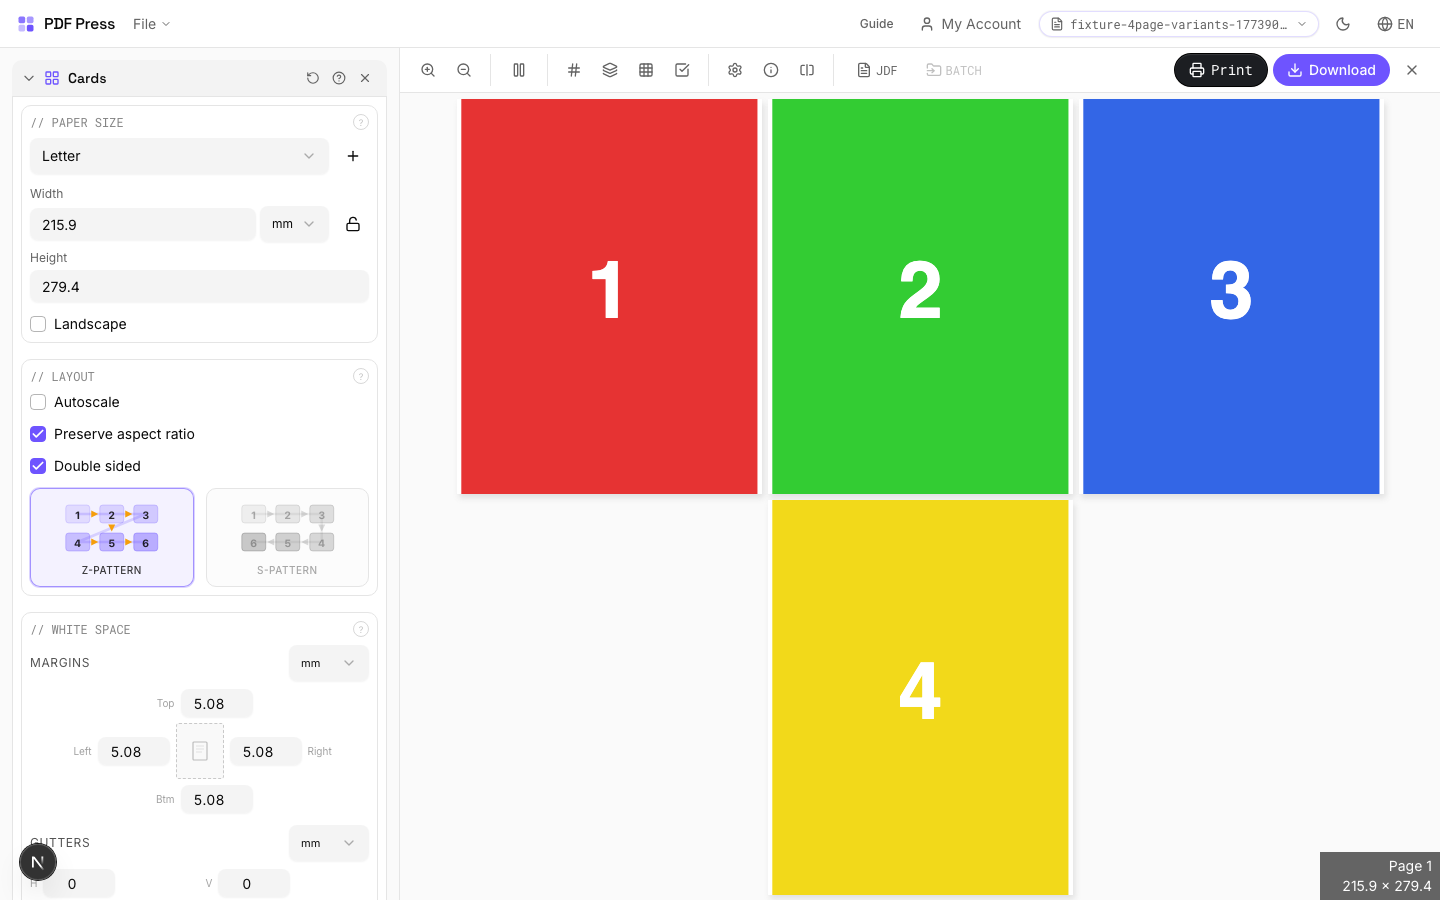
Creates a grid of repeated identical items from your design. Set the output sheet size, then the engine calculates optimal row/column counts based on page dimensions, margins, and gutters. Use crop marks for precise guillotine trimming. For different pages in each cell, use Grid instead.
How It Works
Creates a grid of repeated identical items from your design. Set the output sheet size, then the engine calculates optimal row/column counts based on page dimensions, margins, and gutters. Use crop marks for precise guillotine trimming. For different pages in each cell, use Grid instead.

Cards tool applied. Options panel on the left, imposed result on the right. Click to zoom.
Options Guide
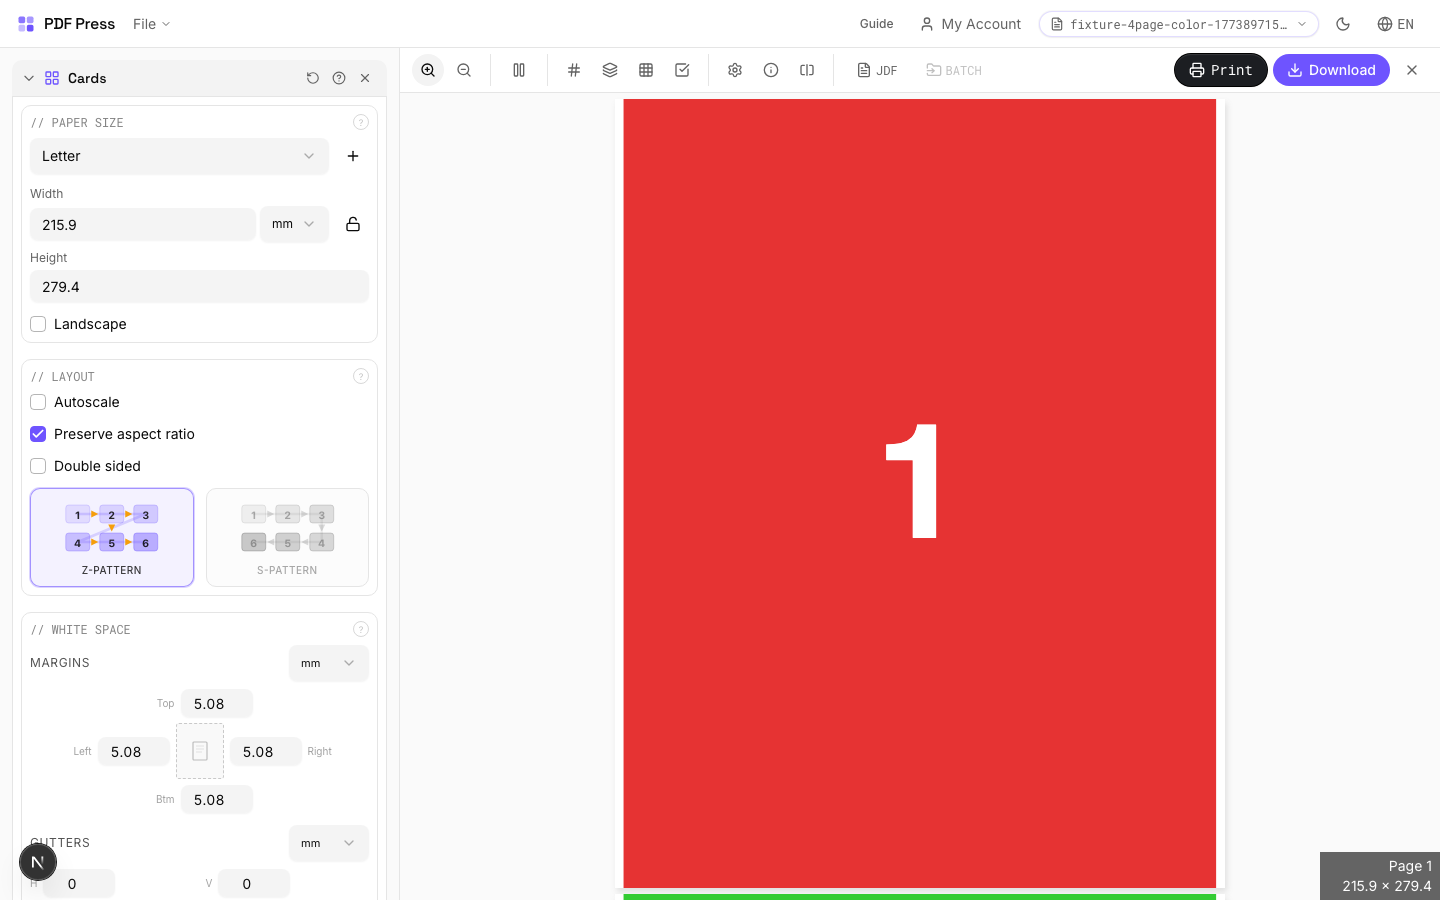
Paper Size
Sets the output sheet dimensions. This is the physical paper going through your printer or press.
Standard presets: Letter (8.5×11in), Legal (8.5×14in), Tabloid (11×17in), A4 (210×297mm), A3 (297×420mm). Landscape swaps width↔height. Lock icon links dimensions to preserve aspect ratio. Custom lets you enter any size in inches, mm, or points (1in = 72pt = 25.4mm).
White Space
Controls margins around the sheet edges and gutters between items in the grid.
Left margin = space from the left sheet edge to the first column. Top margin = space from the top edge to the first row. Horizontal gutter = gap between columns. Vertical gutter = gap between rows. All values are in your selected unit (inches/mm/points). 'Center output on page' distributes leftover space evenly instead of anchoring content to the top-left corner.
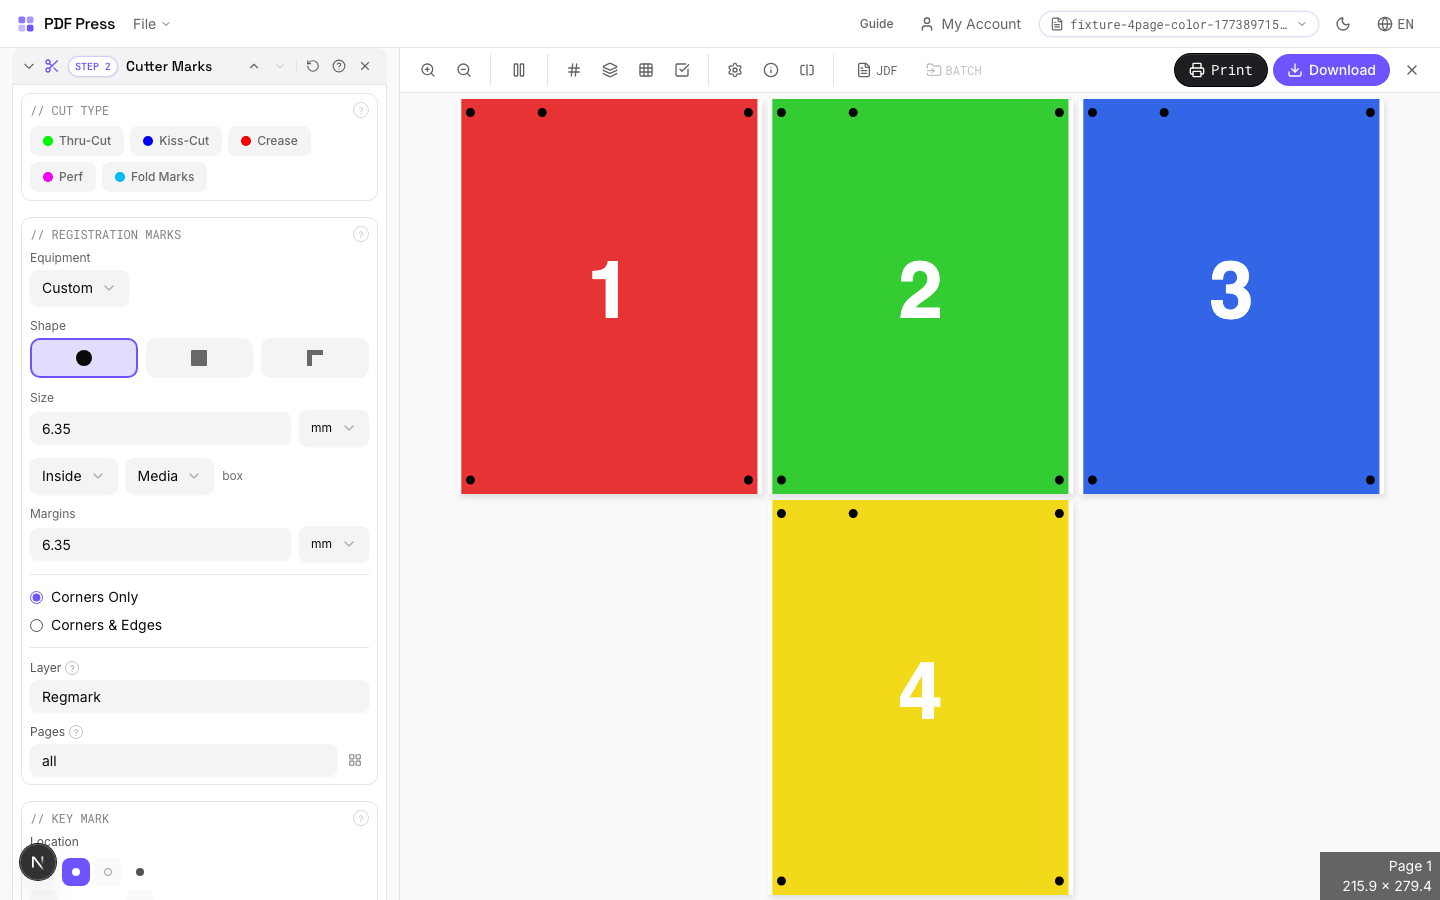
Printer's Marks
Adds trim guides and alignment marks outside the live area for accurate cutting and registration.
Crop marks: short lines at each corner showing where to trim. Center marks: crosshairs at sheet midpoints for front/back alignment on duplex jobs. Line length (default 0.43in/31pt): how long each mark line extends. Line thickness (default 0.014in/1pt): mark stroke weight. Line distance (default 0.139in/10pt): gap between the mark and the artwork edge. Four-color black: prints marks in C+M+Y+K for visibility on color proofs. Knockout: adds a white halo around marks so they show on dark backgrounds.
Bleeds
Extends artwork beyond the trim edge to prevent white strips after cutting.
Three modes: 'No bleeds' trims exactly at the page boundary. 'Pull from document' uses bleed info already embedded in the PDF (TrimBox/BleedBox metadata). 'Fixed' lets you manually set bleed on each side, typically 3mm (0.125in / 9pt) for commercial print, 1-2mm for digital. Bleed values define how far past the trim edge the artwork extends.
Layout
Controls fill pattern, columns, rows, scaling, and duplex pairing.
Z-pattern: fills left→right, top→bottom (standard Western reading order). S-pattern (snake): reverses alternating rows: useful when cutting strips horizontally and stacking. Double-sided: pairs page 1 (front) with page 2 (back) for duplex. Columns×Rows is auto-calculated from sheet/page dimensions: override manually for a specific count. Step-and-repeat fills the entire sheet with copies of each page before moving to the next.
Configurations & Variations
Landscape Orientation
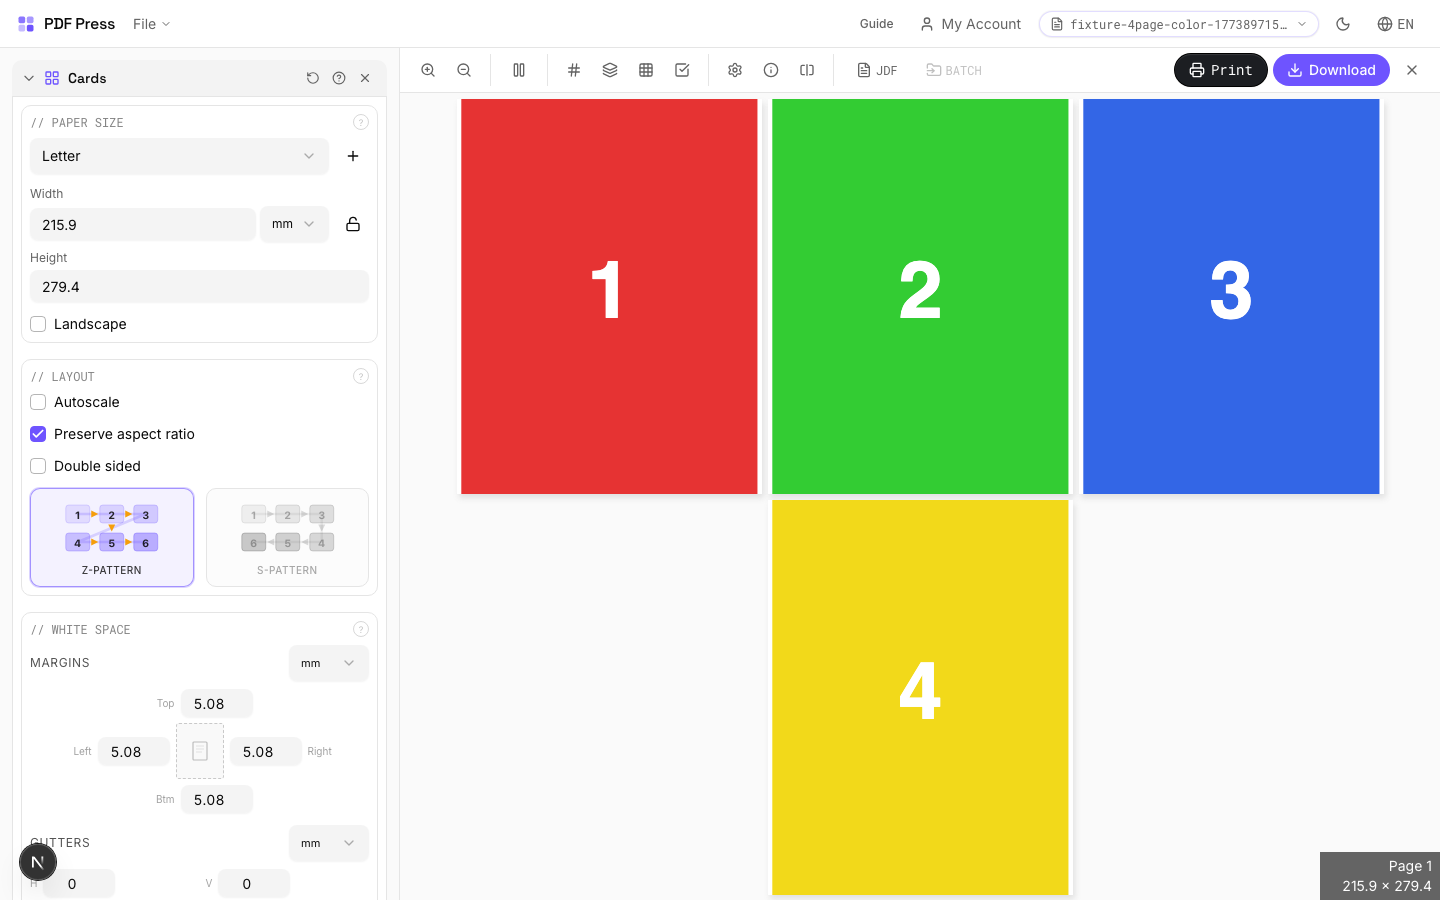
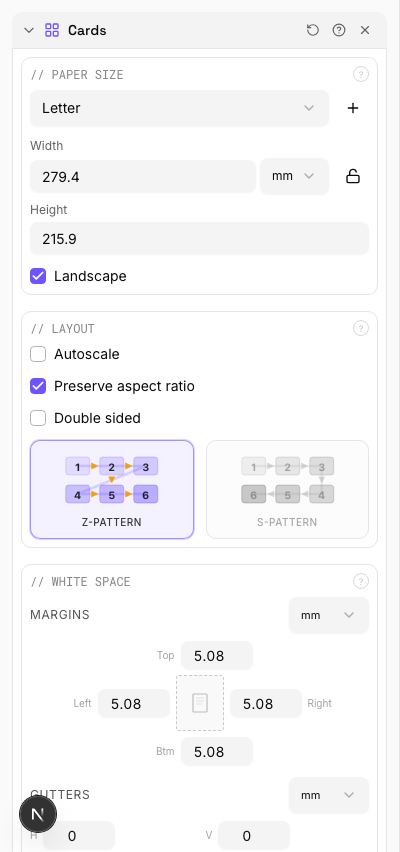
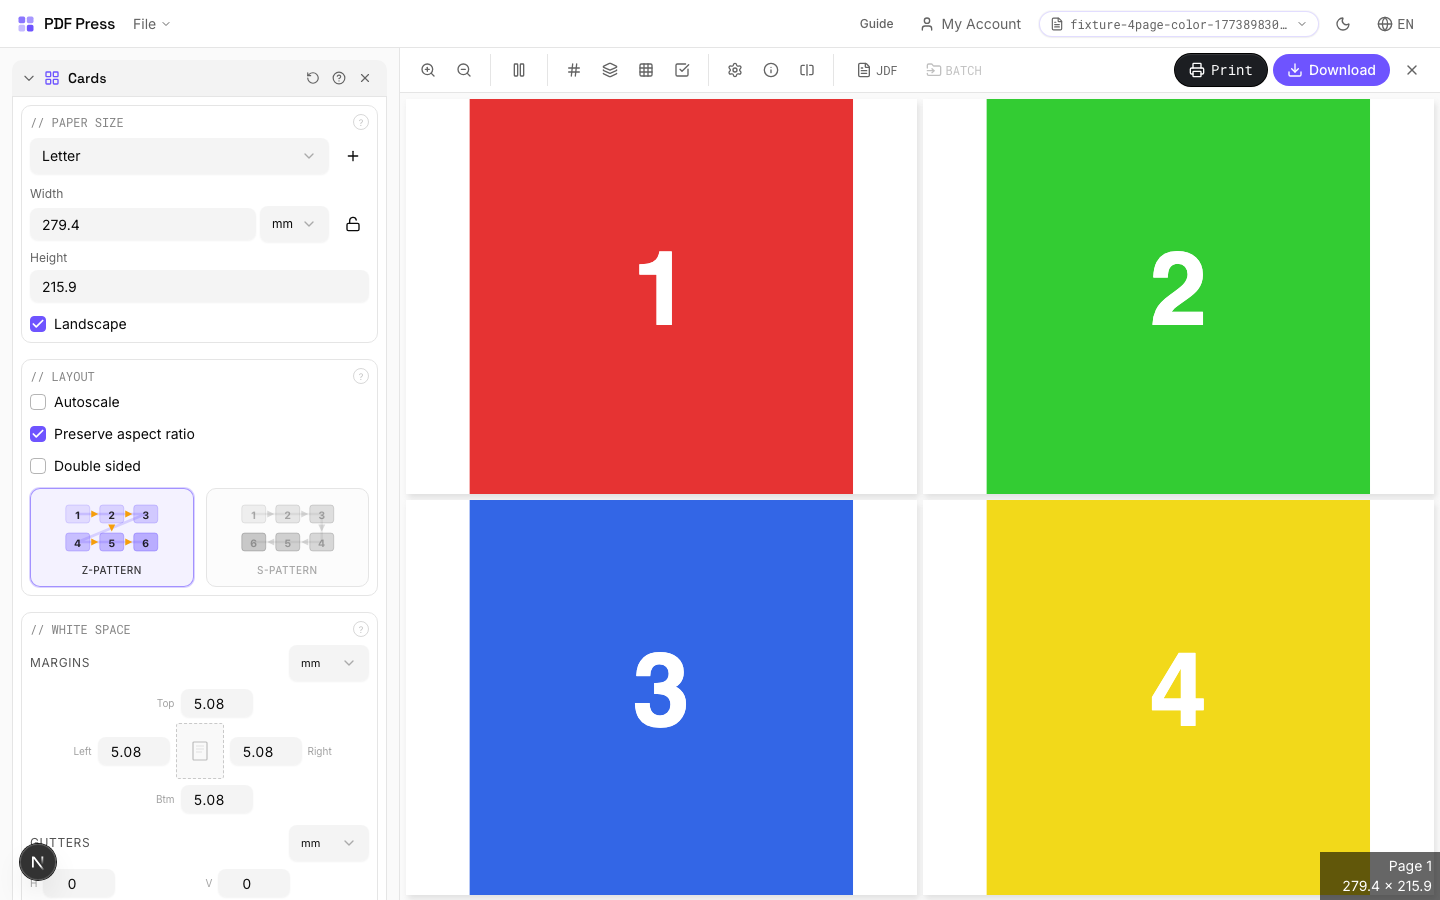
Tick the Landscape checkbox to swap paper width and height. Useful when the card design is wider than it is tall (for example, standard 3.5 x 2 in business cards on a portrait sheet). The grid recalculates automatically and will often yield a different row/column count in landscape.
Settings to change
Full app view

Output result
With Fixed Bleeds
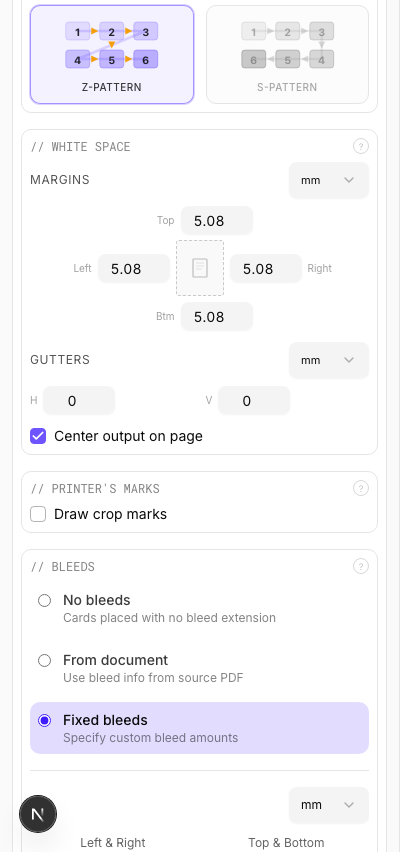
Under the Bleeds section, select Fixed bleeds and enter 3 mm (0.125 in) on all four sides. This extends artwork past the trim edge so the guillotine does not leave a white strip. Use this when your source was delivered at trim size with no built-in bleed.
Settings to change
Full app view

Output result
Double Sided
Tick Double sided in the Layout section. Page 1 becomes the front, page 2 becomes the back, and the output alternates front/back sheets with correct alignment for duplex. Standard setup for business cards, postcards, or any two-sided product.
Settings to change
Full app view

Output result
Expert Tip
Pull bleeds from the document whenever possible. This preserves the designer's original bleed artwork and avoids synthetic artefacts. Set gutters to 0 for cards that share a cut line to get the most items per sheet.
If the source has no TrimBox or BleedBox metadata, switch to Fixed bleeds at 0.125 in / 3 mm.
Learn More
Used in Recipes
Business Cards
Standard multi-up business card layout on a press sheet.
Business Cards (No-Bleed Rescue)
Business cards from artwork delivered without bleeds.
Postcards
Multi-up postcards (4x6 or A6) on press sheets.
Rack Cards
4x9 inch rack cards imposed for multi-up printing.
Desk Calendar
Desk tent calendar with fold-and-stand construction.
Booklet
8 recipesArranges pages into printer spreads so they read correctly after folding and binding.
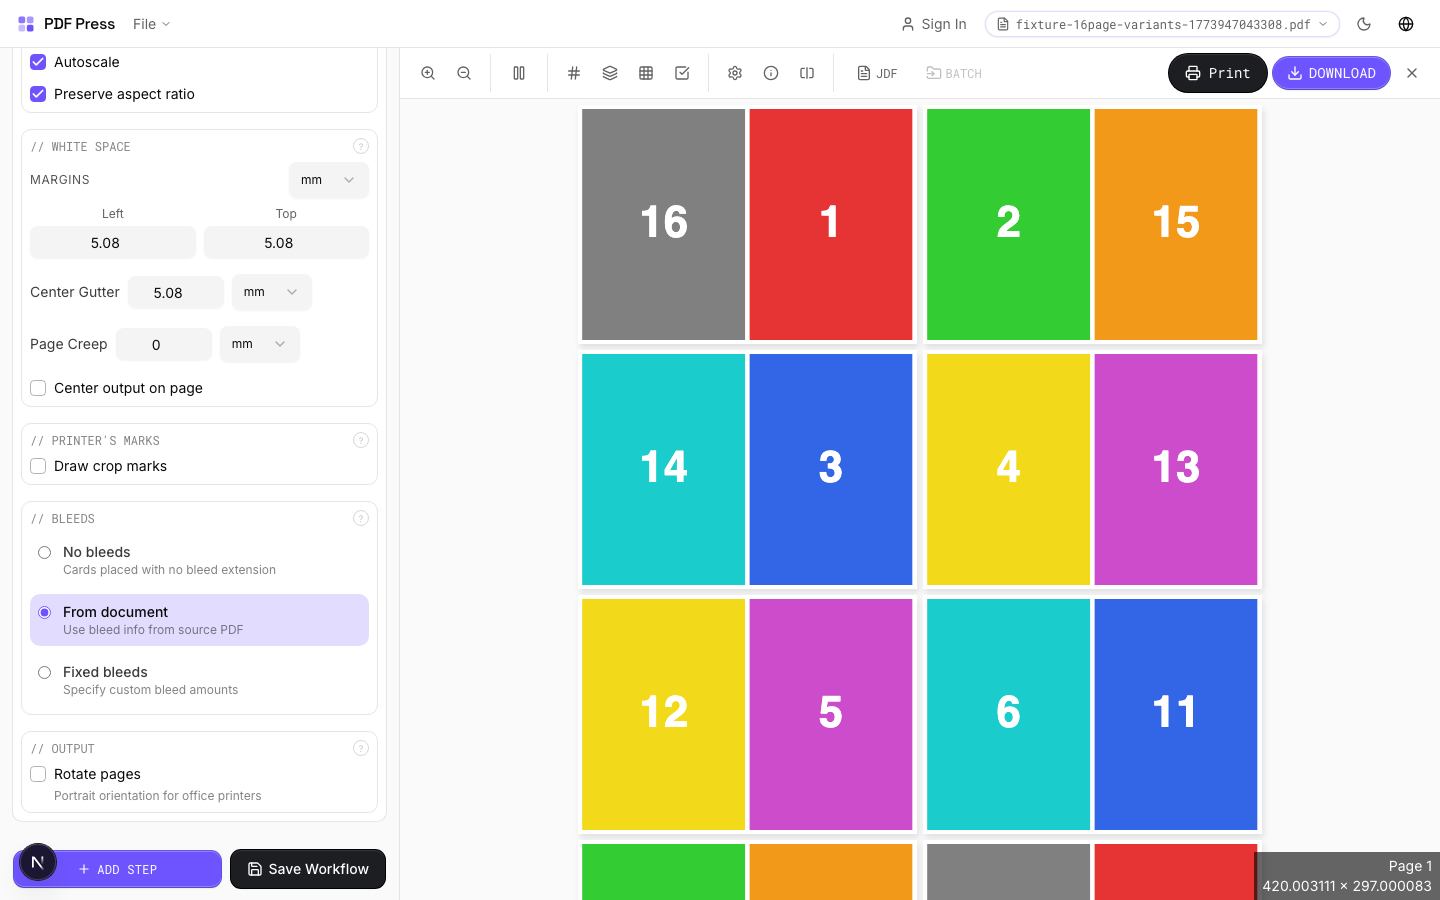
Shuffles pages into imposition order: the last and first page share a sheet, second-to-last and second share the next, and so on. After printing duplex, folding, and stapling/gluing, pages read sequentially. Supports saddle-stitch (single folded stack, ideal for up to ~64 pages) and perfect binding (multiple signatures glued at the spine, for thicker books).
How It Works
Shuffles pages into imposition order: the last and first page share a sheet, second-to-last and second share the next, and so on. After printing duplex, folding, and stapling/gluing, pages read sequentially. Supports saddle-stitch (single folded stack, ideal for up to ~64 pages) and perfect binding (multiple signatures glued at the spine, for thicker books).
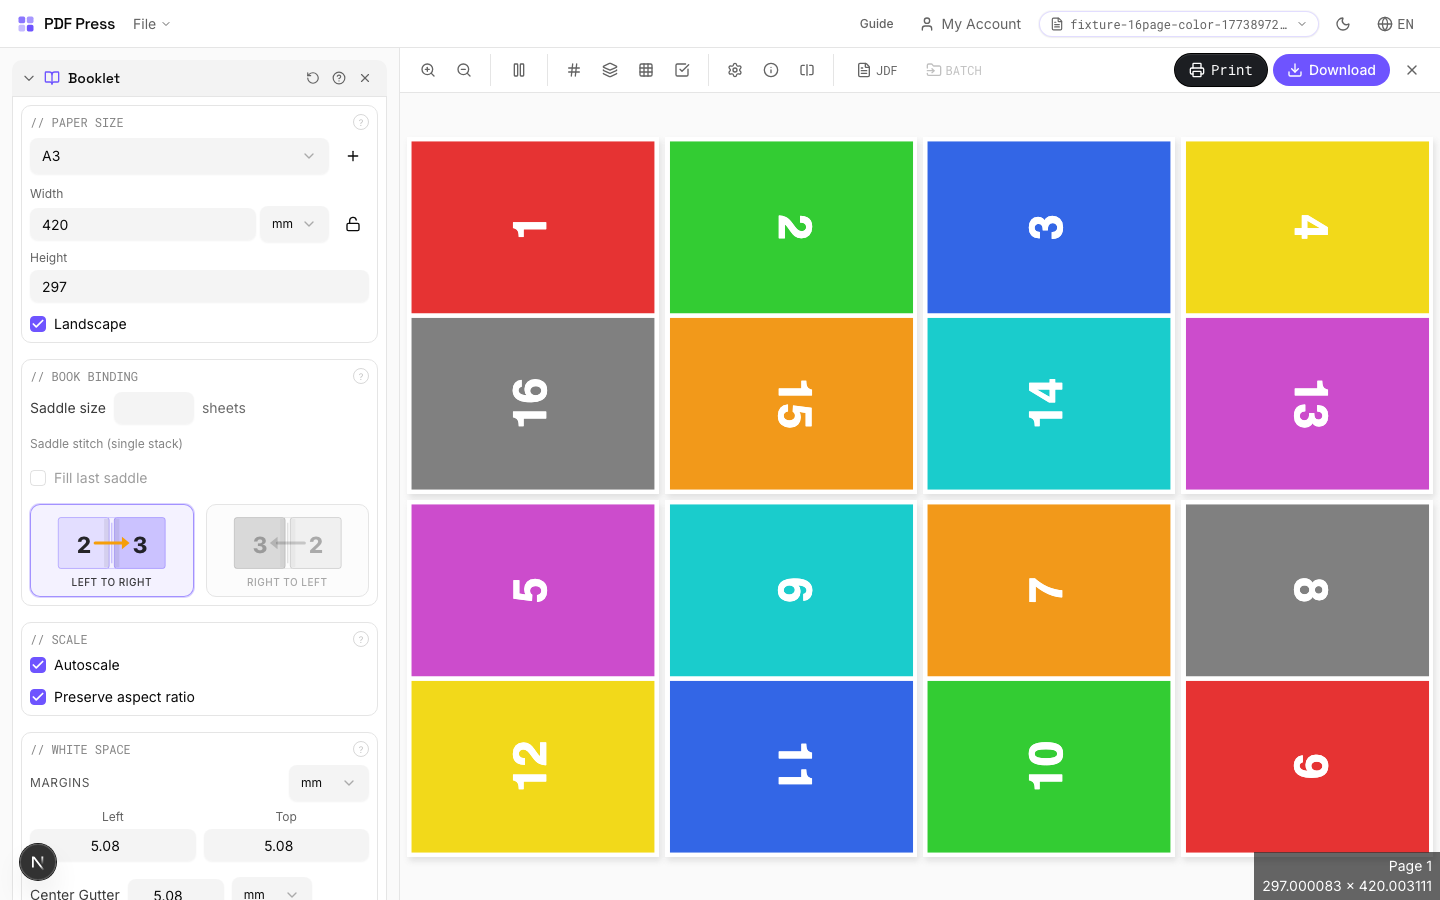
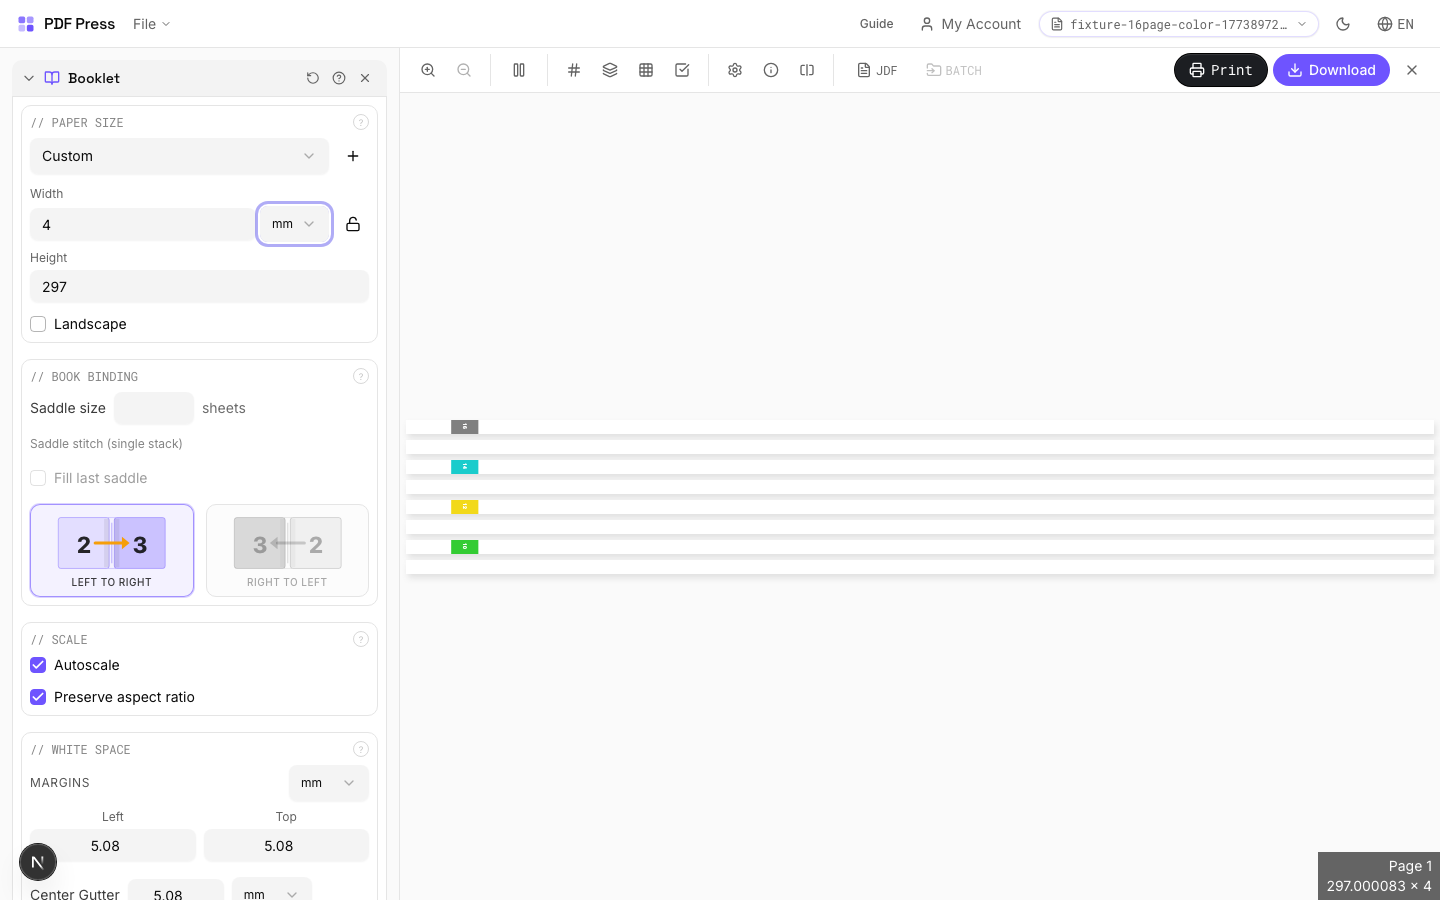
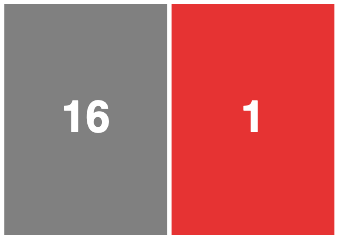
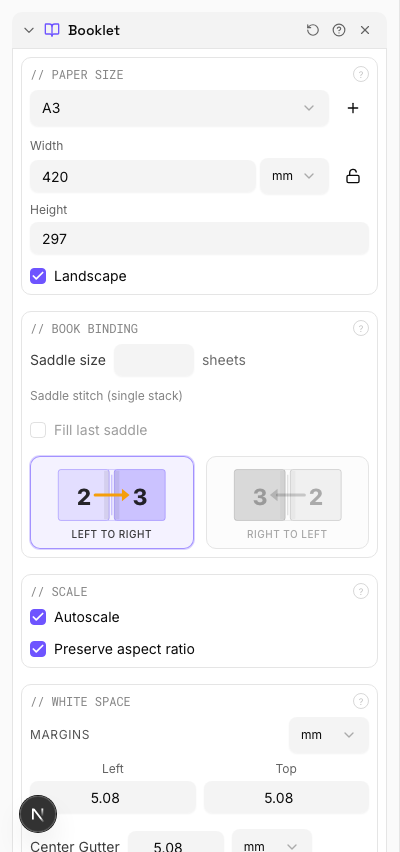
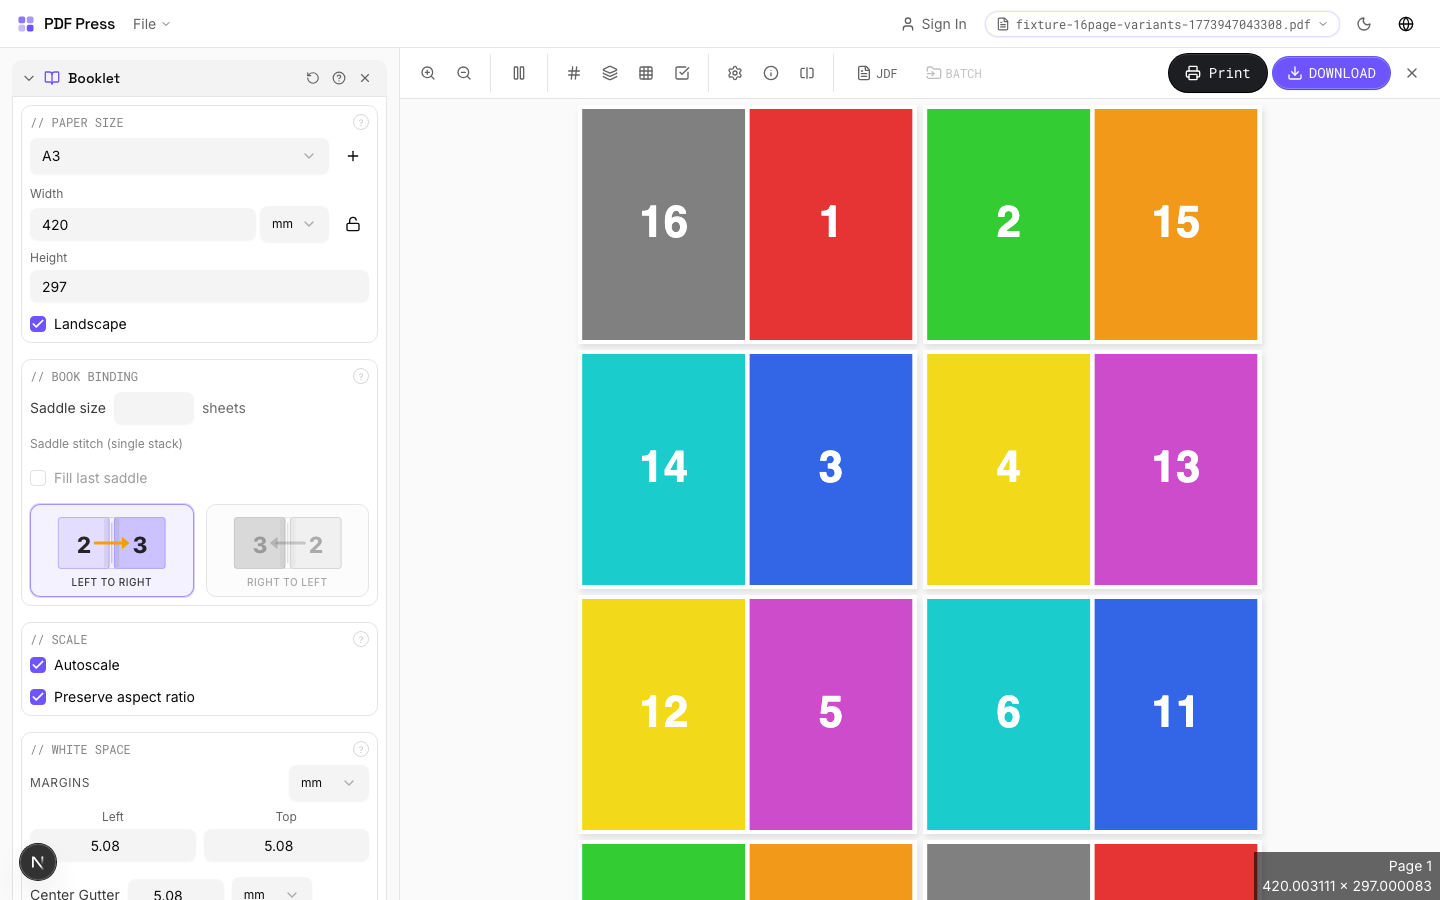
Booklet tool applied. Options panel on the left, imposed result on the right. Click to zoom.
Options Guide
Paper Size
Sets the output sheet dimensions. This is the physical paper going through your printer or press.
Standard presets: Letter (8.5×11in), Legal (8.5×14in), Tabloid (11×17in), A4 (210×297mm), A3 (297×420mm). Landscape swaps width↔height. Lock icon links dimensions to preserve aspect ratio. Custom lets you enter any size in inches, mm, or points (1in = 72pt = 25.4mm).
Scale
Controls whether pages are resized to fit the available cell in the grid.
Autoscale ON: pages are shrunk or enlarged to fill each cell. OFF: pages are placed at their original size (may overflow or leave empty space). 'Preserve aspect ratio' prevents stretching. Pages scale uniformly and are centered, so they may not fill the cell completely in one direction.
Printer's Marks
Adds trim guides and alignment marks outside the live area for accurate cutting and registration.
Crop marks: short lines at each corner showing where to trim. Center marks: crosshairs at sheet midpoints for front/back alignment on duplex jobs. Line length (default 0.43in/31pt): how long each mark line extends. Line thickness (default 0.014in/1pt): mark stroke weight. Line distance (default 0.139in/10pt): gap between the mark and the artwork edge. Four-color black: prints marks in C+M+Y+K for visibility on color proofs. Knockout: adds a white halo around marks so they show on dark backgrounds.
Bleeds
Extends artwork beyond the trim edge to prevent white strips after cutting.
Three modes: 'No bleeds' trims exactly at the page boundary. 'Pull from document' uses bleed info already embedded in the PDF (TrimBox/BleedBox metadata). 'Fixed' lets you manually set bleed on each side, typically 3mm (0.125in / 9pt) for commercial print, 1-2mm for digital. Bleed values define how far past the trim edge the artwork extends.
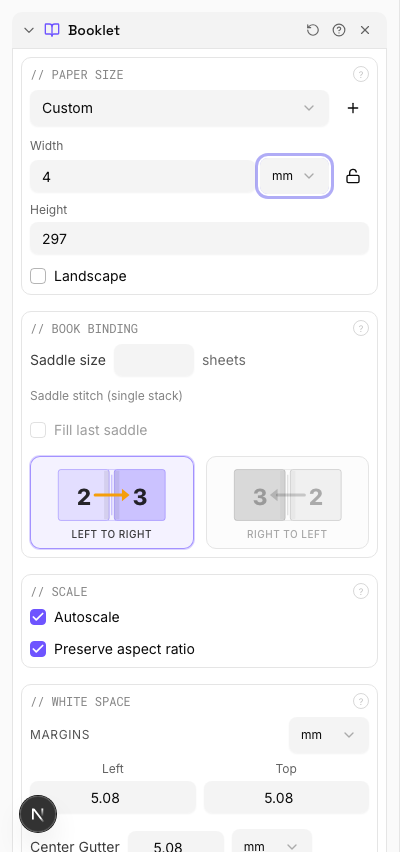
Book Binding
Choose saddle-stitch (folded and stapled) or perfect binding (multiple signatures glued at spine).
Saddle-stitch: leave 'Saddle size' empty: all sheets nest inside each other and are stapled through the fold. Best for 8–64 page booklets. Perfect binding: set a number (e.g., 4 or 8) to group pages into signatures of that many sheets each. Signatures are stacked and glue-bound at the spine. 'Fill last saddle' pads the final signature with blanks if needed. Page count must be a multiple of 4 for saddle-stitch.
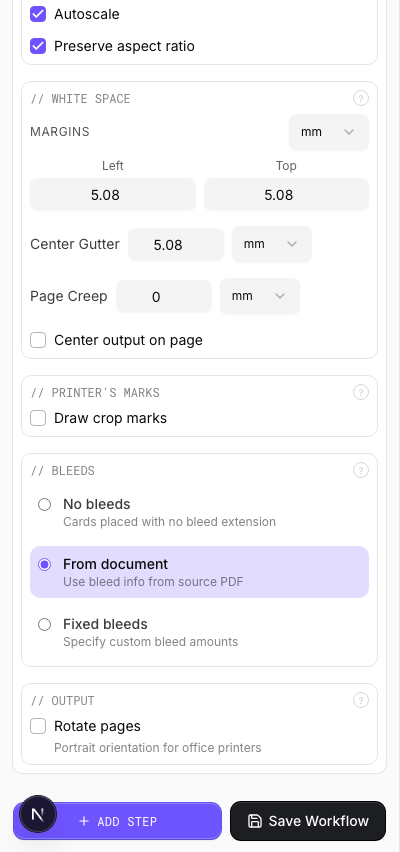
White Space
Margins around the sheet edge, center gutter at the fold, and page creep compensation.
Center gutter: extra space at the spine fold for binding clearance: typically 0.125–0.25in (9–18pt) depending on binding method. Page creep: compensates for paper thickness pushing inner pages outward in thick booklets. The engine auto-calculates creep per sheet based on the number of nested sheets. Inward creep shifts content toward the spine; outward shifts it away.
Output
Controls the final page orientation and rotation.
Rotate pages: produces portrait-orientation output sheets, useful for office printers that can't handle landscape feeding. The booklet content is rotated 90° so you can print on standard portrait paper and fold.
Configurations & Variations
Perfect Binding Mode
In the Book Binding section, type a number into the Saddle size field (4 or 8 sheets per signature are the most common choices). This switches the imposition from saddle-stitch to perfect binding. Pages are grouped into signatures of N sheets each, stacked and glue-bound at the spine. Anything over 48 pages should use perfect binding because saddle-stitch creep becomes unmanageable at that thickness.
Settings to change
Full app view

Output result
Rotated Output
Tick the Rotate pages checkbox in the Output section. The booklet spreads are rotated 90° so the output sheets come out in portrait orientation. Handy for desktop printers that cannot feed landscape sheets, or when your finisher's stitcher expects portrait input. Enable the checkerboard background in the toolbar to confirm transparency areas after rotation.
Settings to change
Full app view
Output result
Creep Compensation
Set the Page Creep direction to Inward in the White Space section. In a thick saddle-stitched booklet, each nested sheet pushes the inner pages outward at the face trim. Without compensation, the outer margin on inner sheets gets progressively wider. The engine auto-calculates the shift per sheet, but you should verify on stock heavier than 120 gsm by folding a paper dummy first.
Settings to change
Full app view

Output result
Expert Tip
Page count must be a multiple of 4 for saddle-stitch. Anything over 48 pages should go to perfect binding; creep becomes unmanageable beyond that thickness.
On stock heavier than 120 gsm, turn on creep compensation or the outer margins on inner sheets will get progressively wider after trimming.
Learn More
Used in Recipes
Saddle-Stitch Booklet
Standard saddle-stitched booklet. The most common short-run binding method.
Saddle-Stitch with Bleeds
Saddle-stitch booklet with synthetic bleed generation for artwork delivered without bleeds.
Zine / Mini Booklet
Small-format DIY zine from a single sheet of paper (8-page or 16-page fold).
Comic Book Signatures
Comic book or graphic novel imposed in saddle-stitch or perfect-bound signatures.
Greeting Cards
Folded greeting cards imposed for duplex printing and fold finishing.
Wall Calendar
12-month wall calendar with saddle-stitch or wire-o binding.
Restaurant Menu
Folded restaurant menu (bi-fold, tri-fold, or booklet).
Newsletter
Folded newsletter (4-8 pages) for mailing or distribution.
Shuffle
2 recipesReorders pages using a flexible expression language: reverse, interleave, rotate, or rearrange freely.
Accepts page range expressions with support for odd/even filters, last-page references, rotation suffixes (> ^ <), repetition multipliers, grouped patterns, and blank page insertion (X). Powerful for creating custom collation sequences.
How It Works
Accepts page range expressions with support for odd/even filters, last-page references, rotation suffixes (> ^ <), repetition multipliers, grouped patterns, and blank page insertion (X). Powerful for creating custom collation sequences.
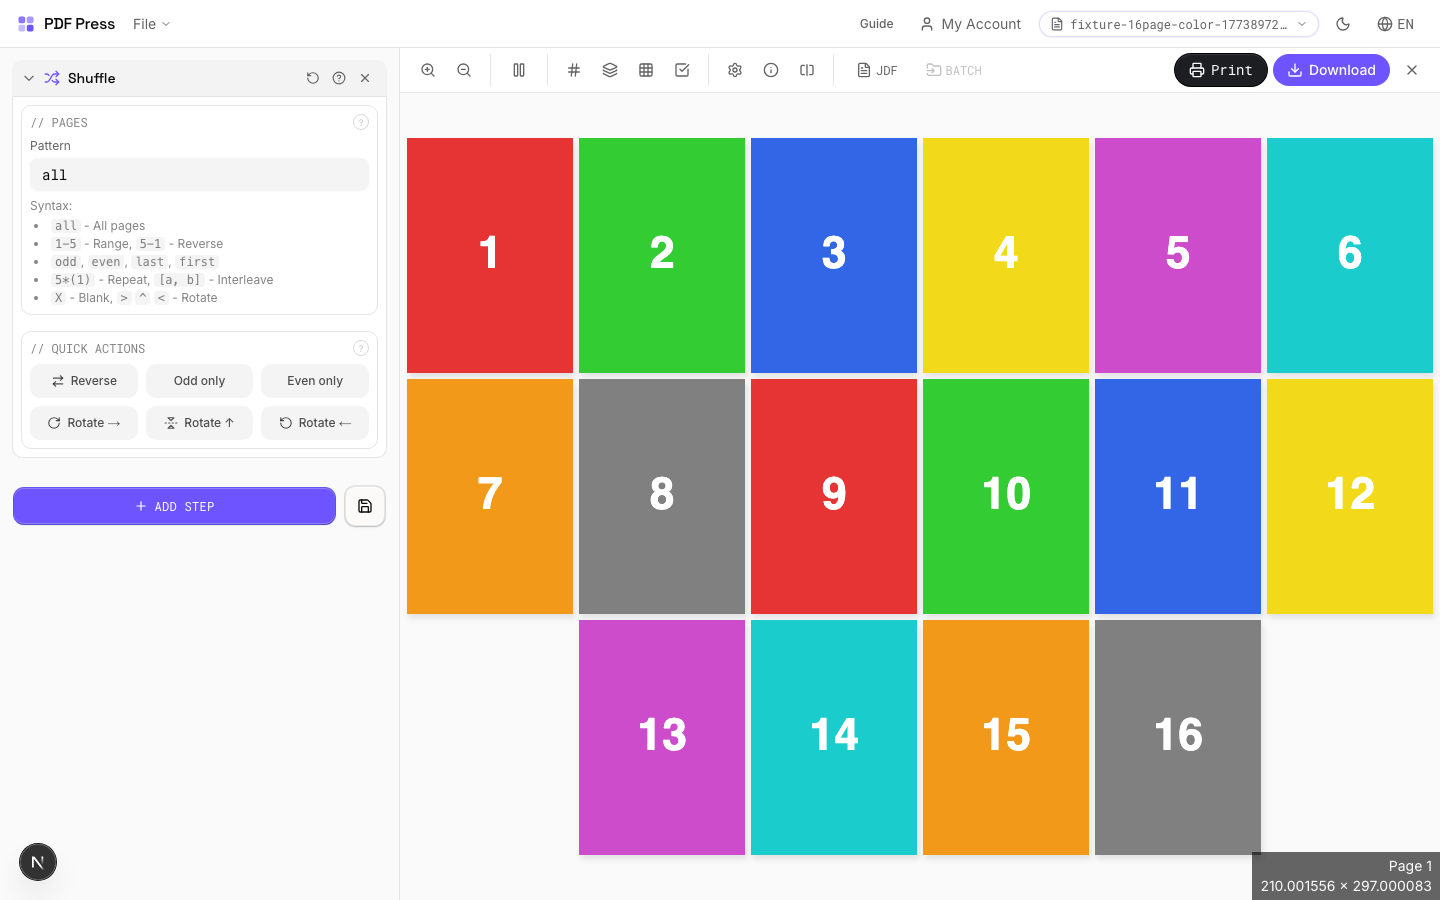
Shuffle tool applied. Options panel on the left, imposed result on the right. Click to zoom.
Options Guide
Pages
Enter a page expression to define the new order. Examples: 'all', '1-5', 'odd', 'last-1'.
Advanced syntax: '5*(1)' repeats page 1 five times. '[odd, even]' interleaves odd and even pages. 'last-1' reverses all pages. Append > for 90° rotation, ^ for 180°, < for 270°. 'group 3: 3 2 1' reverses within groups of 3. 'X' inserts a blank page.
Quick Actions
One-click presets for common page reordering tasks.
Reverse All: flips document back-to-front. Odd/Even Split: separates for simplex scanning. Interleave: merges two halves of a split duplex scan. Each preset fills the page expression: customize further after applying.
Expert Tip
Shuffle reorders pages for cut-and-stack numbering (NCR forms, raffle tickets, etc.). Set the stack height to match your guillotine cut count so the sequential numbers end up in order after cutting and stacking.
Page count must be evenly divisible by the stack height. If it is not, the last stack will be short and the numbering sequence breaks.
Learn More
Used in Recipes
Numbered Tickets
Sequential numbered tickets with cut-and-stack imposition.
Cut-and-Stack Numbering
Sequential numbering with cut-and-stack page ordering for tickets, NCR forms, or raffle books.
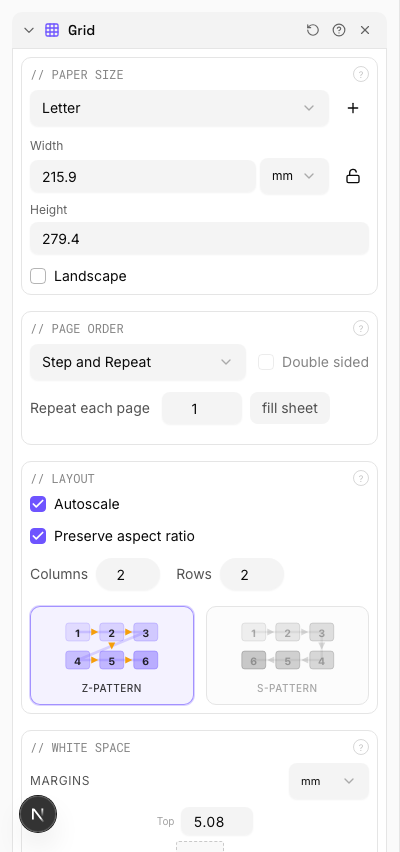
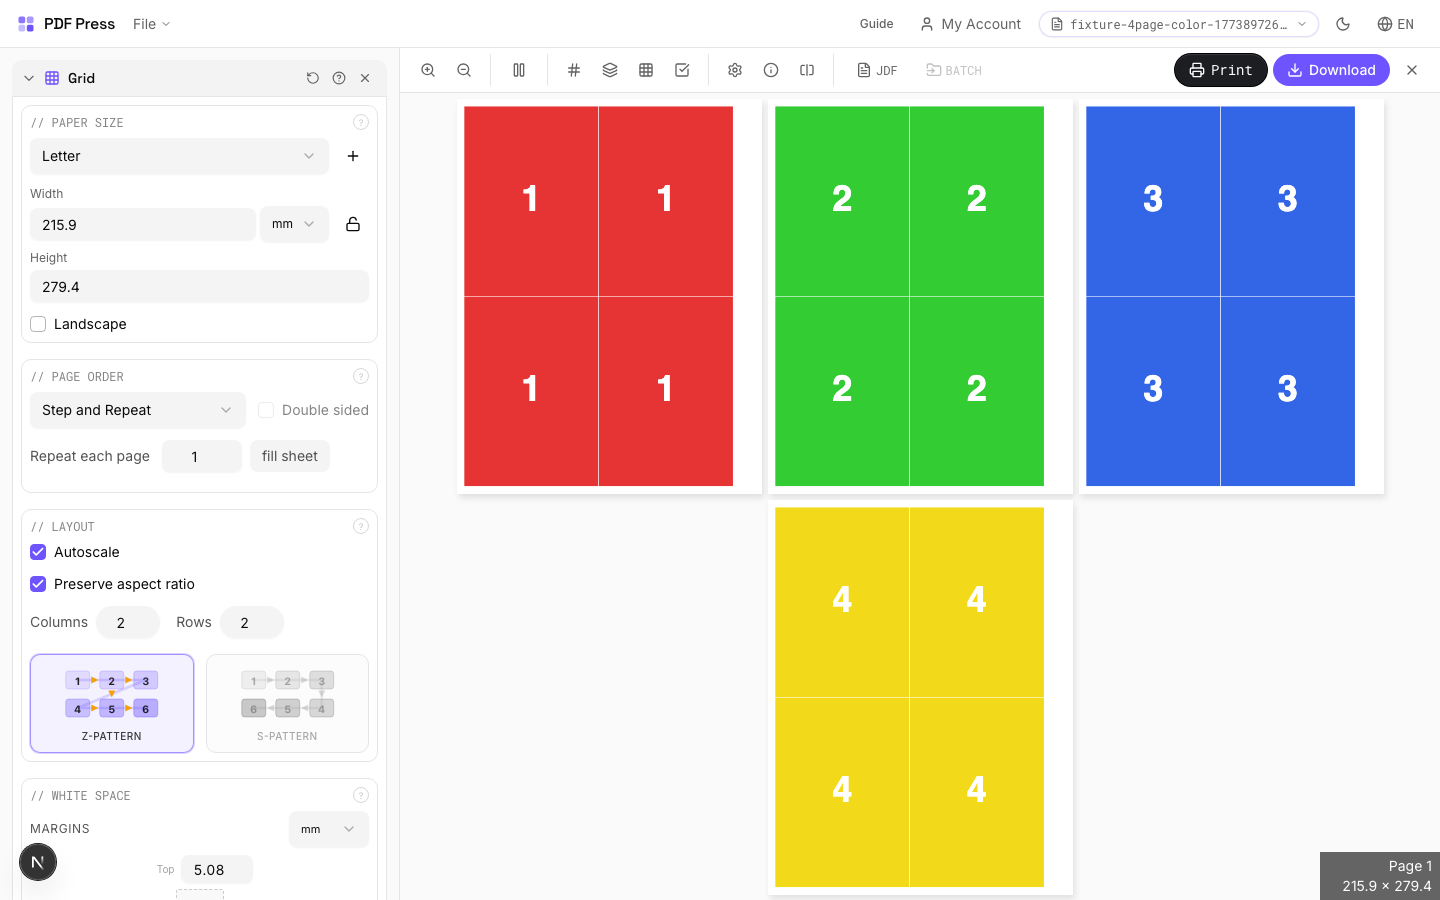
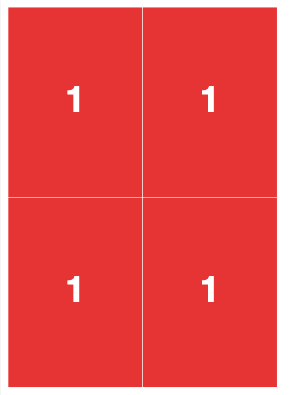
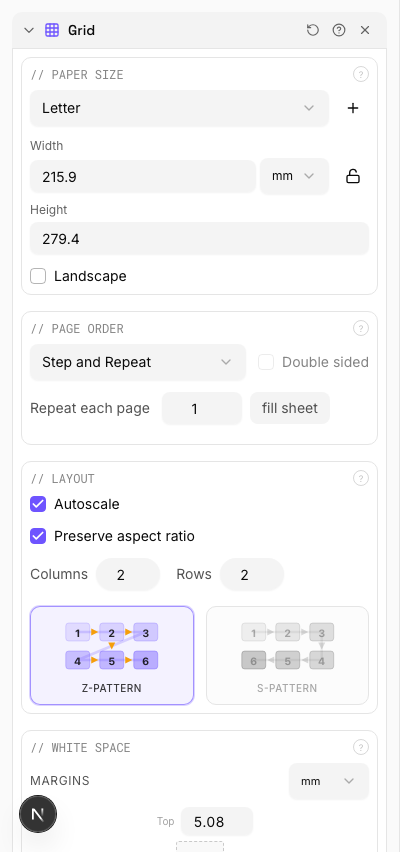
Grid
16 recipesPlaces different source pages into a grid layout: each cell holds a different page.
Unlike Cards (which repeats the same page), Grid assigns consecutive source pages to grid cells in reading order. A 2×2 grid on Letter paper fits 4 different pages per sheet. Useful for N-up printing, proofing, contact sheets, and arranging multiple items on shared press sheets.
How It Works
Unlike Cards (which repeats the same page), Grid assigns consecutive source pages to grid cells in reading order. A 2×2 grid on Letter paper fits 4 different pages per sheet. Useful for N-up printing, proofing, contact sheets, and arranging multiple items on shared press sheets.

Grid tool applied. Options panel on the left, imposed result on the right. Click to zoom.
Options Guide
Paper Size
Sets the output sheet dimensions. This is the physical paper going through your printer or press.
Standard presets: Letter (8.5×11in), Legal (8.5×14in), Tabloid (11×17in), A4 (210×297mm), A3 (297×420mm). Landscape swaps width↔height. Lock icon links dimensions to preserve aspect ratio. Custom lets you enter any size in inches, mm, or points (1in = 72pt = 25.4mm).
White Space
Controls margins around the sheet edges and gutters between items in the grid.
Left margin = space from the left sheet edge to the first column. Top margin = space from the top edge to the first row. Horizontal gutter = gap between columns. Vertical gutter = gap between rows. All values are in your selected unit (inches/mm/points). 'Center output on page' distributes leftover space evenly instead of anchoring content to the top-left corner.
Printer's Marks
Adds trim guides and alignment marks outside the live area for accurate cutting and registration.
Crop marks: short lines at each corner showing where to trim. Center marks: crosshairs at sheet midpoints for front/back alignment on duplex jobs. Line length (default 0.43in/31pt): how long each mark line extends. Line thickness (default 0.014in/1pt): mark stroke weight. Line distance (default 0.139in/10pt): gap between the mark and the artwork edge. Four-color black: prints marks in C+M+Y+K for visibility on color proofs. Knockout: adds a white halo around marks so they show on dark backgrounds.
Bleeds
Extends artwork beyond the trim edge to prevent white strips after cutting.
Three modes: 'No bleeds' trims exactly at the page boundary. 'Pull from document' uses bleed info already embedded in the PDF (TrimBox/BleedBox metadata). 'Fixed' lets you manually set bleed on each side, typically 3mm (0.125in / 9pt) for commercial print, 1-2mm for digital. Bleed values define how far past the trim edge the artwork extends.
Page Order
Controls the reading direction and page assignment order in the grid.
Left-to-right: fills cells in Western reading order (top-left first). Right-to-left: starts from the top-right corner: for RTL languages (Arabic, Hebrew) or specific finishing workflows. Direction affects both single-sided and double-sided layouts.
Layout
Set columns, rows, page filling pattern, and scaling behavior.
Sequential: pages fill cells left→right, top→bottom, then next sheet. Stack (cut-and-stack): reorders pages so that after printing, cutting into strips, and stacking, pages are in reading order — saves manual collation. Step-and-repeat: fills the entire sheet with copies of each page before moving to the next (like Cards but within Grid's framework). Double-sided pairs sheets for front/back printing.
Configurations & Variations
3×3 Grid Layout
Set columns to 3 and rows to 3 for a 9-up layout. Each cell holds a different source page in sequence. On A3 or Tabloid paper this fits 9 A6-sized pages per sheet, making it a quick way to produce proofing contact sheets.
Settings to change
Full app view
Output result
Step and Repeat
Switch to the Step and repeat fill pattern. The entire sheet fills with copies of page 1 before advancing to page 2, and so on. Unlike sequential mode (which places a different page in each cell), step-and-repeat produces multiple identical copies per sheet, similar to Cards but with Grid's margin and gutter controls.
Settings to change

Full app view

Output result
Expert Tip
For step-and-repeat work (labels, tags), set columns and rows to maximise sheet utilisation. Turn on auto-scale so the engine fits the most repeats without manual arithmetic.
Double-sided is not available in step-and-repeat mode. If you need back-printing, switch to N-up Book or Expert Grid.
Learn More
Used in Recipes
Playing Cards
Full deck of playing cards imposed for sheet-fed printing.
Door Hangers
Multi-up door hangers with die-cut hook hole.
Numbered Tickets
Sequential numbered tickets with cut-and-stack imposition.
Variable Data Tickets
Tickets with variable data (barcodes, names, seat numbers) imposed efficiently.
Product Labels
Multi-up product labels for bottles, jars, and boxes.
Shipping Labels
Shipping labels (4x6 inch) on self-adhesive A4/Letter sheets.
Address Labels
Avery-style address labels on standard label sheets.
QR Code Labels
Unique QR code labels for product tracking or authentication.
Coasters
Printed coasters (round or square) imposed for die cutting.
Label Wrap
Wraparound labels for bottles, cans, or tubes with distortion compensation.
Bag Layout
Paper or poly bag printed flat and imposed for production.
Sleeve / Band
Shrink sleeves or belly bands for product packaging.
Envelope Layout
Printed envelopes imposed for flatbed or rotary die cutting.
Signage Repeat
Repeated signage (e.g., shelf talkers, aisle signs) ganged on large-format sheets.
Envelope Production
Printed envelopes imposed and prepared for envelope-making machinery.
Cut-and-Stack Numbering
Sequential numbering with cut-and-stack page ordering for tickets, NCR forms, or raffle books.
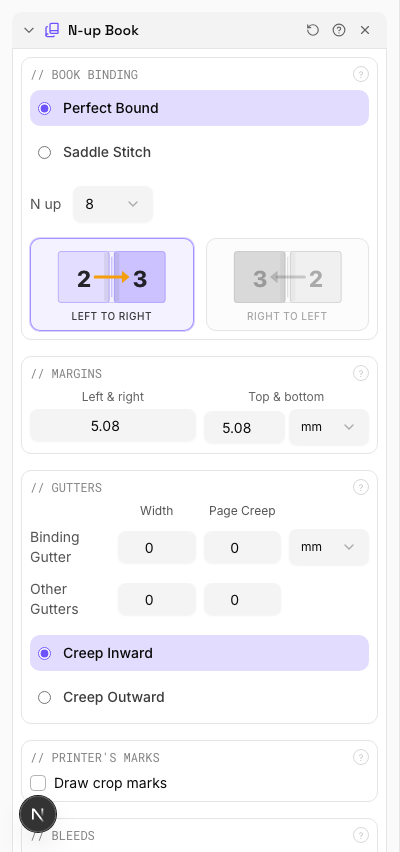
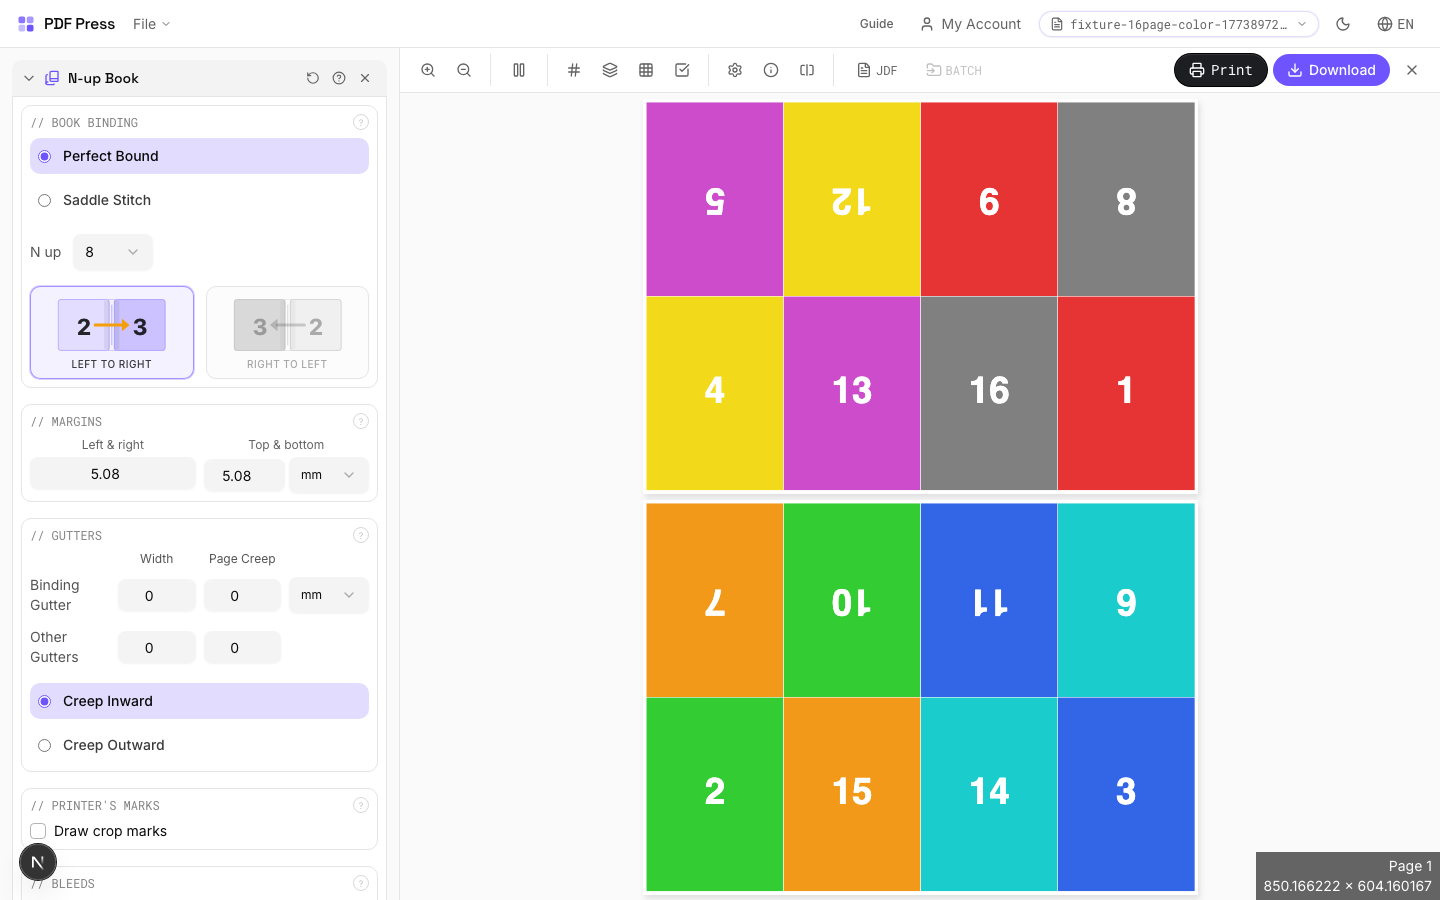
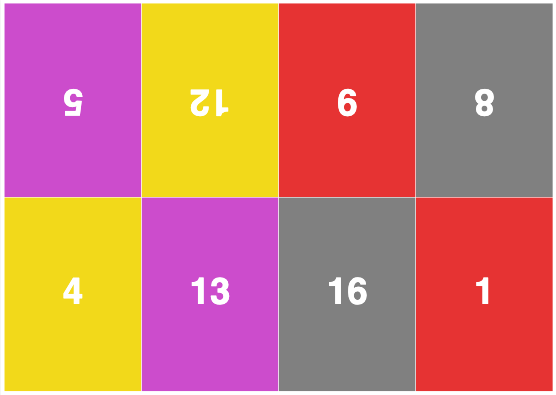
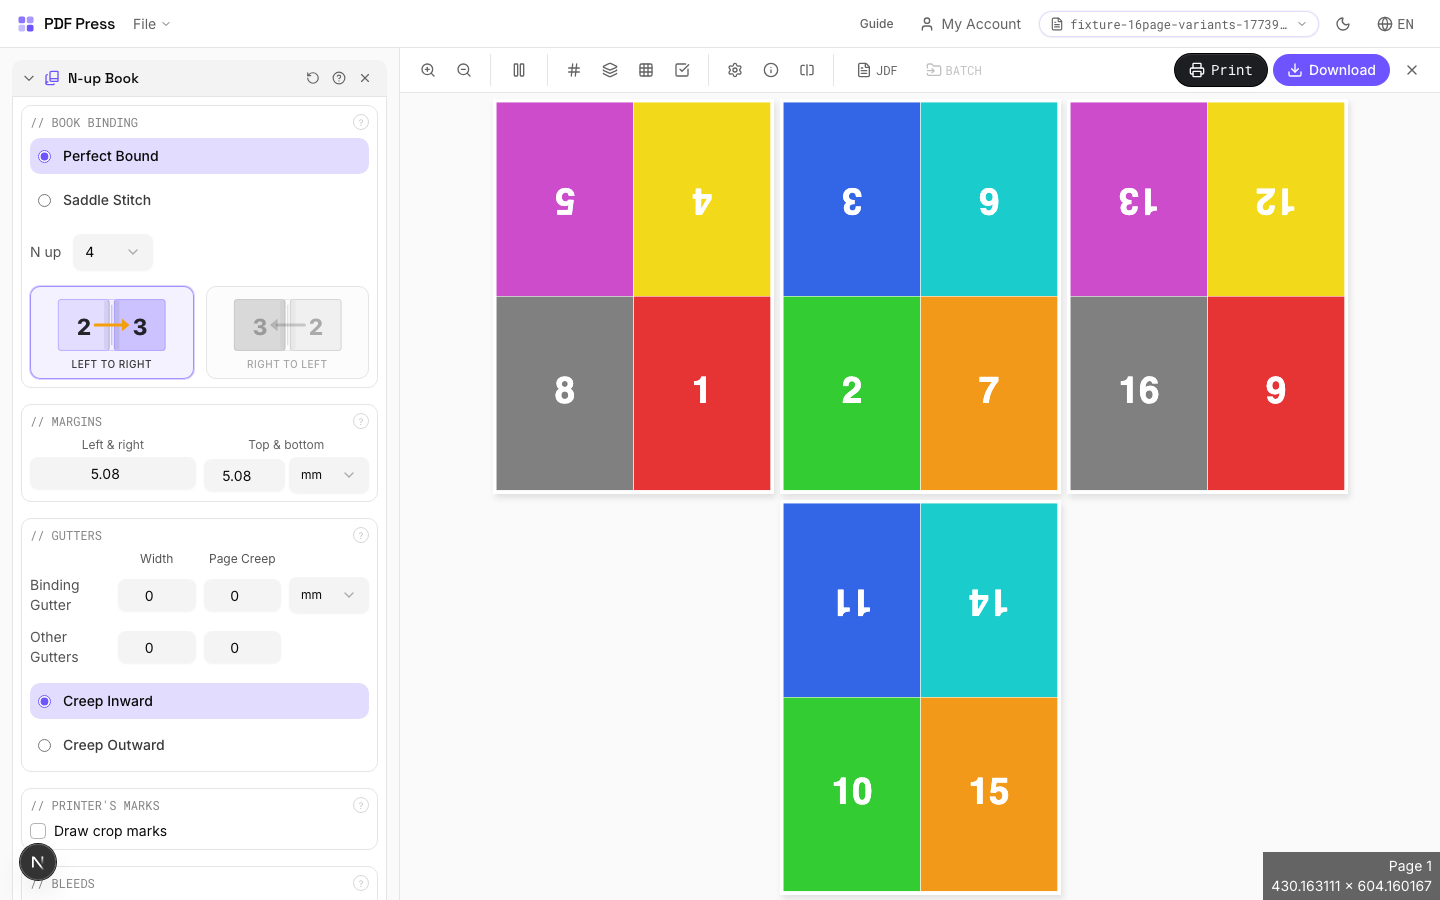
N-up Book
9 recipesCombines multi-page-per-sheet layout with book signature imposition.
Places multiple pages on each side of a large press sheet so that after folding and trimming, pages read sequentially. N-up count: 2 = folio (1 fold), 4 = quarto (2 folds), 8 = octavo (3 folds), 16 = sexto-decimo (4 folds), 32 = trigesimo-secundo. Larger N-up values require proportionally larger press sheets.
How It Works
Places multiple pages on each side of a large press sheet so that after folding and trimming, pages read sequentially. N-up count: 2 = folio (1 fold), 4 = quarto (2 folds), 8 = octavo (3 folds), 16 = sexto-decimo (4 folds), 32 = trigesimo-secundo. Larger N-up values require proportionally larger press sheets.

N-up Book tool applied. Options panel on the left, imposed result on the right. Click to zoom.
Options Guide
Paper Size
Sets the output sheet dimensions. This is the physical paper going through your printer or press.
Standard presets: Letter (8.5×11in), Legal (8.5×14in), Tabloid (11×17in), A4 (210×297mm), A3 (297×420mm). Landscape swaps width↔height. Lock icon links dimensions to preserve aspect ratio. Custom lets you enter any size in inches, mm, or points (1in = 72pt = 25.4mm).
Printer's Marks
Adds trim guides and alignment marks outside the live area for accurate cutting and registration.
Crop marks: short lines at each corner showing where to trim. Center marks: crosshairs at sheet midpoints for front/back alignment on duplex jobs. Line length (default 0.43in/31pt): how long each mark line extends. Line thickness (default 0.014in/1pt): mark stroke weight. Line distance (default 0.139in/10pt): gap between the mark and the artwork edge. Four-color black: prints marks in C+M+Y+K for visibility on color proofs. Knockout: adds a white halo around marks so they show on dark backgrounds.
Bleeds
Extends artwork beyond the trim edge to prevent white strips after cutting.
Three modes: 'No bleeds' trims exactly at the page boundary. 'Pull from document' uses bleed info already embedded in the PDF (TrimBox/BleedBox metadata). 'Fixed' lets you manually set bleed on each side, typically 3mm (0.125in / 9pt) for commercial print, 1-2mm for digital. Bleed values define how far past the trim edge the artwork extends.
Book Binding
Choose nested (saddle-stitch) or perfect binding for how signatures are assembled.
Nested: all sheets fold together into one section, then stapled through the spine — ideal for thin booklets (8–64 pages). Perfect: creates separate signatures that stack and glue at the spine. Creep direction (inward/outward) compensates for paper thickness pushing inner pages outward after folding. Reading direction: left-to-right (Western) or right-to-left (RTL languages like Arabic, Hebrew, Japanese manga).
Margins
Non-printable border around each output sheet edge.
Ensures content stays within the printable area of your press or printer. Typical commercial offset: 0.25–0.5in (18–36pt). Digital printers: 0.125–0.25in (9–18pt). Binding margin adds extra space at the spine edge for adhesive or thread.
Gutters
Spacing between adjacent pages on the same side of the sheet.
Binding gutter: space at the spine fold between facing pages — prevents content from being lost in the fold. Default 2.835pt (1mm). Other gutter: space between pages perpendicular to the spine. Increase gutters for thicker paper stock or tight binding methods.
Configurations & Variations
8-Up Signatures (Octavo)
Select N-up = 8 for octavo imposition (3 folds per sheet). Places 8 pages per side of a large press sheet. After folding and trimming, pages read sequentially. This is the standard commercial offset configuration and requires at least an SRA2 or B2 press sheet for A5 final trim.
Settings to change
Full app view
Output result
4-Up Layout (Quarto)
Select N-up = 4 for quarto imposition (2 folds). Works well on SRA3 digital press sheets producing A5 finished books. Simpler folding than 8-up, with fewer pages per sheet but easier finishing on smaller equipment.

Settings to change
Full app view
Output result
Expert Tip
Pick the N-up value (2, 4, 8, 16, 32) based on your press sheet size relative to the finished trim. For A5 final on SRA3 press sheets, 4-up is the optimal choice. Always enable creep compensation when binding is nested (saddle-stitch).
If the N-up value does not match the press sheet, you will get blank cells or clipped pages. Check the output sheet dimensions before making plates.
Learn More
Used in Recipes
Perfect-Bound Book
PUR/hot-melt perfect binding for books with 48+ pages.
Perfect-Bound with Color Bar
Perfect-bound book signatures with inline color bars for press density control.
Case-Bound (Hardcover) Book
Smyth-sewn case-bound book with proper signature imposition and spine marks.
Children's Book
Full-color children's picture book with heavy stock and case binding.
Photo Book
Lay-flat photo book with flush-mount or perfect binding.
Magazine Production
Full commercial magazine with saddle-stitch or perfect binding and press marks.
Catalog Signatures
Multi-signature catalog for perfect binding on commercial presses.
Annual Report
Corporate annual report with mixed content (text, charts, photos) and premium finishing.
Planner / Diary
Wire-o or perfect-bound planner with weekly/daily layouts.
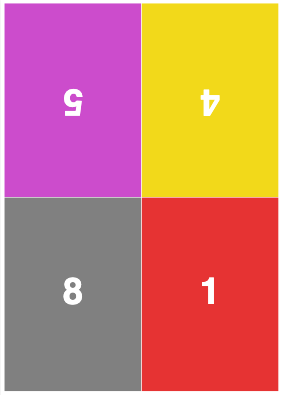
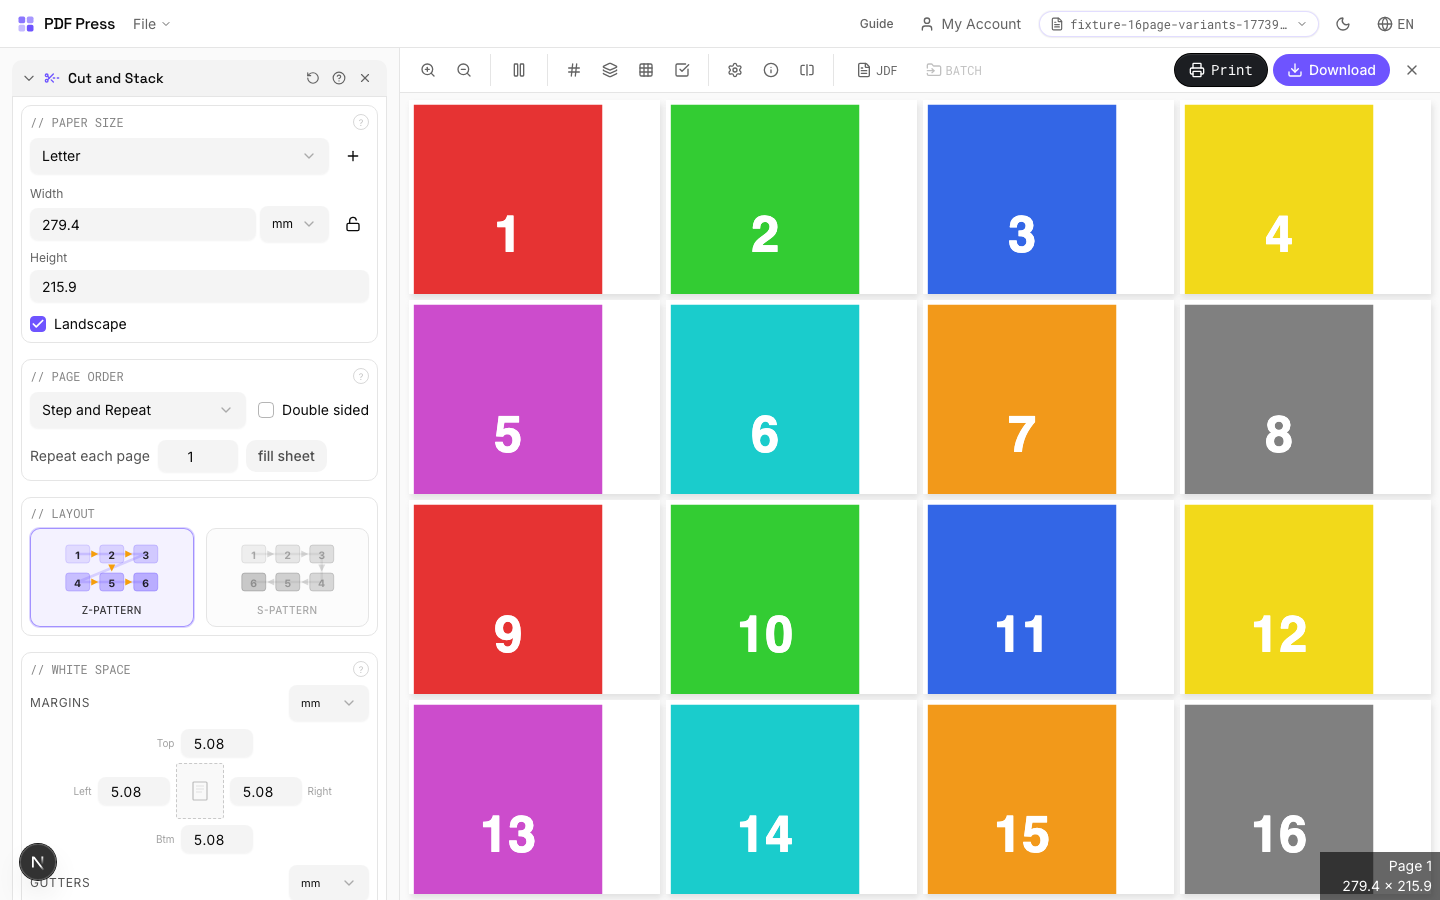
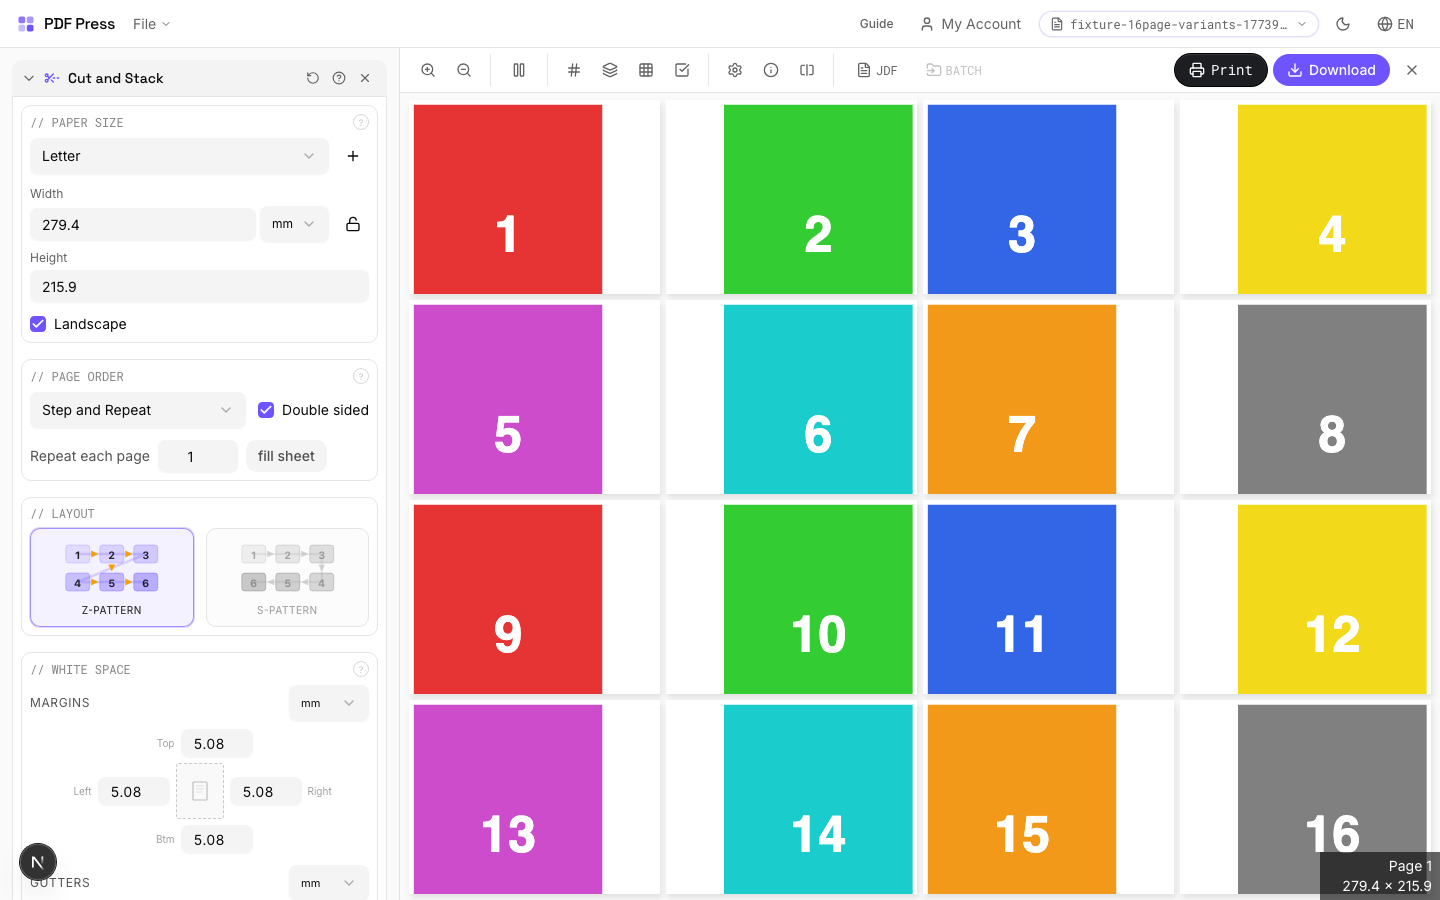
Cut and Stack
Cut-and-stack imposition: pages are arranged so that after cutting, stacks are in reading order.
Also known as 'cut and stack' or 'slit and stack' layout. Pages are positioned so that after printing, cutting the sheet into strips, and stacking the strips, you get sequential page order. Saves time vs. manual collation for high-volume jobs.
How It Works
Also known as 'cut and stack' or 'slit and stack' layout. Pages are positioned so that after printing, cutting the sheet into strips, and stacking the strips, you get sequential page order. Saves time vs. manual collation for high-volume jobs.
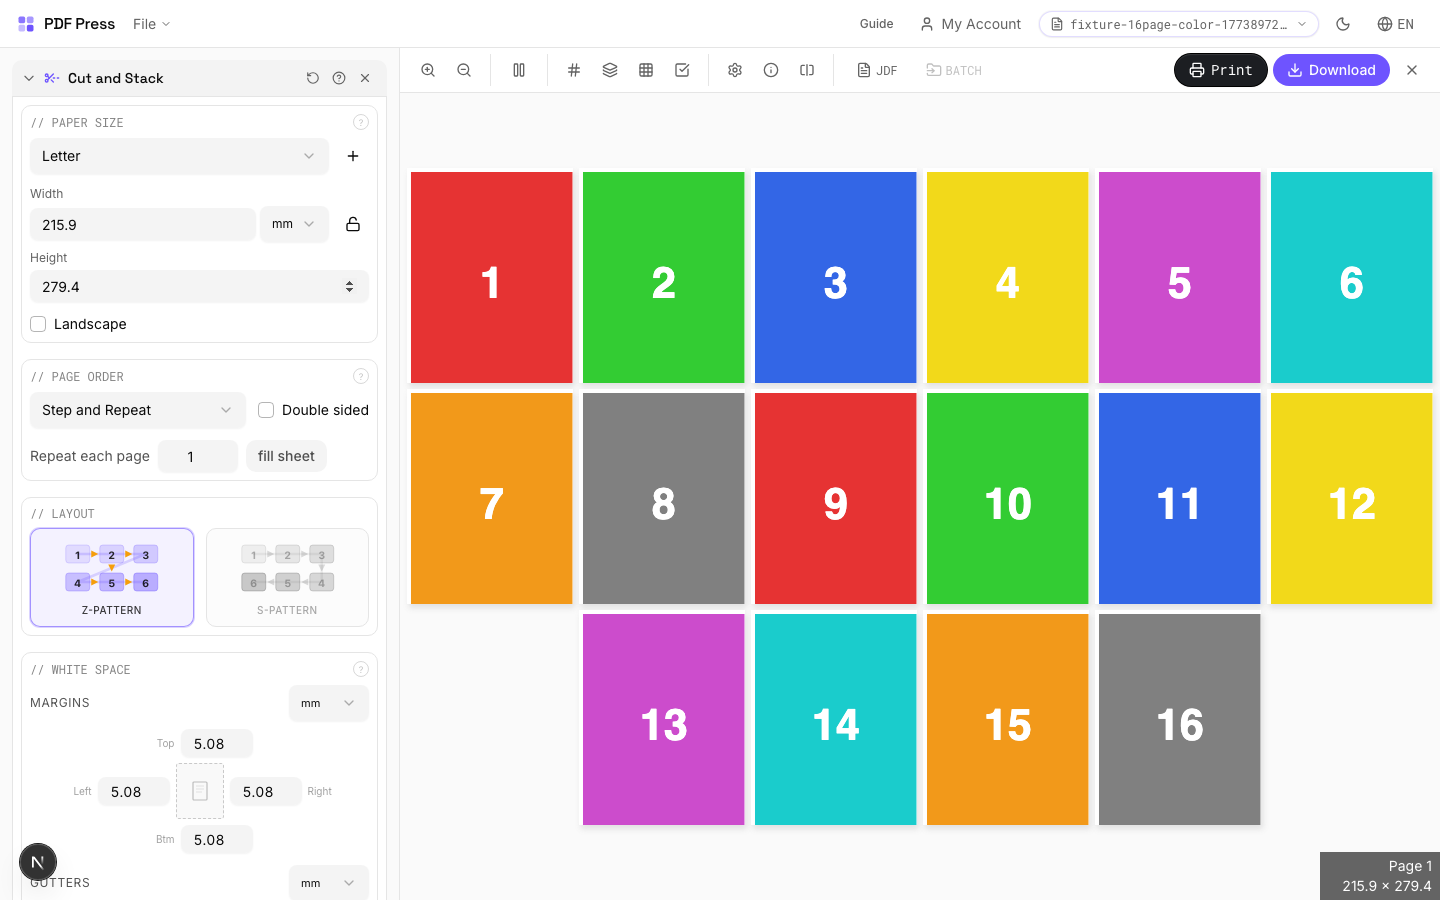
Cut and Stack tool applied. Options panel on the left, imposed result on the right. Click to zoom.
Options Guide
Paper Size
Sets the output sheet dimensions. This is the physical paper going through your printer or press.
Standard presets: Letter (8.5×11in), Legal (8.5×14in), Tabloid (11×17in), A4 (210×297mm), A3 (297×420mm). Landscape swaps width↔height. Lock icon links dimensions to preserve aspect ratio. Custom lets you enter any size in inches, mm, or points (1in = 72pt = 25.4mm).
White Space
Controls margins around the sheet edges and gutters between items in the grid.
Left margin = space from the left sheet edge to the first column. Top margin = space from the top edge to the first row. Horizontal gutter = gap between columns. Vertical gutter = gap between rows. All values are in your selected unit (inches/mm/points). 'Center output on page' distributes leftover space evenly instead of anchoring content to the top-left corner.
Printer's Marks
Adds trim guides and alignment marks outside the live area for accurate cutting and registration.
Crop marks: short lines at each corner showing where to trim. Center marks: crosshairs at sheet midpoints for front/back alignment on duplex jobs. Line length (default 0.43in/31pt): how long each mark line extends. Line thickness (default 0.014in/1pt): mark stroke weight. Line distance (default 0.139in/10pt): gap between the mark and the artwork edge. Four-color black: prints marks in C+M+Y+K for visibility on color proofs. Knockout: adds a white halo around marks so they show on dark backgrounds.
Bleeds
Extends artwork beyond the trim edge to prevent white strips after cutting.
Three modes: 'No bleeds' trims exactly at the page boundary. 'Pull from document' uses bleed info already embedded in the PDF (TrimBox/BleedBox metadata). 'Fixed' lets you manually set bleed on each side, typically 3mm (0.125in / 9pt) for commercial print, 1-2mm for digital. Bleed values define how far past the trim edge the artwork extends.
Page Order
Controls the reading direction for cut-and-stack assembly.
Left-to-right arranges strips so that when stacked from left to right, pages are in sequential order. Right-to-left reverses the strip direction for workflows that stack in the opposite direction.
Configurations & Variations
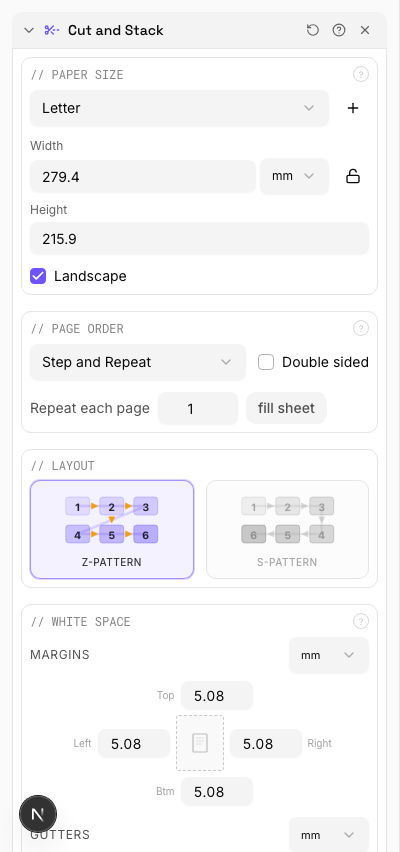
Landscape Paper
Tick Landscape to orient the output sheet horizontally. For cut-and-stack work, this determines whether strips are cut vertically or horizontally. Match the direction to your guillotine's preferred cutting orientation for the fastest workflow.
Settings to change
Full app view

Output result
Double Sided
Tick Double-sided for front/back printing. The back side is arranged automatically so that after cutting and stacking, fronts align with backs. Standard for two-sided flyers, coupons, or numbered forms.

Settings to change
Full app view

Output result
Expert Tip
Cut-and-stack layout works well for irregular gang-ups where different products share a press sheet. Place the highest-quantity item first so the packing algorithm has the most room to work with.
The algorithm does not guarantee minimal waste on its own. Always check the layout preview before sending to plate.
Transform Tools(8)
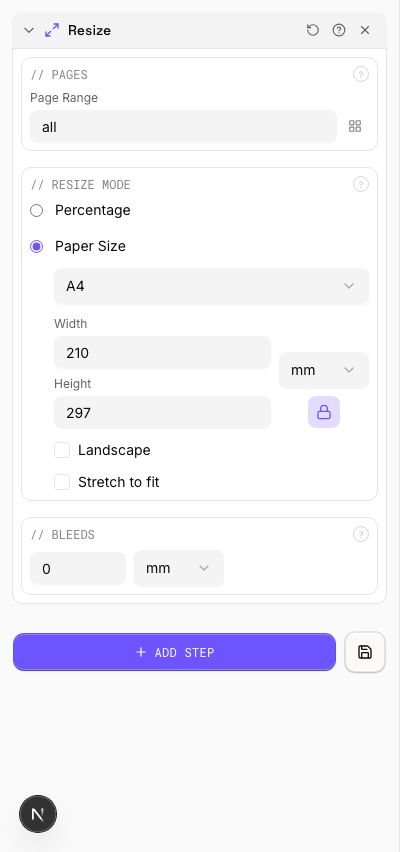
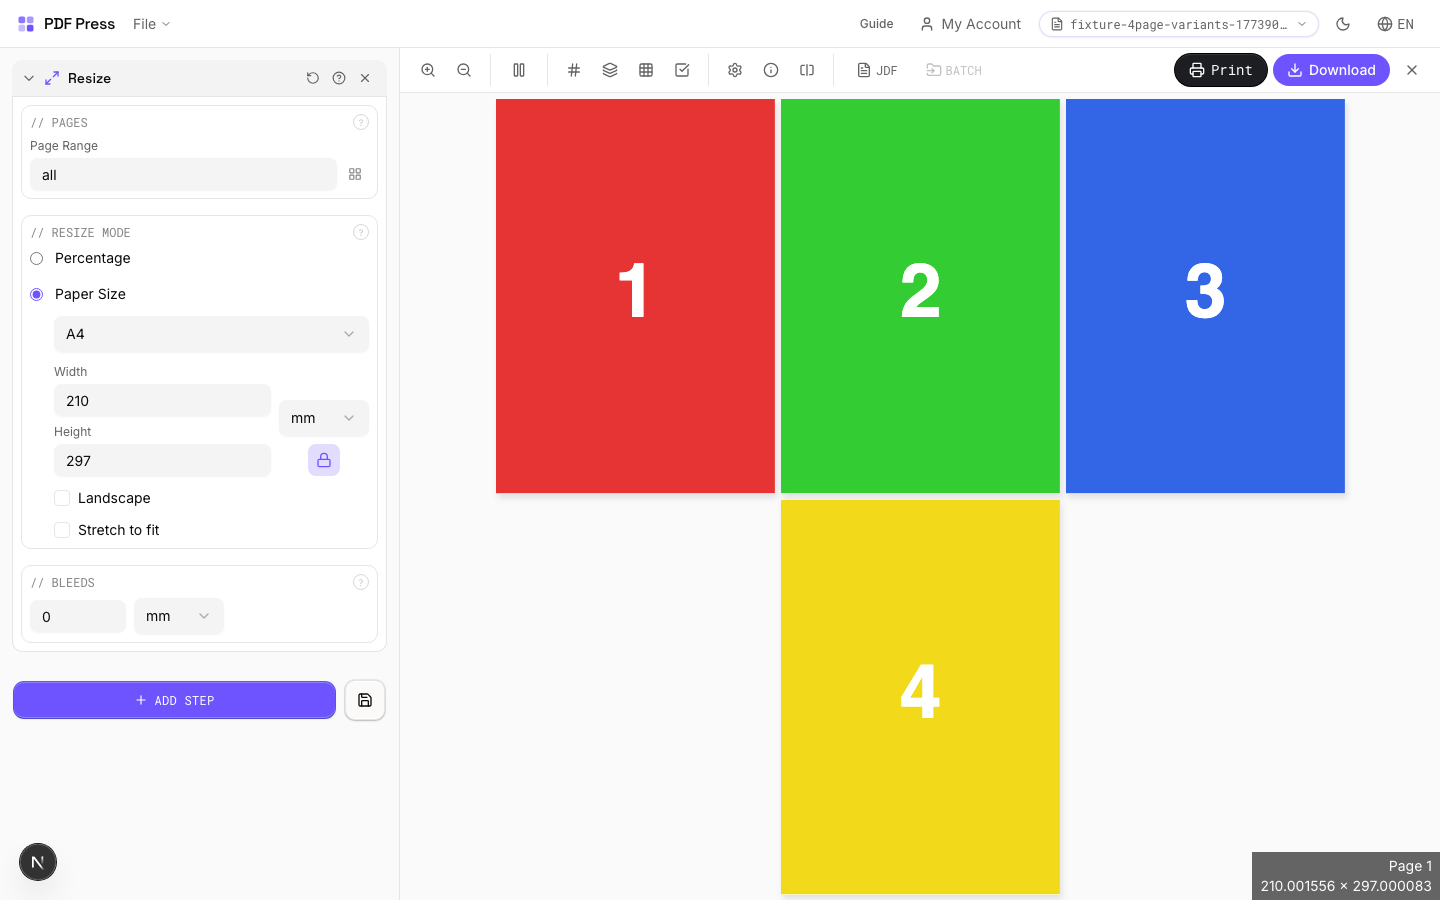
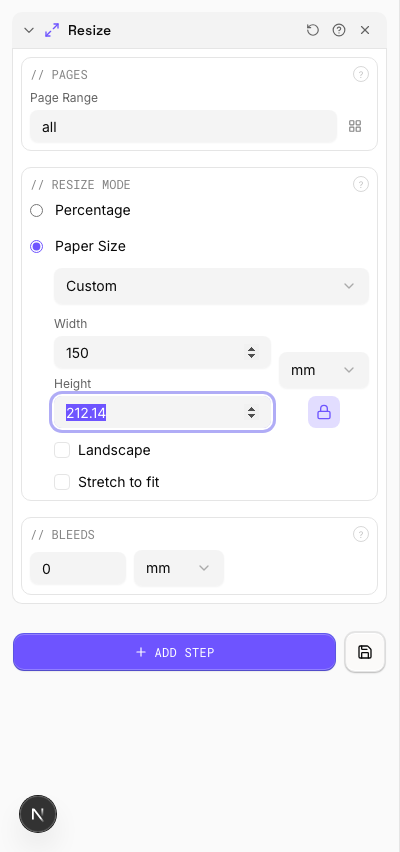
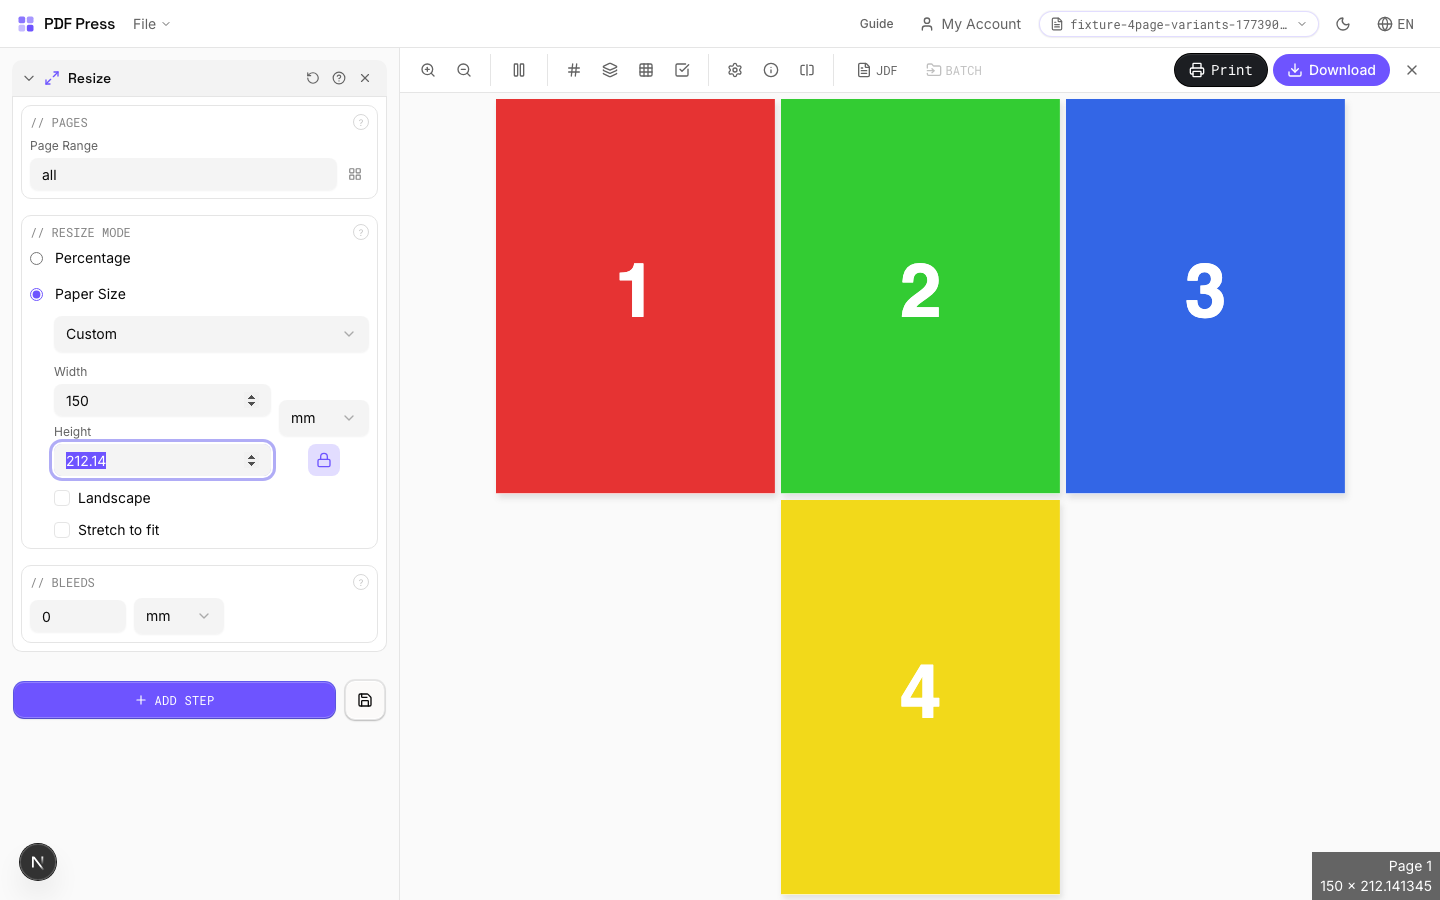
Resize
8 recipesScales pages to different dimensions: by percentage or to a target paper size.
Two modes: Percentage scaling (50% = half size, 100% = no change, 200% = double). Paper size mode fits pages onto a target sheet (Letter, A4, etc.). With 'Preserve aspect ratio' enabled (recommended), pages scale uniformly and center on the sheet without distortion.
How It Works
Two modes: Percentage scaling (50% = half size, 100% = no change, 200% = double). Paper size mode fits pages onto a target sheet (Letter, A4, etc.). With 'Preserve aspect ratio' enabled (recommended), pages scale uniformly and center on the sheet without distortion.

Resize tool applied. Options panel on the left, imposed result on the right. Click to zoom.
Options Guide
Pages
Specify which pages to process using a range expression.
Examples: 'all' = every page. '1-5' = pages 1 through 5. '1,3,5' = specific pages. '1-10 odd' = odd pages 1-9. '2-20 even' = even pages 2-20. 'last' = last page. 'last-2' = third from last. Ranges are 1-based. Combine with commas: '1-5, 8, 12-15'.
Resize Mode
Choose percentage scaling or fitting to a target paper size.
Percentage: applies a uniform scale factor to all pages. Common values: 50% (half), 71% (A4→A5), 141% (A5→A4), 200% (double). Paper size: select a target sheet and pages are scaled to fit. Larger pages are shrunk, smaller ones are enlarged. Aspect ratio preservation prevents distortion.
Bleeds
Extends artwork beyond the trim edge to prevent white strips after cutting.
Three modes: 'No bleeds' trims exactly at the page boundary. 'Pull from document' uses bleed info already embedded in the PDF (TrimBox/BleedBox metadata). 'Fixed' lets you manually set bleed on each side, typically 3mm (0.125in / 9pt) for commercial print, 1-2mm for digital. Bleed values define how far past the trim edge the artwork extends.
Configurations & Variations
Resize to A4 Paper
Pick A4 from the paper size dropdown to fit content onto 210 x 297 mm sheets. Pages scale proportionally by default and center on the A4 area. A common use case is converting US Letter designs for European print runs.
Settings to change
Full app view

Output result
150% Scale
Enter 150 in the percentage field to enlarge pages by 50%. A4 pages come out at roughly A3 size. Handy for producing enlarged proofs where small text and fine details need close inspection, or for scaling artwork up to large-format dimensions.
Settings to change
Full app view

Output result
Expert Tip
When scaling for a different press sheet, keep Preserve aspect ratio on to avoid stretching. Use absolute dimensions (points or mm) instead of percentages for repeatable results across jobs.
Scaling raster-heavy PDFs up beyond 150% will produce visible pixelation. Request higher-resolution source files instead of scaling up.
Learn More
Used in Recipes
Zine / Mini Booklet
Small-format DIY zine from a single sheet of paper (8-page or 16-page fold).
Banner Printing
Wide-format banners with tiling for roll-fed printers.
Trade Show Panels
Multi-panel trade show displays split for separate printing and assembly.
Floor Graphics
Floor decals and wayfinding graphics with contour cutting.
Vehicle Wrap
Vehicle wrap panels split for contour-cut application.
Multi-File Merge
Merge multiple source files into a single document for unified processing.
Duplex Interleave
Interleave separate front and back files for duplex printing.
Landscape Rotation
Rotate pages from portrait to landscape (or vice versa) for press feed direction.
Rotate
1 recipeRotates pages by any angle — use presets for 90/180/270 or enter a custom degree value.
Rotation is applied around the page center. Positive values rotate clockwise. Common use: fixing landscape scans, rotating for duplex alignment, or preparing artwork for press. Non-90° rotations increase the bounding box to fit rotated content without clipping.
How It Works
Rotation is applied around the page center. Positive values rotate clockwise. Common use: fixing landscape scans, rotating for duplex alignment, or preparing artwork for press. Non-90° rotations increase the bounding box to fit rotated content without clipping.
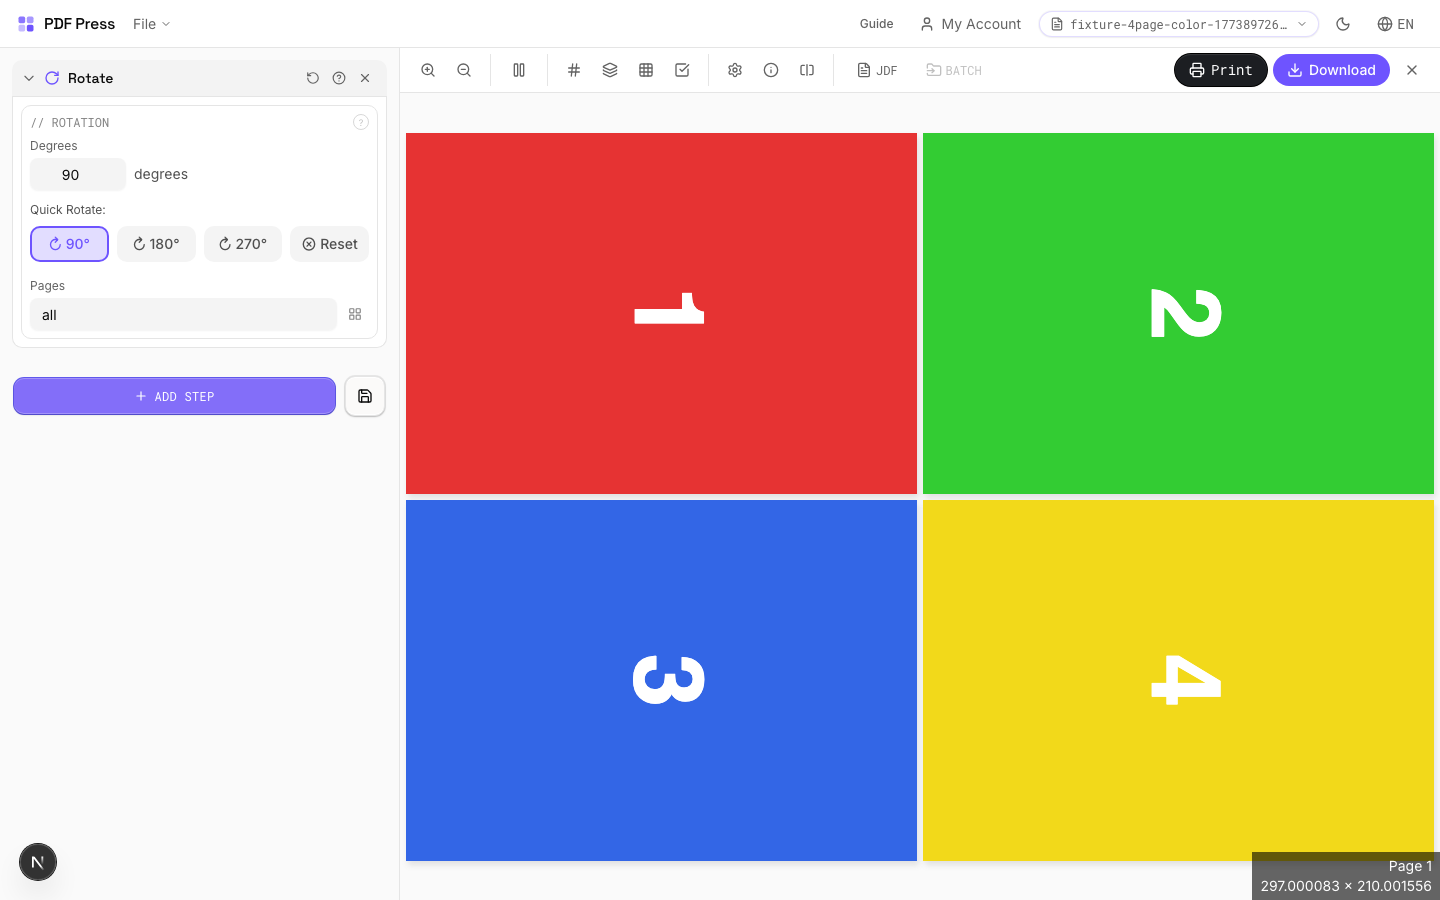
Rotate tool applied. Options panel on the left, imposed result on the right. Click to zoom.
Options Guide
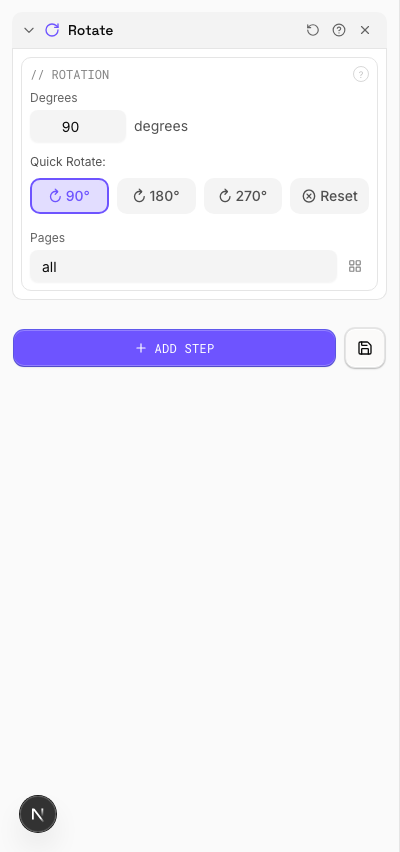
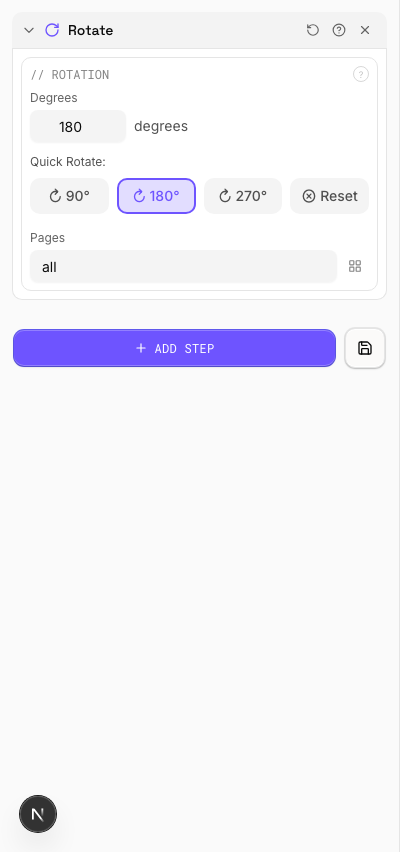
Rotation
Set the rotation angle and optionally limit to specific pages.
Quick presets: 90° (quarter turn CW), 180° (upside down), 270° (quarter turn CCW / 90° CCW). Reset returns to 0°. Custom angles: enter any value for non-standard rotations. Page range lets you rotate only specific pages (e.g., rotate just the cover or odd pages).
Configurations & Variations
Rotated 90° Clockwise
Click the 90° preset button to rotate all pages clockwise. Converts landscape pages to portrait orientation (or vice versa). Run this before booklet imposition when your source pages are landscape but your press requires portrait sheet feeding.
Settings to change

Full app view

Output result
Rotated 180° (Upside Down)
Click the 180° preset button to flip pages upside down. Needed for work-and-tumble duplex setups where the second pass is printed with the sheet flipped end-over-end. Also a quick fix for upside-down scans.
Settings to change
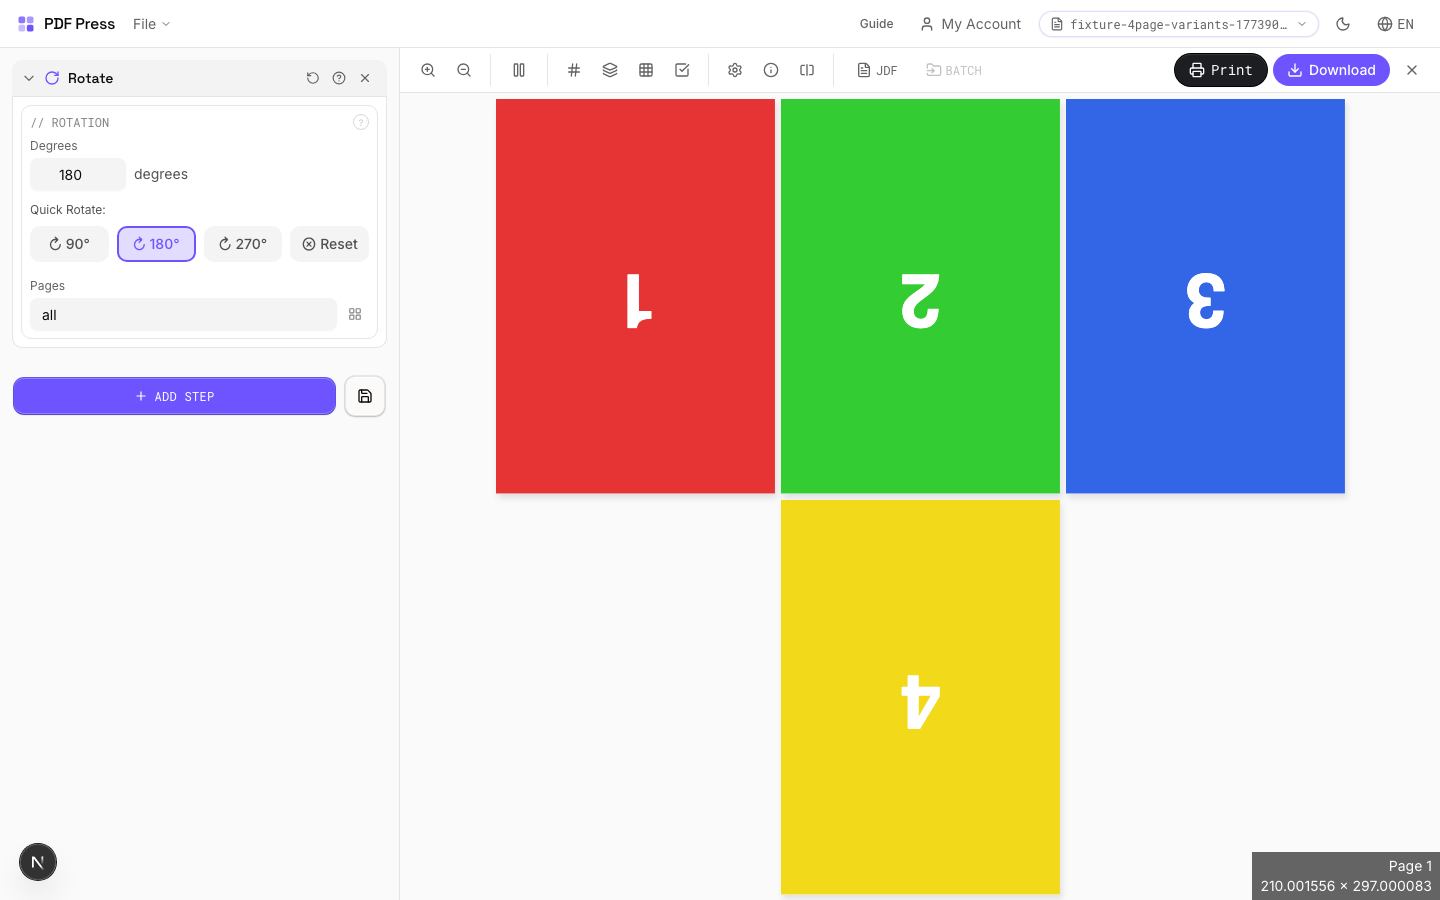
Full app view

Output result
Expert Tip
90-degree rotation switches between portrait and landscape feed direction. For landscape A4 on a portrait-feed press, rotate 90 CW so the gripper edge is correct.
Rotating by arbitrary angles (not multiples of 90) enlarges the MediaBox and may cause unexpected clipping on press.
Used in Recipes
Landscape Rotation
Rotate pages from portrait to landscape (or vice versa) for press feed direction.
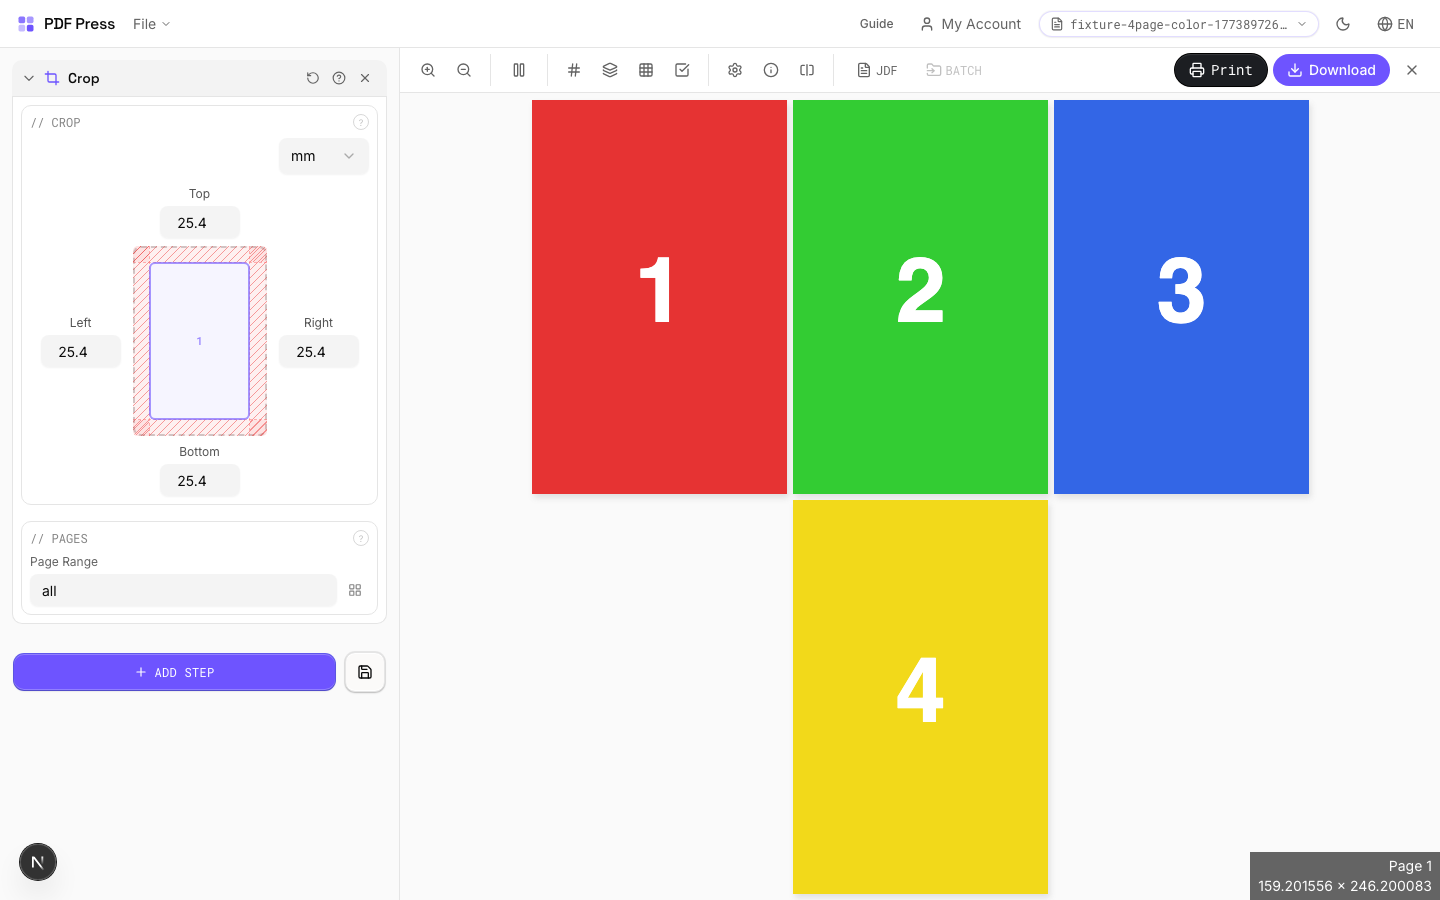
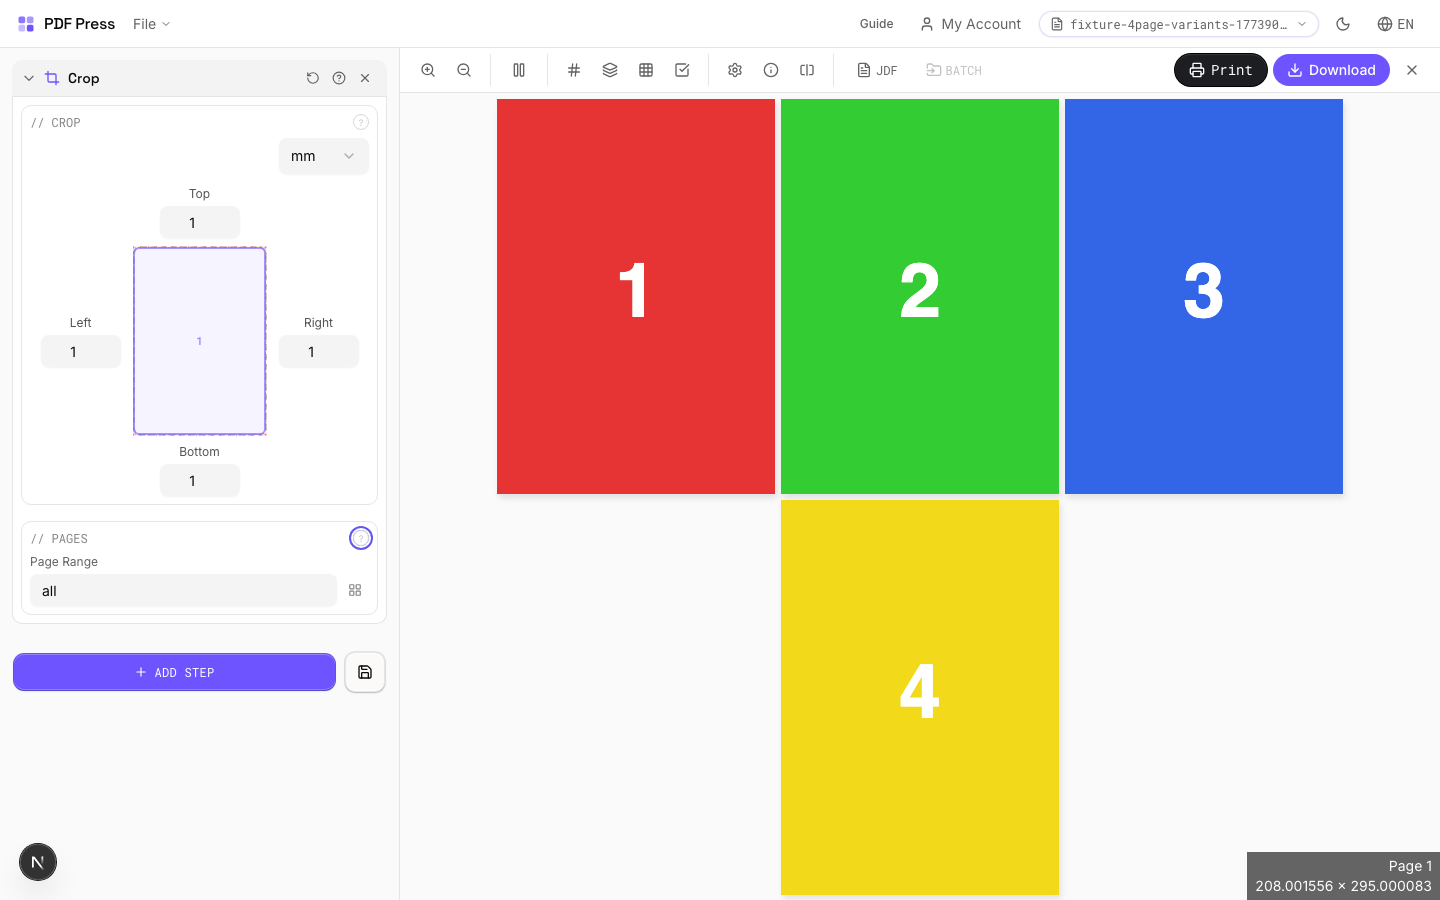
Crop
Trims content from page edges — specify how much to remove from each side.
Values represent the amount to remove, not the remaining size. A crop of 72pt (1in) on all sides removes 1 inch from every edge, making the page 2in narrower and 2in shorter. Useful for removing unwanted margins, printer borders, bleed areas, or white space from scanned documents.
How It Works
Values represent the amount to remove, not the remaining size. A crop of 72pt (1in) on all sides removes 1 inch from every edge, making the page 2in narrower and 2in shorter. Useful for removing unwanted margins, printer borders, bleed areas, or white space from scanned documents.
Crop tool applied. Options panel on the left, imposed result on the right. Click to zoom.
Options Guide
Crop
Set removal amounts for each edge: top, bottom, left, right.
Each value is subtracted from the corresponding page edge. Example: cropping 36pt (0.5in) from all sides on an A4 page (595×842pt) produces 523×770pt output. Use the same value on all sides to remove a uniform border. Different values per side let you trim asymmetrically (e.g., remove a binding margin from the left only).
Pages
Specify which pages to process using a range expression.
Examples: 'all' = every page. '1-5' = pages 1 through 5. '1,3,5' = specific pages. '1-10 odd' = odd pages 1-9. '2-20 even' = even pages 2-20. 'last' = last page. 'last-2' = third from last. Ranges are 1-based. Combine with commas: '1-5, 8, 12-15'.
Configurations & Variations
Cropped 1 Inch All Sides
Enter 72 pt (1 inch) in all four crop fields to remove a 1 inch border from every edge. The page shrinks by 2 inches in each dimension. Typical use: stripping unwanted margins, printer borders, or slug areas from production files before re-imposing.
Settings to change
Full app view

Output result
Expert Tip
Crop to the TrimBox to strip printer marks and bleed before re-imposing. This gives you a clean starting point. Use the CropBox variant if you want to preserve marks for reference.
Cropping is destructive. If you crop too tight and lose the bleed, you cannot recover it without the original source file.
Split
4 recipesDivides a multi-page PDF into smaller files, each containing a set number of pages.
Two modes: Chunk mode splits by fixed page count (a 100-page PDF at chunk size 20 = 5 files). Visual mode lets you click between page thumbnails to place split points exactly where needed. Output downloads as a zip archive of individual PDFs.
How It Works
Two modes: Chunk mode splits by fixed page count (a 100-page PDF at chunk size 20 = 5 files). Visual mode lets you click between page thumbnails to place split points exactly where needed. Output downloads as a zip archive of individual PDFs.
Split tool applied. Options panel on the left, imposed result on the right. Click to zoom.
Options Guide
Split Settings
Set how many pages each output file should contain.
Chunk mode: every output file gets the same number of pages (the last file may have fewer if the total doesn't divide evenly). Visual mode: click between page thumbnails to place split boundaries manually — useful when chapters or sections don't have uniform page counts.
Preview
Shows the file split plan — how many output files and the page ranges in each.
Visual Pages
Interactive page thumbnails — click between pages to toggle split points.
Each red line marks a split boundary. Click to add or remove. The resulting files are listed below with their page ranges. Drag to reorder split points is not supported — click to toggle on/off instead.
Action
Download all split files as a single zip archive.
Configurations & Variations
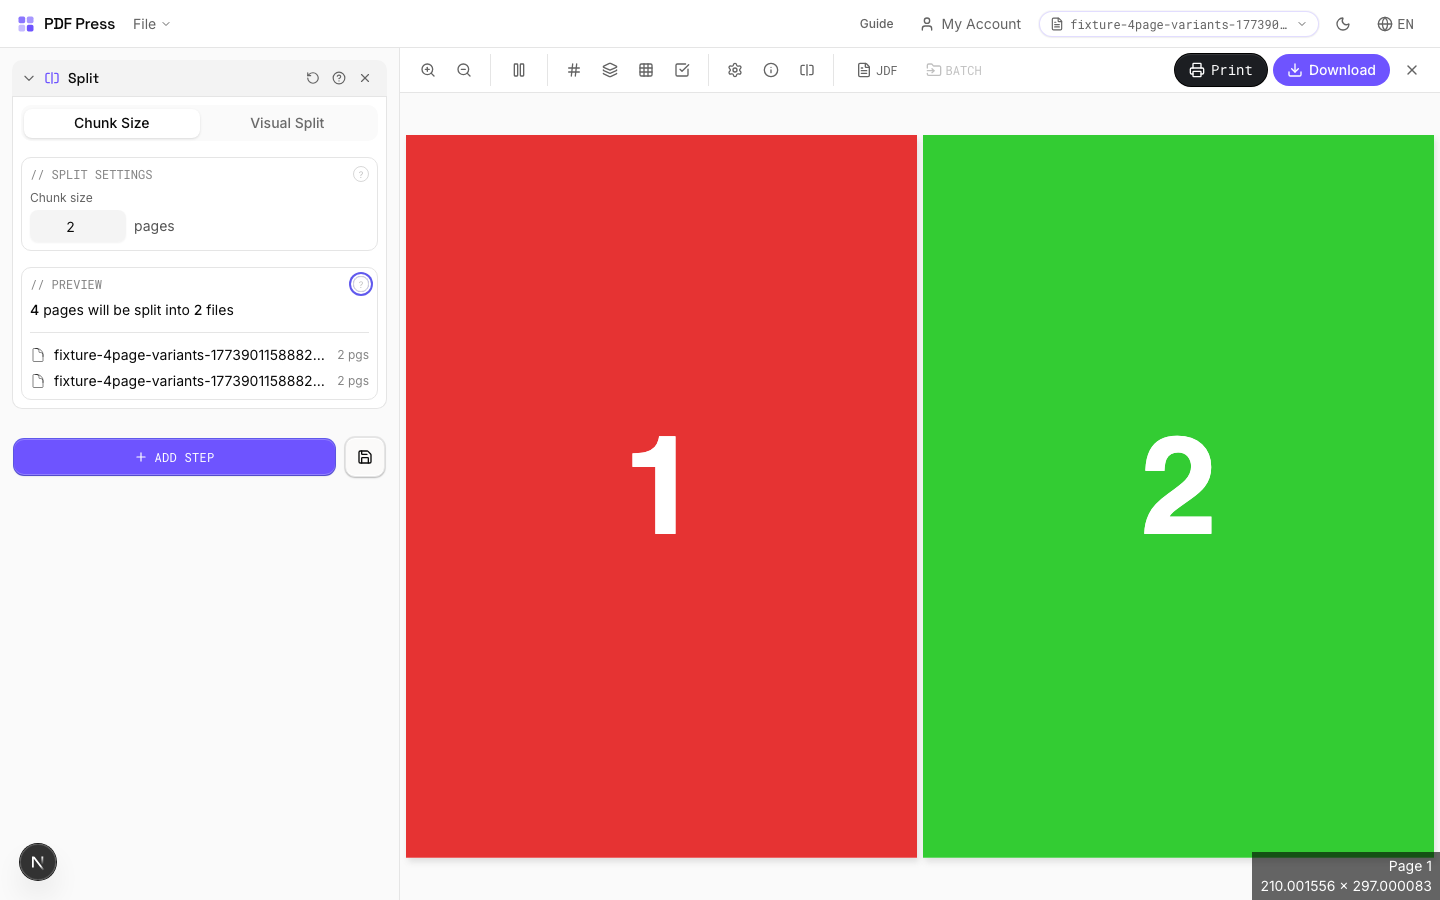
Split into 2-Page Chunks
Set chunk size to 2 to split the document into separate files of 2 pages each. A 16-page document becomes 8 files. Use this to separate reader spreads into individual sheets, or to break a large document into signature-sized chunks for parallel processing.
Settings to change
Full app view

Output result
Expert Tip
Split large-format pages into press-sheet-sized tiles with 10 mm overlap for accurate reassembly. 10 mm is the standard for most wide-format tiling jobs.
When splitting a booklet spread back into single pages, split at the exact spine position. Even 1 pt off will show as a white line at the bind edge.
Learn More
Used in Recipes
Poster Tiling
Large poster split into printable tiles with overlap for assembly.
Banner Printing
Wide-format banners with tiling for roll-fed printers.
Trade Show Panels
Multi-panel trade show displays split for separate printing and assembly.
Vehicle Wrap
Vehicle wrap panels split for contour-cut application.
Flip
1 recipeMirrors pages horizontally — creates a left-right mirror image.
Essential for iron-on transfers (text reads correctly after transfer), screen printing films, and plate-making workflows where the emulsion side must face the plate. Applied to all pages in the specified range.
How It Works
Essential for iron-on transfers (text reads correctly after transfer), screen printing films, and plate-making workflows where the emulsion side must face the plate. Applied to all pages in the specified range.

Flip tool applied. Options panel on the left, imposed result on the right. Click to zoom.
Options Guide
Pages
Specify which pages to process using a range expression.
Examples: 'all' = every page. '1-5' = pages 1 through 5. '1,3,5' = specific pages. '1-10 odd' = odd pages 1-9. '2-20 even' = even pages 2-20. 'last' = last page. 'last-2' = third from last. Ranges are 1-based. Combine with commas: '1-5, 8, 12-15'.
Expert Tip
Horizontal flip is for work-and-tumble backup; vertical flip is for work-and-turn. Always flip before imposition, not after, so registration stays consistent.
Flipping a page with text will mirror the text. This is intentional for backup alignment but will produce unreadable output if applied to a front-side layout by mistake.
Learn More
Used in Recipes
Work and Tumble
Flip backup for work-and-tumble duplex printing method.
Merge PDFs
3 recipesCombines multiple PDF files into a single document: merge chapters, sections, or separate print jobs.
Drag and drop additional PDF files alongside your primary document and arrange them in the desired order. The merged output preserves each file's page sizes, fonts, images, and vector content. Use this to assemble multi-chapter books, combine front and back covers with interior pages, or consolidate separate job files into one press-ready PDF.
How It Works
Drag and drop additional PDF files alongside your primary document and arrange them in the desired order. The merged output preserves each file's page sizes, fonts, images, and vector content. Use this to assemble multi-chapter books, combine front and back covers with interior pages, or consolidate separate job files into one press-ready PDF.
Merge PDFs tool applied. Options panel on the left, imposed result on the right. Click to zoom.
Options Guide
Primary Document
The base PDF file: additional files will be appended after this document.
This is the first file in the merged output. Its pages appear at the beginning. All subsequent files are added in the order they appear in the file list below.
Additional Files
Upload or drag extra PDFs to append after the primary document.
Files are merged in list order. Drag to rearrange. Each file retains its original page dimensions: mixed page sizes (e.g., Letter covers with A4 interior) are preserved as-is. Remove files by clicking the delete button next to each entry.
Summary
Shows the total page count and file order of the merged output.
Expert Tip
Merge multiple PDFs before imposition so they are treated as one continuous document. File order determines page order in every downstream operation, so double-check the sequence.
Merging files with different page sizes can cause unexpected scaling in layout tools. Resize all inputs to a common size first, or turn on auto-scale in the layout step.
Learn More
Used in Recipes
Wedding Invitations
Premium wedding invitations with RSVP cards and envelopes imposed together.
Mixed Gang Run
Multiple different jobs ganged on a single press sheet for cost efficiency.
Multi-File Merge
Merge multiple source files into a single document for unified processing.
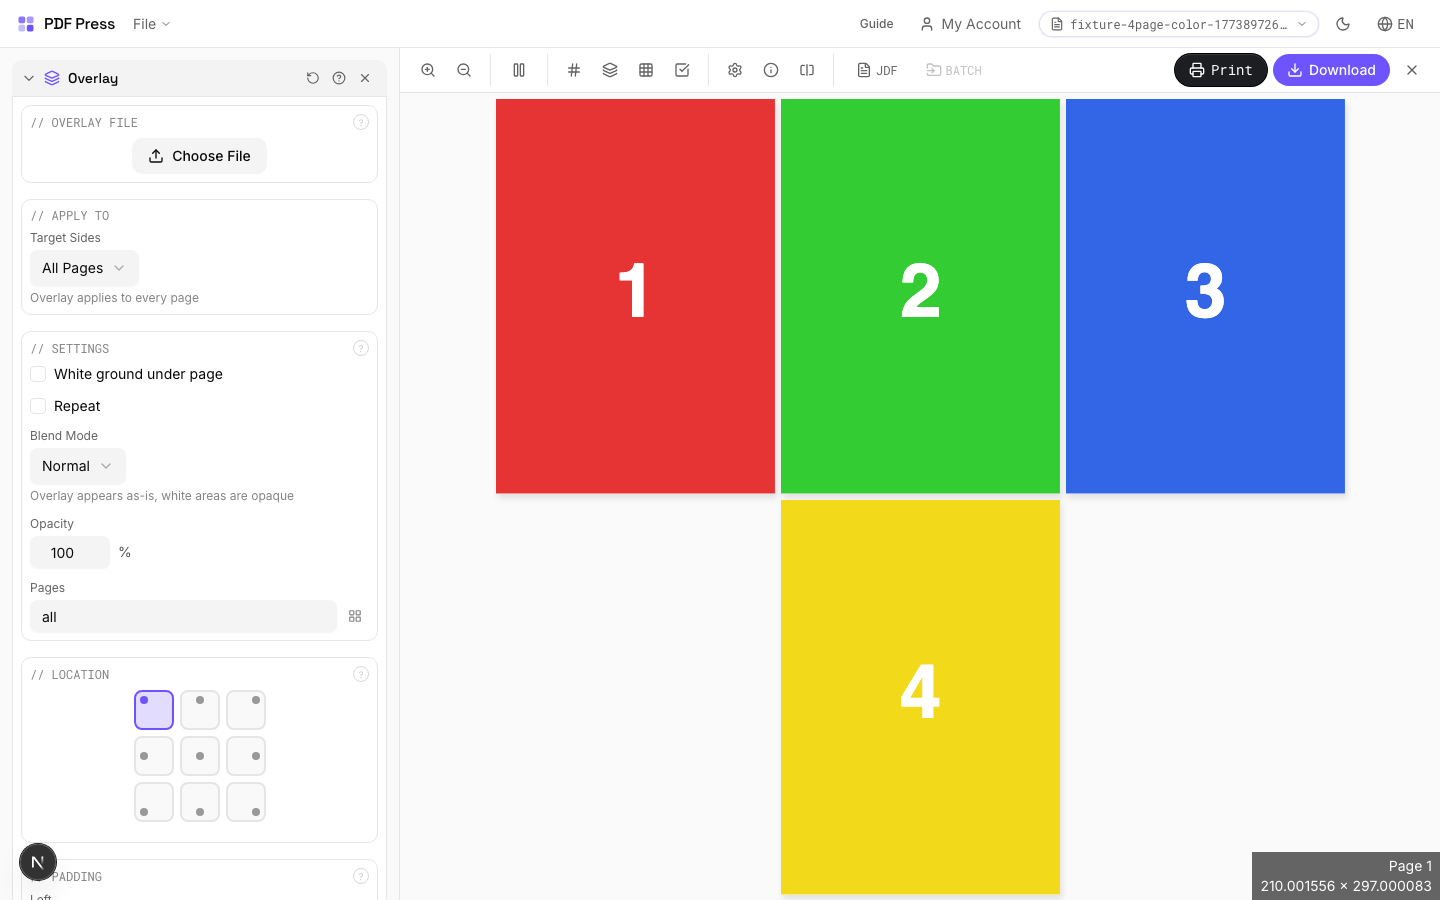
Overlay
4 recipesLayers a second PDF on top of your pages: for watermarks, letterheads, or templates.
The overlay PDF is composited onto each page of the base document. Control opacity, blend mode, positioning, and which pages receive the overlay. 'Repeat' cycles the overlay pages if the base has more pages than the overlay.
How It Works
The overlay PDF is composited onto each page of the base document. Control opacity, blend mode, positioning, and which pages receive the overlay. 'Repeat' cycles the overlay pages if the base has more pages than the overlay.
Overlay tool applied. Options panel on the left, imposed result on the right. Click to zoom.
Options Guide
Overlay File
Upload the PDF to layer on top of your document.
Settings
Control repeat behavior, blend mode, opacity, and page range.
Normal blend mode places the overlay directly on top: white areas are opaque. Multiply blend mode makes white areas transparent, which is ideal for overlaying dark logos onto colored backgrounds. Opacity at 100% is fully opaque; lower values create translucent effects.
Location
Choose where the overlay is anchored using a 9-point position grid.
Select one of nine anchor points: top-left, top-center, top-right, center-left, center, center-right, bottom-left, bottom-center, or bottom-right. The overlay is aligned relative to this point on the base page.
Padding
Offsets the overlay from its anchor position.
Left padding shifts the overlay horizontally. Top padding shifts it vertically. Use padding to fine-tune placement after choosing the anchor point.
Expert Tip
Overlays are for die-line templates, watermarks, or recurring background elements. Set opacity to 100% for die lines and 15-30% for draft watermarks. Upload the overlay file first via the file upload area in the Overlay section.
The overlay PDF must match the page dimensions of your working file. A size mismatch will position the overlay from the bottom-left origin, and it will appear shifted.
Used in Recipes
Box Layout
Folding carton box flat (die-line) with artwork positioned for die cutting.
Bag Layout
Paper or poly bag printed flat and imposed for production.
Envelope Layout
Printed envelopes imposed for flatbed or rotary die cutting.
Envelope Production
Printed envelopes imposed and prepared for envelope-making machinery.
Distortion Comp.
4 recipesPre-compensates artwork for cylinder-induced stretching in flexographic and rotogravure printing.
When a flat plate wraps around a printing cylinder, the image stretches in the circumferential direction proportional to the plate thickness and cylinder diameter. Without compensation, circle become ovals and text appears elongated on the printed output. This tool pre-shrinks the artwork by the calculated distortion factor so that after mounting on the cylinder, the print appears at the correct dimensions.
How It Works
When a flat plate wraps around a printing cylinder, the image stretches in the circumferential direction proportional to the plate thickness and cylinder diameter. Without compensation, circle become ovals and text appears elongated on the printed output. This tool pre-shrinks the artwork by the calculated distortion factor so that after mounting on the cylinder, the print appears at the correct dimensions.
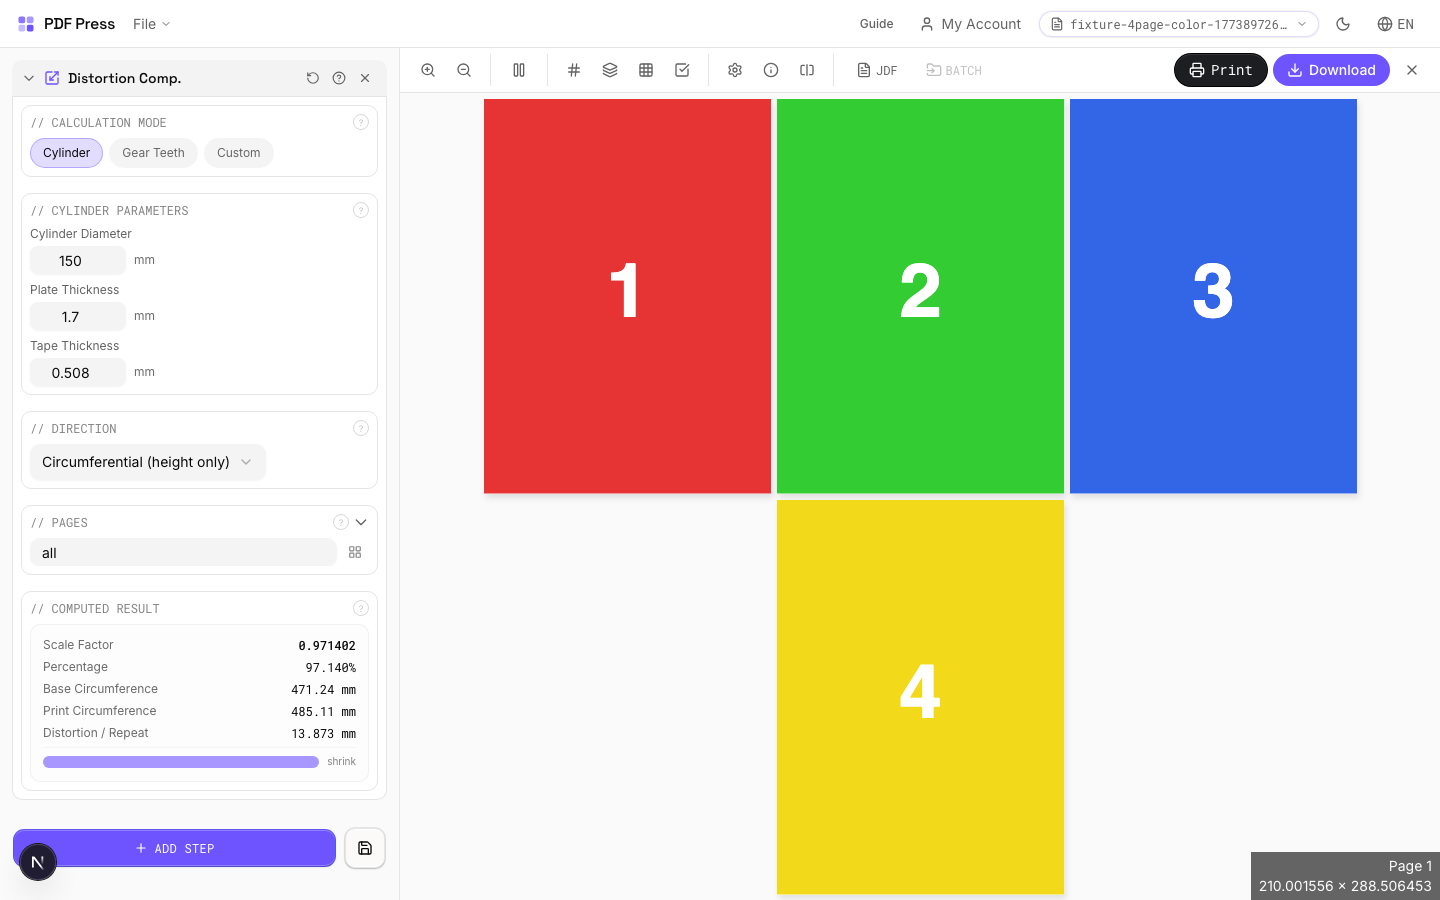
Distortion Comp. tool applied. Options panel on the left, imposed result on the right. Click to zoom.
Options Guide
Calculation Mode
Choose how to determine the distortion factor: from cylinder geometry, gear teeth, or a known value.
Cylinder mode: enter the cylinder diameter and plate/sleeve thickness: the engine calculates the exact compensation percentage. Gear teeth mode: enter gear tooth count and pitch: commonly used when cylinder diameter isn't directly measured but gear specs are available from the press manufacturer. Custom mode: enter a known distortion factor directly as a percentage: use this when your press manufacturer has provided a pre-calculated value.
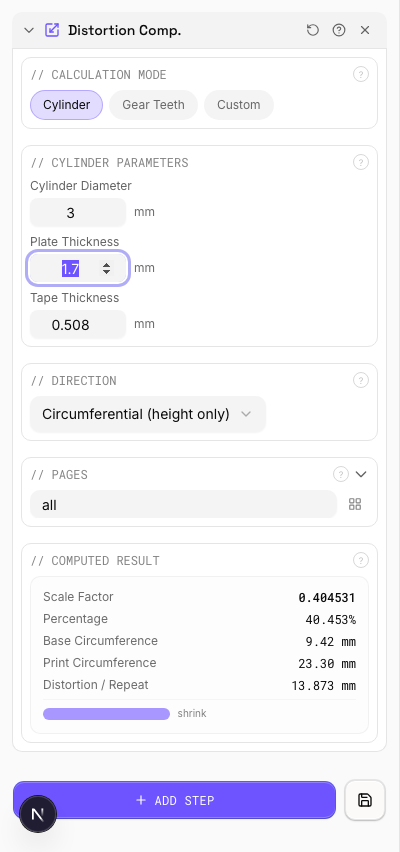
Cylinder Parameters
Enter the cylinder diameter and plate thickness to calculate the distortion compensation factor.
Cylinder (repeat) diameter: the diameter of the bare print cylinder in mm or inches. Plate/sleeve thickness: the thickness of the flexo plate or sleeve mounted on the cylinder. The compensation factor is: original size × (cylinder diameter) / (cylinder diameter + 2 × plate thickness). Typical results: 96–99% compression for standard flexo configurations.
Gear Parameters
Calculate cylinder diameter from gear tooth count and pitch: an alternative to direct measurement.
Gear tooth count × pitch = circumference. Circumference / π = diameter. This is used when the print repeat length is specified by gear selection rather than direct cylinder measurement. Common in narrow-web flexo where repeat lengths are standardized to gear combinations.
Custom Factor
Enter a known distortion factor directly as a percentage.
Use this when your press manufacturer, plate maker, or repro house has provided a pre-calculated distortion value. Enter as a percentage (e.g., 97.5 means the artwork is compressed to 97.5% in the cylinder direction). Values below 100% shrink the artwork; above 100% would stretch it (rare in practice).
Direction
Specify which axis receives the distortion compensation: print direction or cross-web.
Print direction (around the cylinder): the standard axis for flexo/gravure distortion compensation: this is where plate wrap causes stretching. Cross-web (across the cylinder): rarely needed, but some wide-format applications or unusual plate mounting geometries require it. Both: applies compensation in both directions simultaneously for special cases.
Pages
Specify which pages to process using a range expression.
Examples: 'all' = every page. '1-5' = pages 1 through 5. '1,3,5' = specific pages. '1-10 odd' = odd pages 1-9. '2-20 even' = even pages 2-20. 'last' = last page. 'last-2' = third from last. Ranges are 1-based. Combine with commas: '1-5, 8, 12-15'.
Computed Result
Displays the calculated compensation factor and resulting artwork dimensions.
Shows the distortion percentage calculated from your inputs, the original vs. compensated dimensions, and the effective repeat length. Verify the computed factor matches your press specification before generating the output. A typical flexo distortion factor falls between 96% and 99%.
Configurations & Variations
3% Horizontal Distortion
Enter 3% in the distortion field to pre-compensate for flexographic cylinder stretch. When a flexible plate wraps around the print cylinder, artwork elongates in the circumferential direction. Pre-shrinking by 3% brings the printed result back to the intended dimensions. Get the exact percentage from your plate maker; it depends on plate thickness and cylinder diameter.
Settings to change

Full app view

Output result
Expert Tip
Pre-distortion (elongation) compensates for flexographic plate stretch on the cylinder. Calculate the percentage from plate thickness and cylinder circumference, or ask your plate maker for the exact value.
Distortion direction matters. Apply along the cylinder axis only. Distorting the wrong axis will scale artwork non-uniformly and the error will be visible in print.
Learn More
Used in Recipes
Label Wrap
Wraparound labels for bottles, cans, or tubes with distortion compensation.
Corrugated Packaging
Large-format corrugated box or display printed on flatbed or flexo.
Sleeve / Band
Shrink sleeves or belly bands for product packaging.
Flexo Distortion
Pre-distort artwork for flexographic plate mounting on cylinders.
Enhance Tools(22)
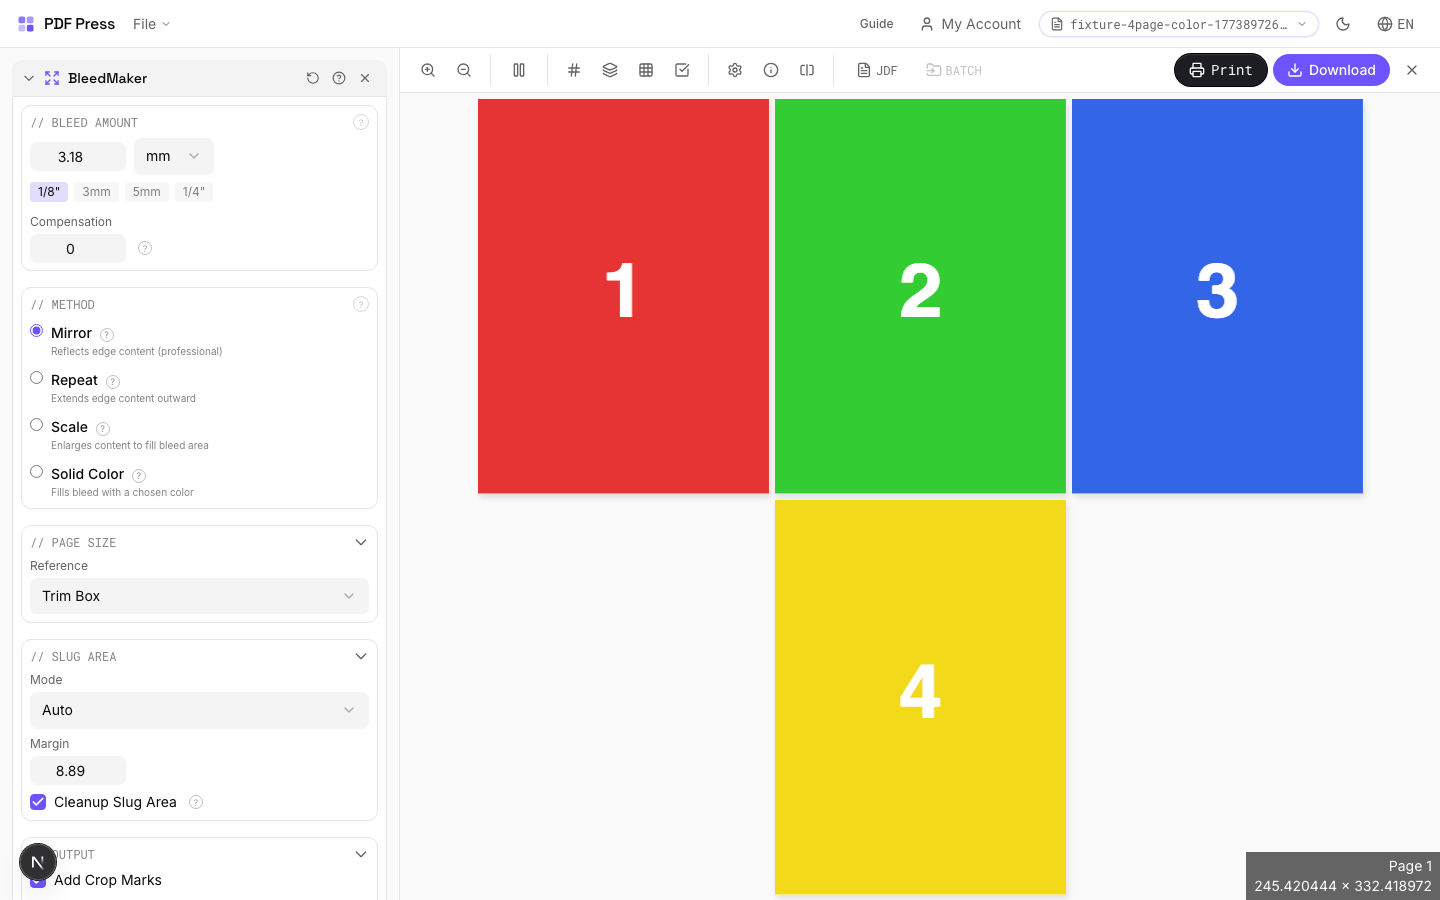
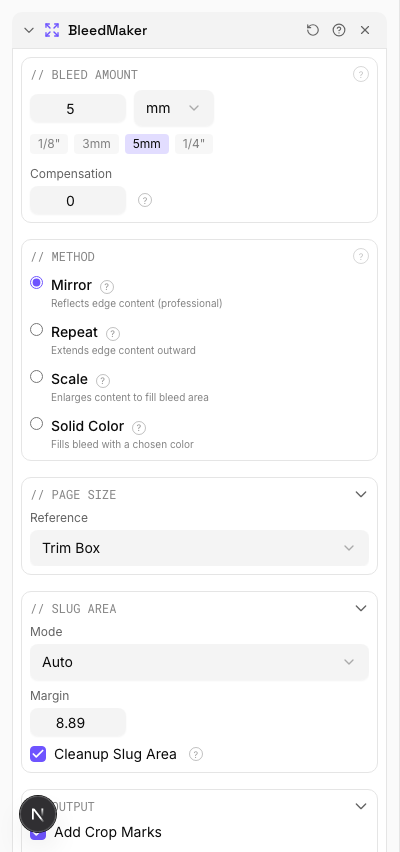
BleedMaker
2 recipesAdds bleed area around pages so artwork extends past the trim edge — prevents white strips after cutting.
BleedMaker extends your page dimensions by the specified bleed amount on all four sides. Two methods: Scale enlarges the existing content to fill the bleed zone (best for full-bleed photos and illustrations), Solid Color fills the bleed area with a flat color (best for designs with solid-color edges). Use this as a pre-press step before Cards, Grid, or Booklet when your source files lack built-in bleeds.
How It Works
BleedMaker extends your page dimensions by the specified bleed amount on all four sides. Two methods: Scale enlarges the existing content to fill the bleed zone (best for full-bleed photos and illustrations), Solid Color fills the bleed area with a flat color (best for designs with solid-color edges). Use this as a pre-press step before Cards, Grid, or Booklet when your source files lack built-in bleeds.
BleedMaker tool applied. Options panel on the left, imposed result on the right. Click to zoom.
Options Guide
Bleed Amount
Set the bleed extension distance — how far artwork extends past the trim edge.
Industry standard: 1/8" (9pt / 3.175mm) for US commercial print, 3mm (8.5pt) for metric markets. Extended bleed (5mm / 14pt) for large-format or packaging. Quick presets set common values instantly. The bleed is added equally on all four sides.
Method
Choose how the bleed area is generated — by scaling content outward or filling with a solid color.
Scale: enlarges the page content proportionally so it extends past the original trim edge into the bleed zone. Preserves vectors and raster quality. Best for full-bleed photographs, illustrations, and designs where edge content can be slightly cropped. Solid Color: fills the bleed area with a chosen color while keeping the original content at its original size. Best for designs with solid-colored borders, white backgrounds, or when scaling would distort important edge content.
Pages
Specify which pages to process using a range expression.
Examples: 'all' = every page. '1-5' = pages 1 through 5. '1,3,5' = specific pages. '1-10 odd' = odd pages 1-9. '2-20 even' = even pages 2-20. 'last' = last page. 'last-2' = third from last. Ranges are 1-based. Combine with commas: '1-5, 8, 12-15'.
Preview
Visual representation showing the trim area (inner box) surrounded by the bleed zone (dashed outer border).
Configurations & Variations
5mm Bleed (Mirror Method)
Enter 5 mm (14.17 pt) in all four bleed fields. BleedMaker extends artwork into the bleed zone by mirroring edge pixels outward, producing a seamless extension on solid colors and gradients. 5 mm is the standard bleed for commercial packaging; 3 mm (9 pt) is sufficient for most general commercial print work.
Settings to change

Full app view

Output result
Expert Tip
BleedMaker synthetically extends artwork into the bleed zone by mirroring edge pixels. It rescues files delivered with no bleed. 3 mm is the minimum for commercial print; 5 mm for packaging.
Synthetic bleeds work well on solid colours and gradients but produce visible artefacts on photos or patterns that have hard edges at the trim line.
Learn More
Used in Recipes
Saddle-Stitch with Bleeds
Saddle-stitch booklet with synthetic bleed generation for artwork delivered without bleeds.
Business Cards (No-Bleed Rescue)
Business cards from artwork delivered without bleeds.
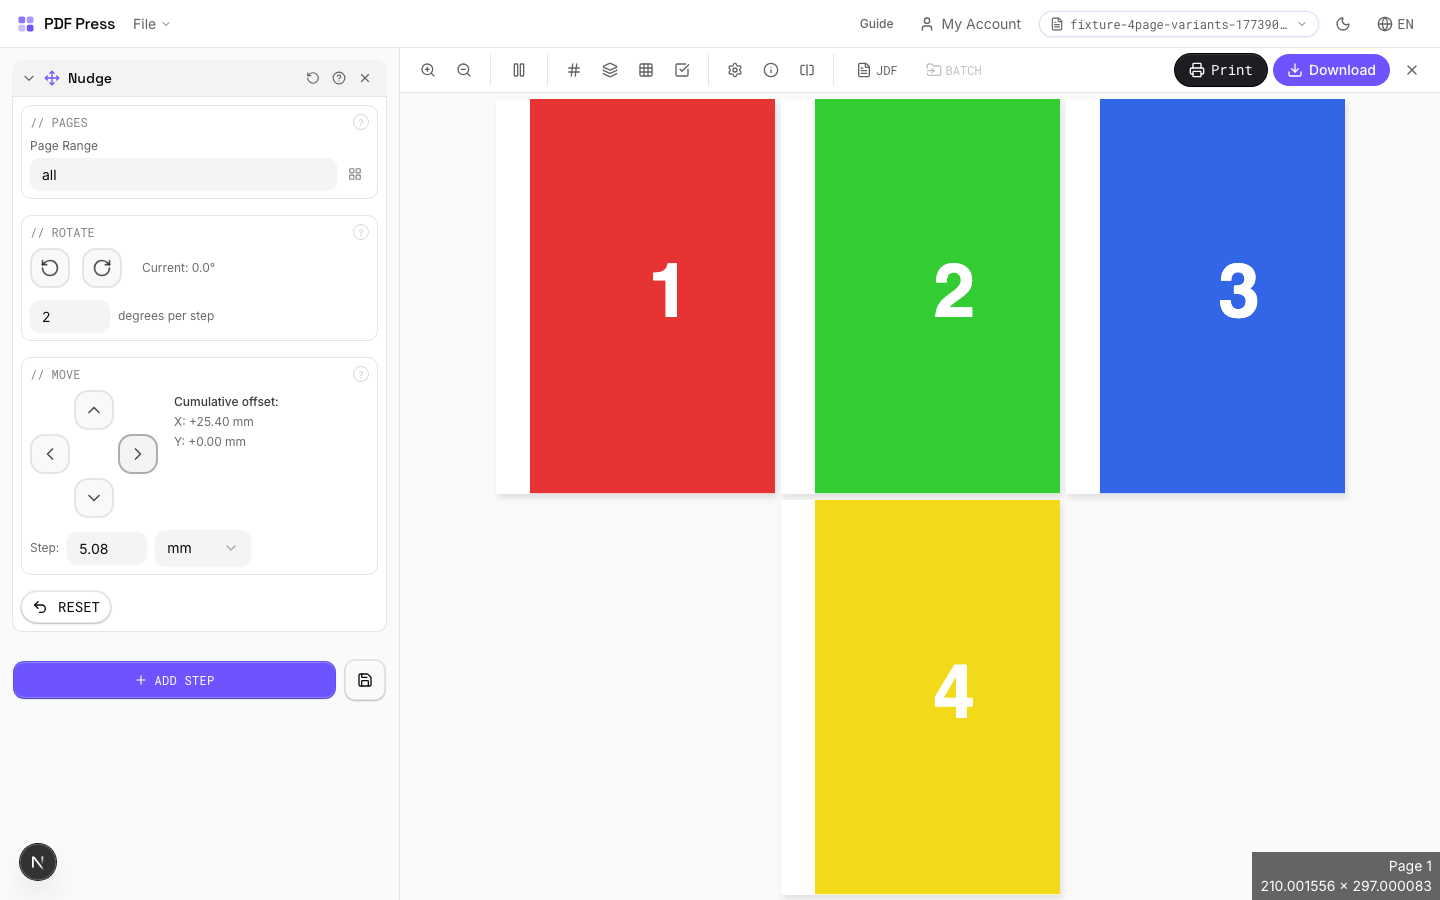
Nudge
Fine-tunes individual page positions: translate or rotate specific pages by precise amounts.
Creates a list of per-page adjustments. Each adjustment specifies a page range and an action: translate (shift x/y) or rotate (degrees). Use this for registration corrections, aligning mismatched pages, or compensating for print-to-cut drift.
How It Works
Creates a list of per-page adjustments. Each adjustment specifies a page range and an action: translate (shift x/y) or rotate (degrees). Use this for registration corrections, aligning mismatched pages, or compensating for print-to-cut drift.
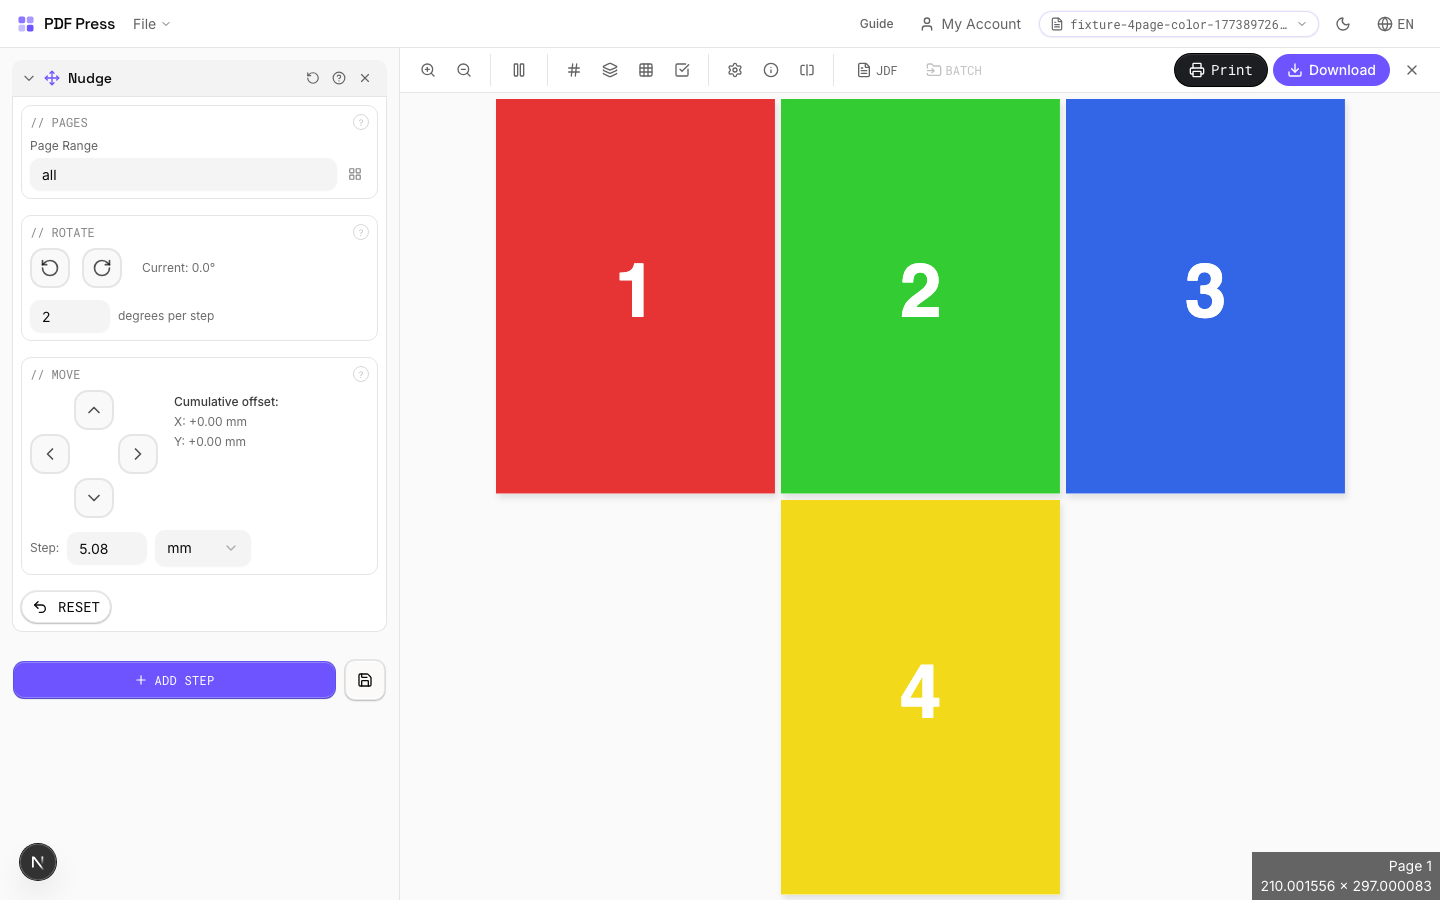
Nudge tool applied. Options panel on the left, imposed result on the right. Click to zoom.
Options Guide
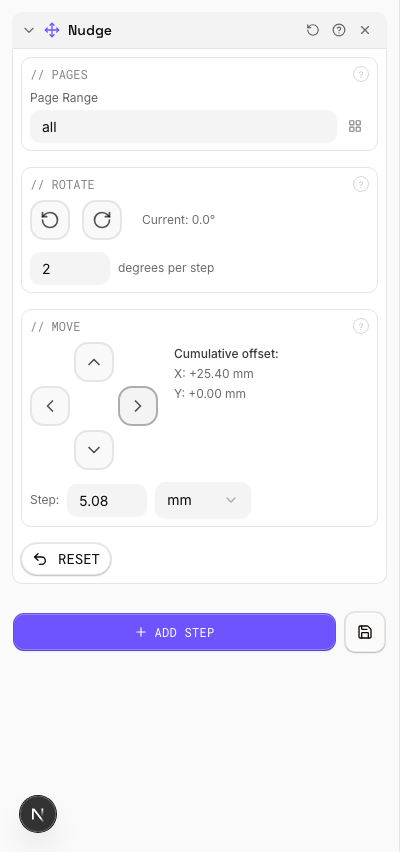
Pages
Select which pages the current nudge adjustment applies to.
Enter a page range expression. Each nudge entry targets specific pages: you can create multiple entries with different adjustments for different page ranges.
Rotate
Rotate selected pages by precise degree increments.
Click the clockwise or counter-clockwise buttons to apply rotation. The delta degrees field controls how much each click rotates. Small values (0.5-2°) are best for fine registration work.
Move
Translate selected pages by precise distance in any direction.
Use the directional pad to shift pages left, right, up, or down. The delta position field controls how far each click moves. Use small values for precise registration adjustments.
Configurations & Variations
Page Shifted Right
Click the right-arrow button to shift page content. Each click moves by the delta amount (default 1 pt, roughly 0.35 mm). Nudge should be the last step in your pipeline so it is not overridden by subsequent layout changes. A typical use is shifting all pages 2 pt to compensate for a plate that consistently prints off-center.
Settings to change
Full app view

Output result
Expert Tip
Nudge is for fine plate registration adjustments, typically 0.5 to 1 pt shifts to compensate for mechanical press drift. Apply it as the very last operation so it is not overridden by subsequent layout changes.
Values are in PDF points (1/72 inch). A seemingly small 5 pt is actually 1.76 mm, which is enough to cause visible misregister on tight-tolerance work.
Header or Footer
3 recipesAdds customizable text to the top or bottom of every page — with dynamic variables for page numbers, filenames, and timestamps.
Supports variable tokens replaced at render time: [page-number], [page-count], [sheet-number], [sheet-count], [file-name], [output-file-name], [timestamp]. Number padding: [page-number:0001] produces 0001, 0042, etc. Timestamp formatting: [timestamp:%B %d, %Y] → "March 12, 2026".
How It Works
Supports variable tokens replaced at render time: [page-number], [page-count], [sheet-number], [sheet-count], [file-name], [output-file-name], [timestamp]. Number padding: [page-number:0001] produces 0001, 0042, etc. Timestamp formatting: [timestamp:%B %d, %Y] → "March 12, 2026".

Header or Footer tool applied. Options panel on the left, imposed result on the right. Click to zoom.
Options Guide
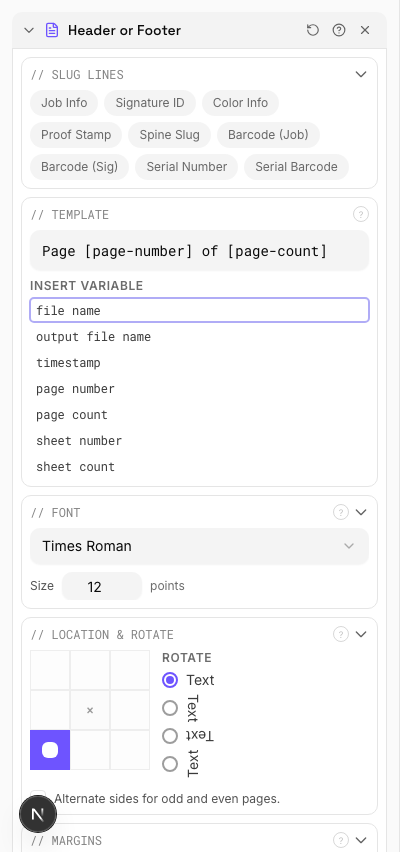
Template
Type or compose the text to stamp on each page. Click variable buttons to insert dynamic tokens.
Available tokens: [page-number] (current page), [page-count] (total pages), [sheet-number] (sheet index), [sheet-count] (total sheets), [file-name] (input filename), [output-file-name] (output filename), [timestamp] (current date/time). Padding: [page-number:0001] zero-pads to 4 digits (0001, 0042, 0100). Timestamp: [timestamp:%Y-%m-%d] → '2026-03-12'. Combine freely: 'Page [page-number] of [page-count] — [file-name]'.
Font
Choose the typeface and point size for the stamped text.
Standard PDF fonts: Helvetica, Helvetica-Bold, Times-Roman, Times-Bold, Courier, Courier-Bold, etc. Size in PDF points: 8–10pt for annotations and sluglines, 12pt for readable body text, 14–18pt for prominent headers. These fonts are embedded in every PDF viewer — no font files needed.
Location & Rotate
Position the text using a 3×3 grid (8 positions — center cell is reserved for page content).
Choose from: top-left, top-center, top-right, center-left, center-right, bottom-left, bottom-center, bottom-right. The selected position sets the anchor point. Rotation: rotates the text at the anchor — 90° for vertical spine labels, 180° for inverted text. Alternate sides: mirrors the horizontal position on even pages — standard for book running headers where left pages show content on the left and right pages on the right.
Margins
Fine-tune the offset of the text from its anchor position.
Horizontal margin: distance from the left or right edge (depending on anchor). Vertical margin: distance from the top or bottom edge. Use margins to ensure text stays within the printable area and doesn't overlap content. Typical values: 18–36pt (0.25–0.5in).
Pages
Specify which pages to process using a range expression.
Examples: 'all' = every page. '1-5' = pages 1 through 5. '1,3,5' = specific pages. '1-10 odd' = odd pages 1-9. '2-20 even' = even pages 2-20. 'last' = last page. 'last-2' = third from last. Ranges are 1-based. Combine with commas: '1-5, 8, 12-15'.
Preview
Live rendering showing what the stamped text will look like with sample variable values filled in.
Configurations & Variations
Page Numbers Added
Type Page [page-number] of [page-count] into the template field and set the position to bottom-center. The bracketed tokens are substituted at render time: [page-number] becomes the sequential page number (1, 2, 3...) and [page-count] becomes the document's total page count. Other available tokens include [file-name], [sheet-number], and [timestamp]. Format specifiers like [page-number:03d] produce zero-padded output (001, 002...). Run this step before booklet imposition so the numbers land in the correct reading position after folding.
Settings to change
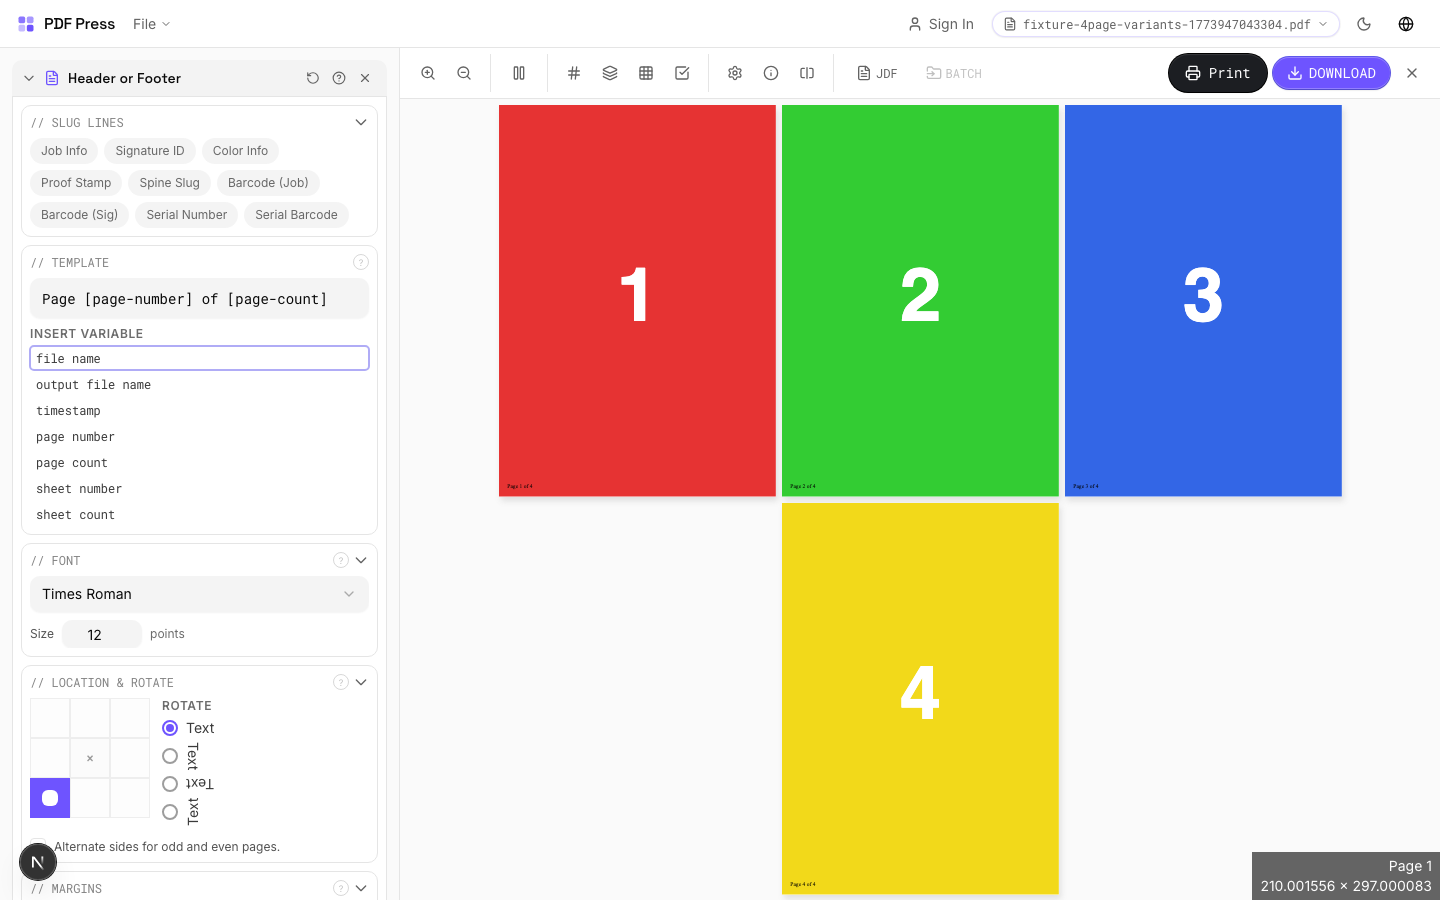
Full app view

Output result
Expert Tip
Put job name, date, and plate/separation info in the slug area using 6-7 pt text in a neutral colour. The marks should be clearly readable on a proof but must not encroach on the live area.
If the header or footer falls inside the trim area, it will be visible on the finished product. Always position them in the slug or bleed zone.
Used in Recipes
Watermarked Proof
Draft proof with watermark and job information for client approval.
Branded Proof
Client proof with your shop's branding, job info, and color patches.
Newsletter
Folded newsletter (4-8 pages) for mailing or distribution.
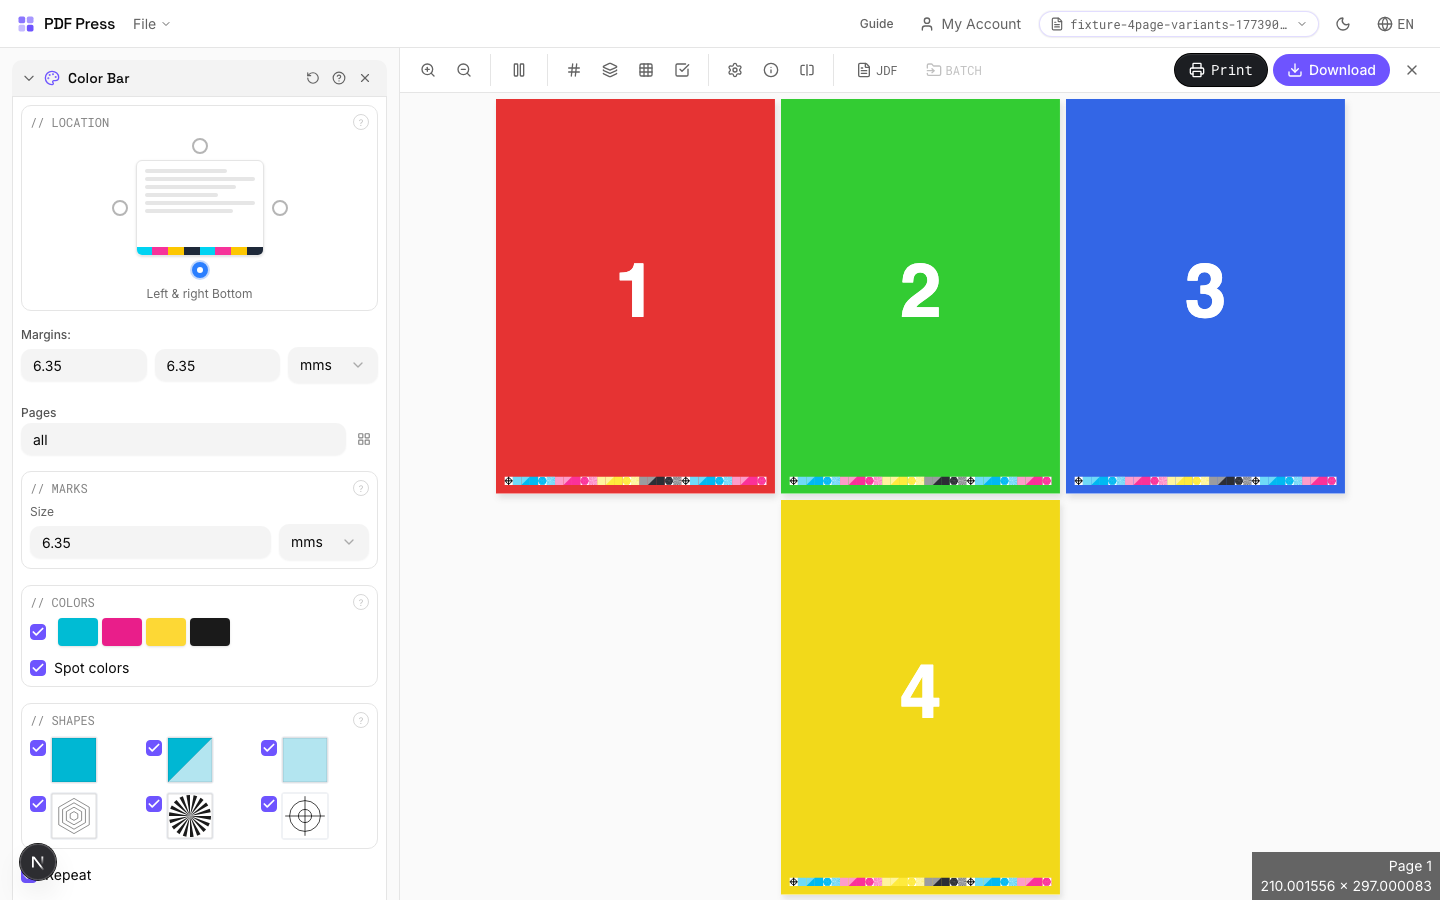
Color Bar
11 recipesAdds color calibration strips along page edges for press quality verification.
Color bars provide a reference target that press operators use to monitor ink density, dot gain, and color consistency throughout a print run. Bars include process color patches (CMYK), registration targets, and optional spot color swatches.
How It Works
Color bars provide a reference target that press operators use to monitor ink density, dot gain, and color consistency throughout a print run. Bars include process color patches (CMYK), registration targets, and optional spot color swatches.
Color Bar tool applied. Options panel on the left, imposed result on the right. Click to zoom.
Options Guide
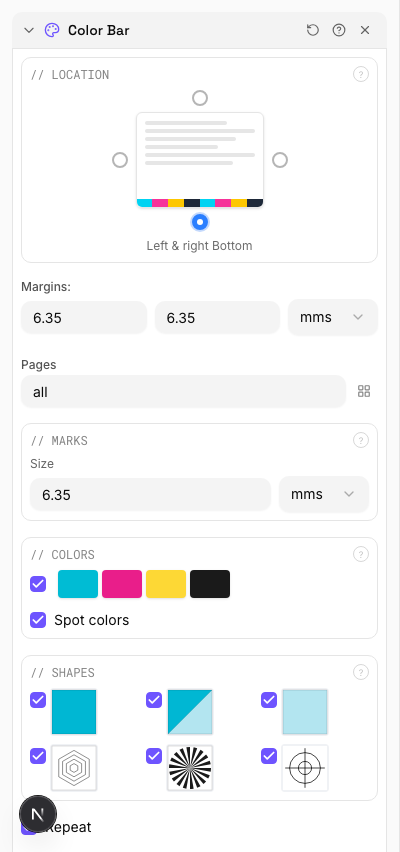
Location
Position the color bar along a page edge using the selection grid.
Choose which edge of the page receives the color bar. The bar runs along the full length of the selected edge, positioned just outside the trim boundary.
Marks
Configure mark size, spacing, and repeat behavior.
Size controls how large each color patch appears. Repeat fills the available edge length with repeating bar patterns for more measurement points across the sheet.
Colors
Select which color patches to include in the bar.
Standard bars include CMYK process patches. Spot colors adds extra patches for any Pantone or custom inks defined in the document. Registration patches help verify plate alignment.
Shapes
Choose the shape of individual color patches.
Squares are the most common and easiest to measure with a spectrophotometer. Circles and rectangles are available for specific press proofing workflows.
Configurations & Variations
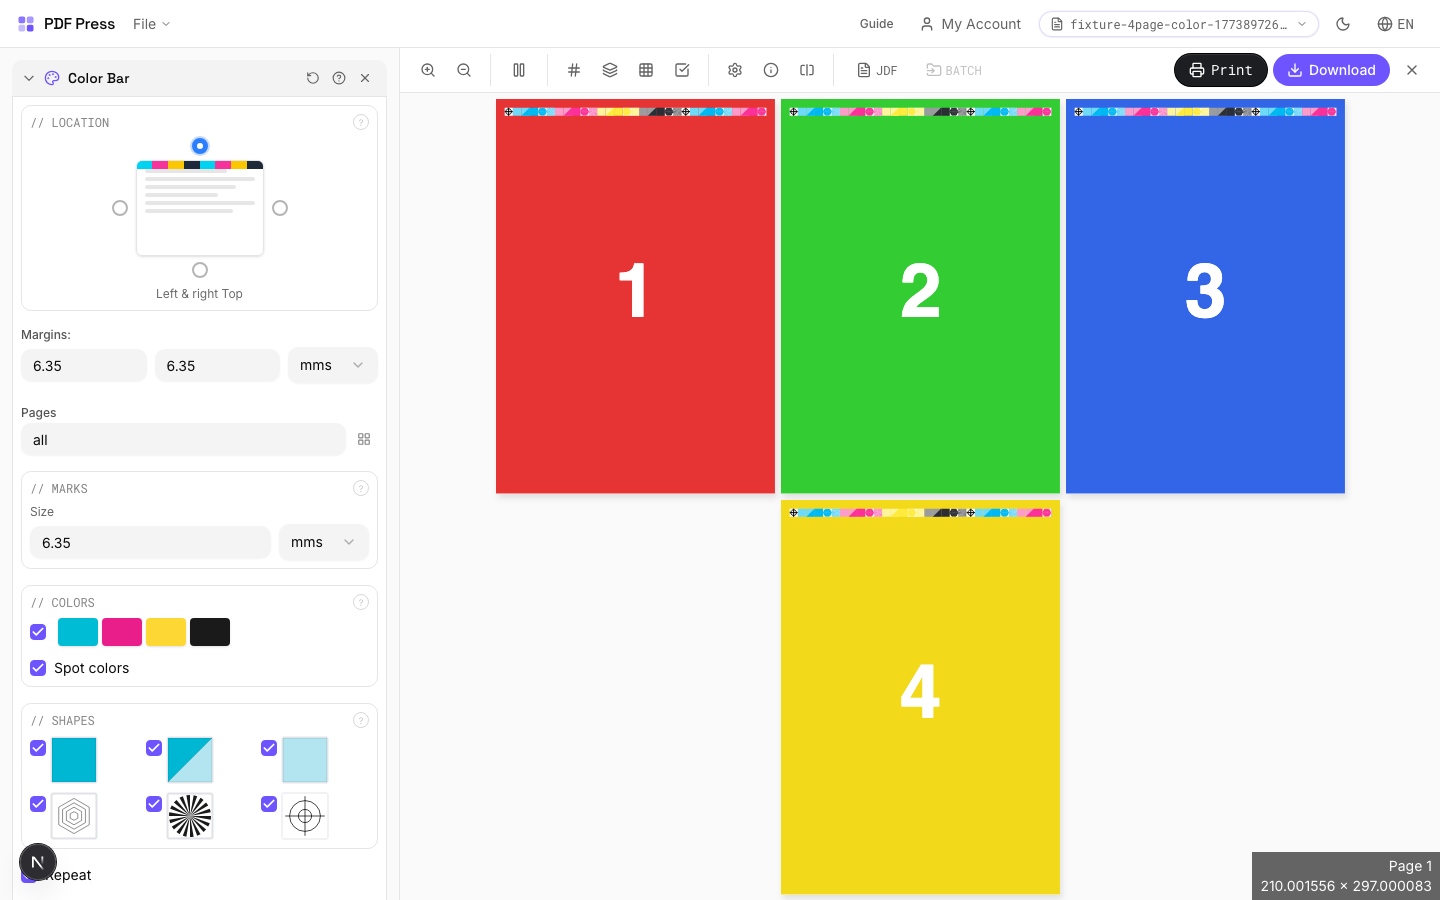
Color Bar at Bottom Edge
Select the bottom position in the location grid. The CMYK control strip is placed along the bottom sheet edge with individual color patches separated by a thin gap for clean densitometer readings. Bottom placement is standard when the top edge is the gripper (the non-printable zone held by press grippers). Each patch in the strip (Cyan, Magenta, Yellow, Black, plus overprint combinations) must be wide enough for your spectrophotometer's aperture, typically 4-5 mm minimum.
Settings to change
Full app view

Output result
Expert Tip
On offset presses, place colour bars along the gripper edge for inline densitometry. On digital presses, place them on the trail edge where toner coverage varies more.
Colour bars increase the overall sheet dimension. Verify your press sheet has enough non-image area to accommodate them without clipping.
Learn More
Used in Recipes
Perfect-Bound with Color Bar
Perfect-bound book signatures with inline color bars for press density control.
Children's Book
Full-color children's picture book with heavy stock and case binding.
Magazine Production
Full commercial magazine with saddle-stitch or perfect binding and press marks.
Annual Report
Corporate annual report with mixed content (text, charts, photos) and premium finishing.
Product Labels
Multi-up product labels for bottles, jars, and boxes.
Full Press Marks
Complete press mark set for commercial offset production.
Digital Press Ready
Mark set optimized for digital presses (HP Indigo, Xerox iGen, etc.).
Offset Press Ready
Full offset press preparation with all required finishing marks.
Branded Proof
Client proof with your shop's branding, job info, and color patches.
Gang Run with Full Marks
Ganged production sheet with complete finishing marks for commercial press.
Expert Grid with Finishing
Custom Expert Grid imposition with full finishing marks.
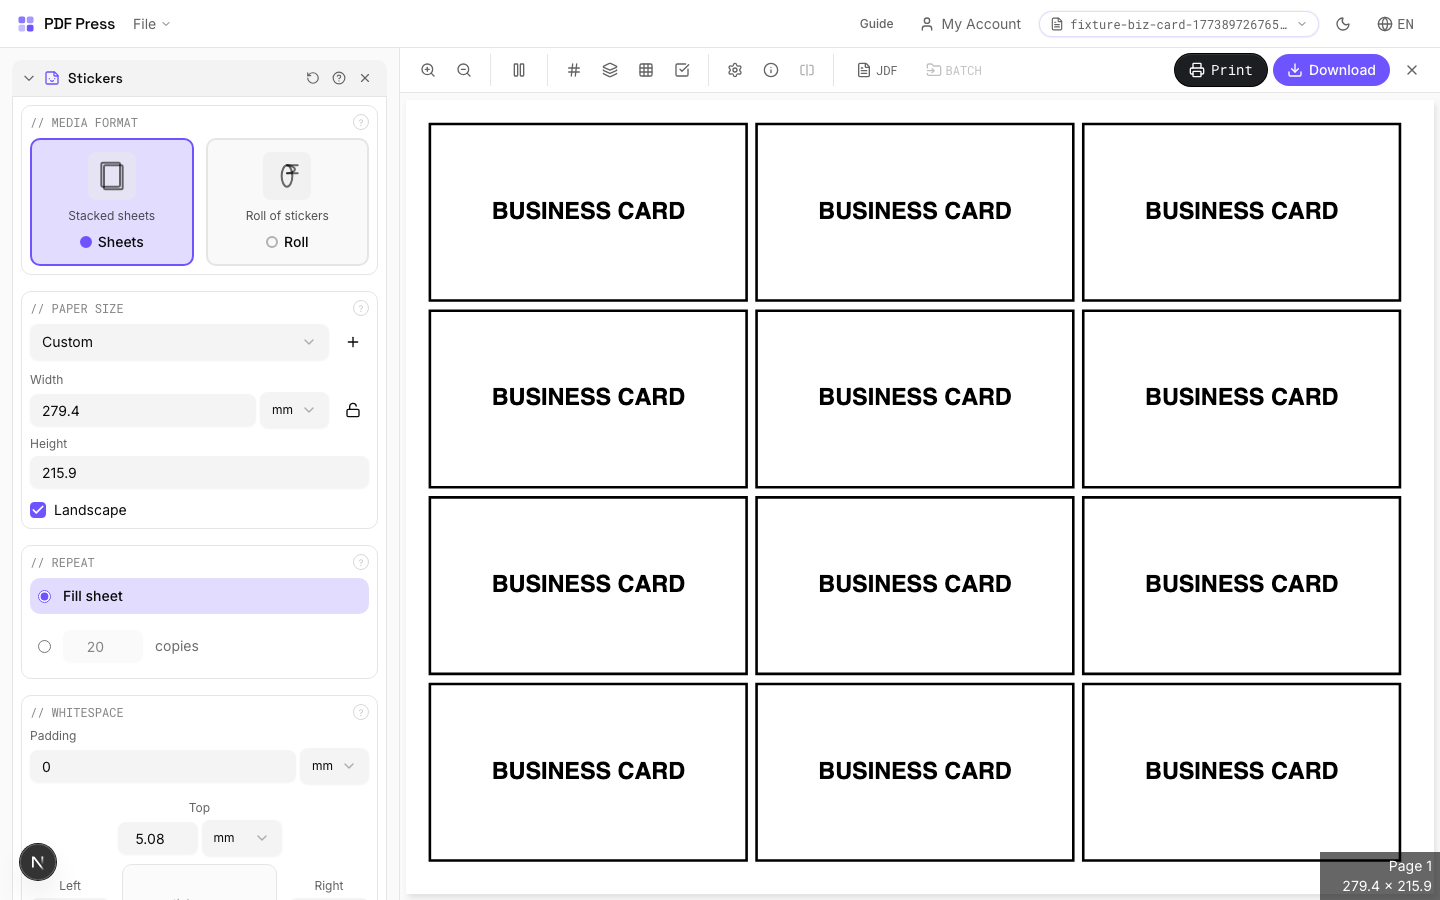
Stickers
3 recipesPacks irregularly-shaped artwork onto sheets or rolls with minimal waste using true shape nesting.
Unlike grid layouts that use rectangular bounding boxes, nesting analyzes the actual shape outline via transparency detection and packs items into each other's negative space. Supports multiple rotation angles for tighter fits. Processing time scales with rotation count, pixel density, and page count.
How It Works
Unlike grid layouts that use rectangular bounding boxes, nesting analyzes the actual shape outline via transparency detection and packs items into each other's negative space. Supports multiple rotation angles for tighter fits. Processing time scales with rotation count, pixel density, and page count.
Stickers tool applied. Options panel on the left, imposed result on the right. Click to zoom.
Options Guide
Media Format
Choose between fixed-size sheets or continuous roll media.
Sheets: standard rectangular paper with fixed width and height — the engine packs items onto as many sheets as needed. Roll: continuous roll where width is fixed but length is variable — the engine calculates the minimum roll length. Use roll mode for vinyl cutters, label rolls, and wide-format printers with roll feed.
Paper Size
Sets the output sheet dimensions. This is the physical paper going through your printer or press.
Standard presets: Letter (8.5×11in), Legal (8.5×14in), Tabloid (11×17in), A4 (210×297mm), A3 (297×420mm). Landscape swaps width↔height. Lock icon links dimensions to preserve aspect ratio. Custom lets you enter any size in inches, mm, or points (1in = 72pt = 25.4mm).
Repeat
How many copies of each design to nest onto the output — or fill the entire sheet.
'Fill sheet': automatically calculates how many copies fit on one sheet and fills it completely. 'Copy count': specify an exact number of copies. Higher copy counts give the nesting algorithm more items to work with, which often produces tighter packing since it can rotate and offset copies to fill gaps. Default: fill sheet with 20 copies.
Whitespace
Padding between nested items and margins from sheet edges.
Item padding: minimum gap between adjacent stickers — accounts for cut tolerance. Typical: 2–4mm for kiss-cut, 0–1mm for thru-cut with precise cutters. Sheet margins: keep items away from the sheet edge. Typical: 5–10mm for sheet-fed, 2–3mm for roll.
Nesting
Rotation angles, pixel density, and packing strategy for the nesting algorithm.
Rotations: how many angles the engine tries per item. 4 (default): tests 0°/90°/180°/270°. 8: adds 45° angles. Higher values = tighter packing but exponentially slower. Pixel density: controls shape detection resolution. 1 (default) is suitable for most work. Increase to 2–4 for very small or highly detailed shapes where sub-point accuracy matters.
Expert Tip
Set padding between items to at least 2 mm to give the plotter or laser cutter room to track. Allow rotation for irregular shapes so the nesting algorithm can maximise sheet yield.
If no items fit on the sheet, you get an empty output. Either increase the sheet dimensions or reduce the sticker size and count.
Learn More
Used in Recipes
Sticker Sheets
Full sticker sheets with kiss-cut contours for peel-and-stick application.
Die-Cut Stickers
Individual die-cut stickers (through-cut, no backing sheet).
Vinyl Stickers
Outdoor-rated vinyl stickers with laminate overprint and contour cut.
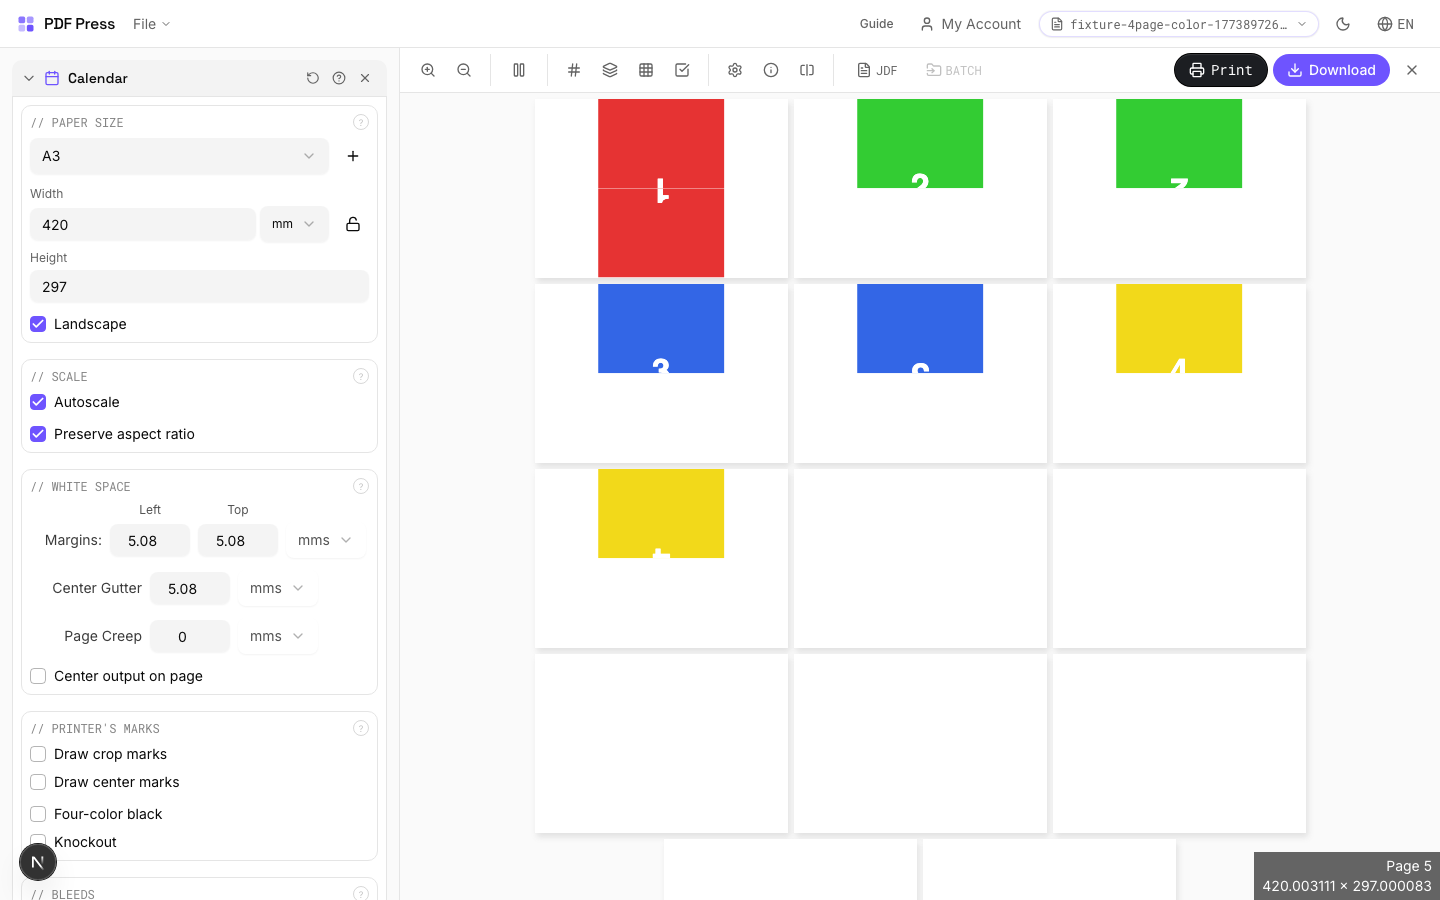
Calendar
2 recipesCreates print-ready calendar layouts with front/back page pairing for wall or desk calendars.
Pairs consecutive pages for calendar production: typically an image on one side and a calendar grid on the other. Supports full-sheet (one image per page) and half-sheet (two items per page) layouts. Automatic back-cover rotation ensures correct orientation when hanging.
How It Works
Pairs consecutive pages for calendar production: typically an image on one side and a calendar grid on the other. Supports full-sheet (one image per page) and half-sheet (two items per page) layouts. Automatic back-cover rotation ensures correct orientation when hanging.
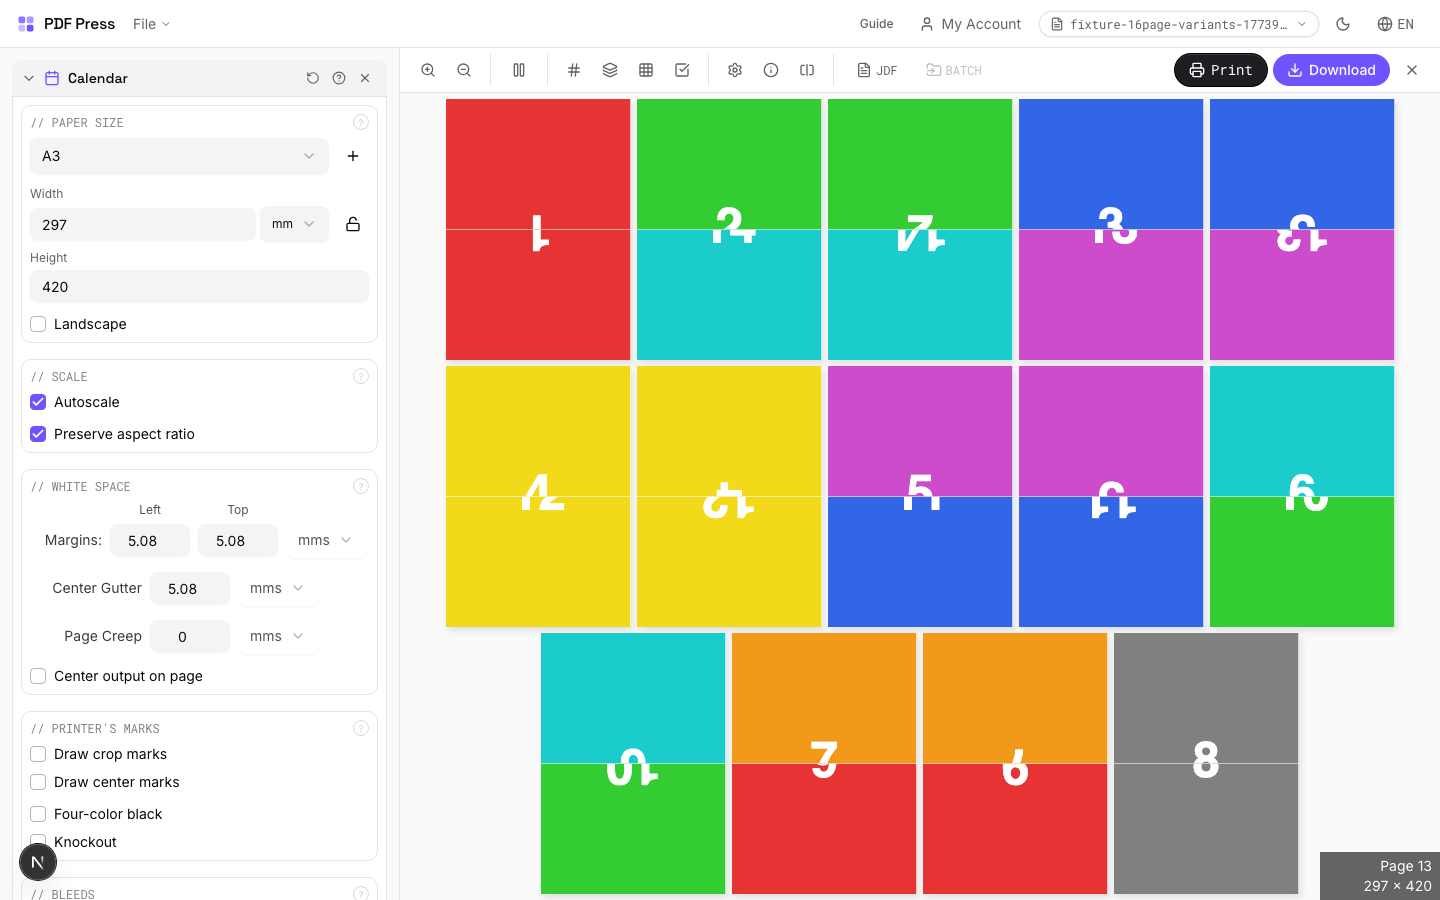
Calendar tool applied. Options panel on the left, imposed result on the right. Click to zoom.
Options Guide
Paper Size
Sets the output sheet dimensions. This is the physical paper going through your printer or press.
Standard presets: Letter (8.5×11in), Legal (8.5×14in), Tabloid (11×17in), A4 (210×297mm), A3 (297×420mm). Landscape swaps width↔height. Lock icon links dimensions to preserve aspect ratio. Custom lets you enter any size in inches, mm, or points (1in = 72pt = 25.4mm).
Scale
Controls whether pages are resized to fit the available cell in the grid.
Autoscale ON: pages are shrunk or enlarged to fill each cell. OFF: pages are placed at their original size (may overflow or leave empty space). 'Preserve aspect ratio' prevents stretching. Pages scale uniformly and are centered, so they may not fill the cell completely in one direction.
Printer's Marks
Adds trim guides and alignment marks outside the live area for accurate cutting and registration.
Crop marks: short lines at each corner showing where to trim. Center marks: crosshairs at sheet midpoints for front/back alignment on duplex jobs. Line length (default 0.43in/31pt): how long each mark line extends. Line thickness (default 0.014in/1pt): mark stroke weight. Line distance (default 0.139in/10pt): gap between the mark and the artwork edge. Four-color black: prints marks in C+M+Y+K for visibility on color proofs. Knockout: adds a white halo around marks so they show on dark backgrounds.
Bleeds
Extends artwork beyond the trim edge to prevent white strips after cutting.
Three modes: 'No bleeds' trims exactly at the page boundary. 'Pull from document' uses bleed info already embedded in the PDF (TrimBox/BleedBox metadata). 'Fixed' lets you manually set bleed on each side, typically 3mm (0.125in / 9pt) for commercial print, 1-2mm for digital. Bleed values define how far past the trim edge the artwork extends.
White Space
Controls margins around the sheet edges and gutters between items in the grid.
Left margin = space from the left sheet edge to the first column. Top margin = space from the top edge to the first row. Horizontal gutter = gap between columns. Vertical gutter = gap between rows. All values are in your selected unit (inches/mm/points). 'Center output on page' distributes leftover space evenly instead of anchoring content to the top-left corner.
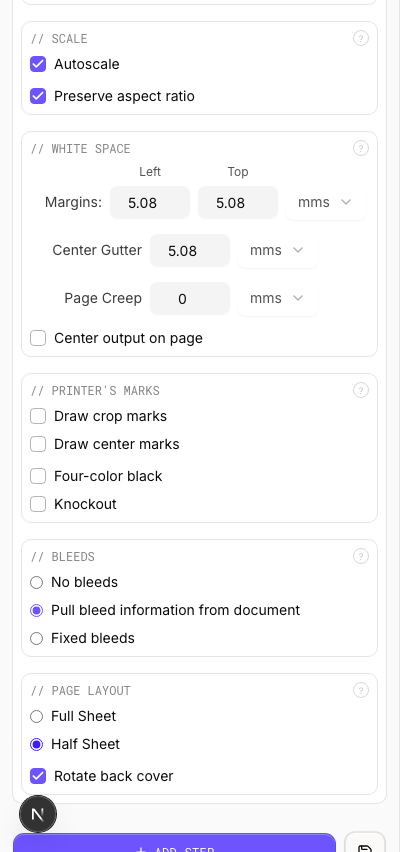
Page Layout
Choose the page pairing style and orientation settings.
Full sheet uses one page per printed side. Half sheet places two pages per side (top and bottom). Rotate back cover flips the reverse side 180° so the calendar hangs correctly when the top is bound.
Configurations & Variations
Landscape Calendar
Tick Landscape for a horizontal output. This is the standard wall calendar orientation where the photo sits above the month grid. The output sheet is wider than tall, with the fold at the top binding edge.
Settings to change
Full app view

Output result
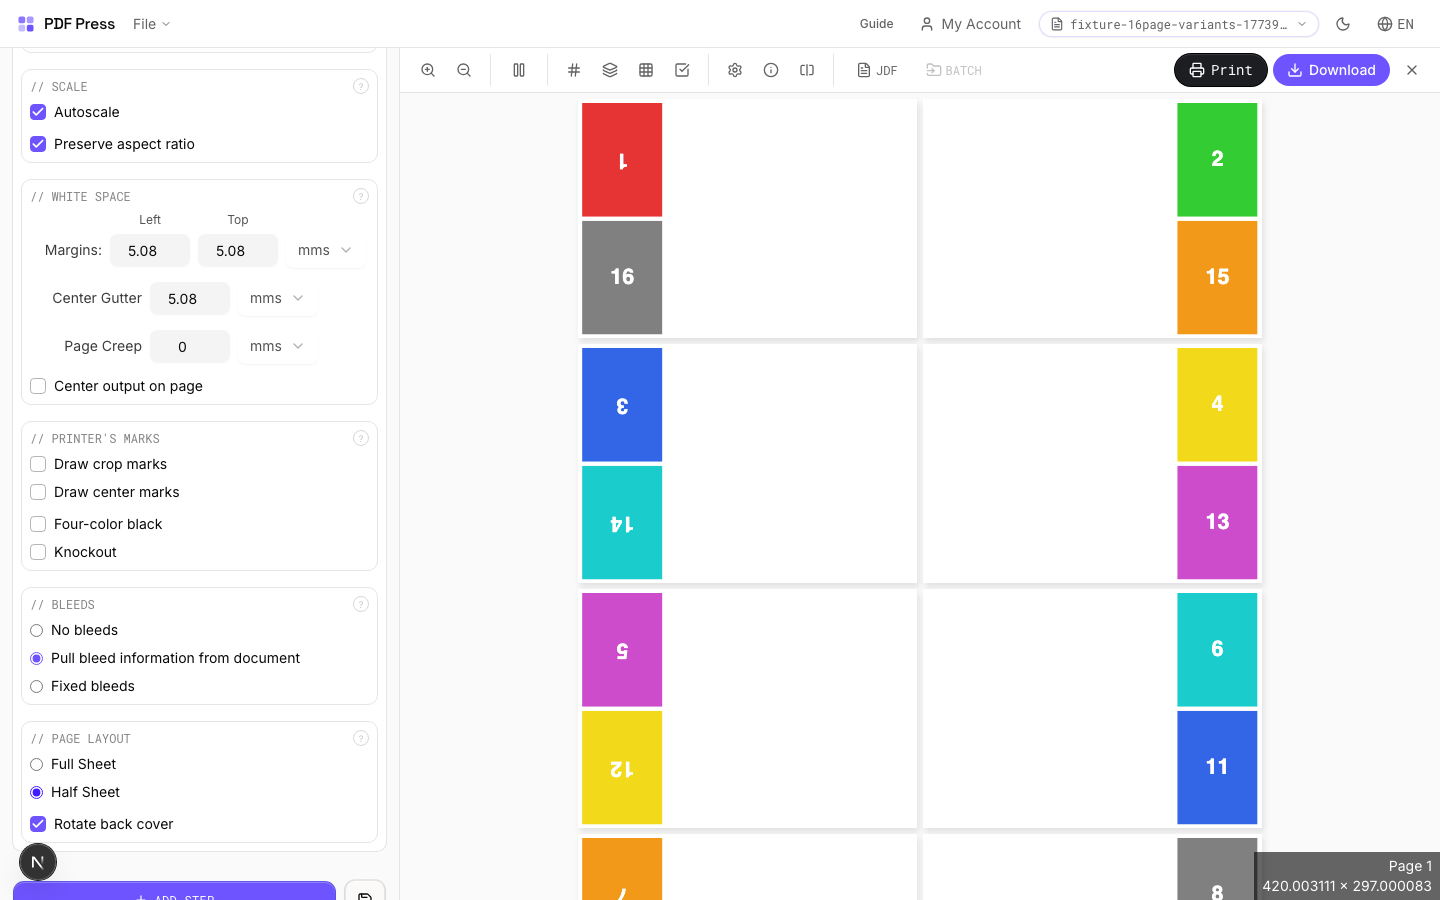
Half Sheet Layout
Select Half sheet to combine two source pages per side of the output. The upper half carries the image or content, the lower half carries the month grid, and you fold in the middle. Cuts paper use in half compared to printing each page separately.
Settings to change
Full app view

Output result
Expert Tip
Set the start month and year to match your production schedule, not the cover date. Wall calendars should be landscape; desk tent calendars should be portrait.
The source PDF must have exactly 13 pages (cover plus 12 months). Anything else will throw off the binding and pagination.
Learn More
Used in Recipes
Wall Calendar
12-month wall calendar with saddle-stitch or wire-o binding.
Desk Calendar
Desk tent calendar with fold-and-stand construction.
Insert Pages
Inserts pages from another PDF at specified positions: interleave blanks, dividers, or slip sheets.
Upload a secondary PDF and specify where its pages should be inserted into your document. Use repeat insertion to add a page at regular intervals (e.g., a divider every 10 pages). Useful for adding blank pages for duplex, interleaving carbon copies, or inserting chapter dividers.
How It Works
Upload a secondary PDF and specify where its pages should be inserted into your document. Use repeat insertion to add a page at regular intervals (e.g., a divider every 10 pages). Useful for adding blank pages for duplex, interleaving carbon copies, or inserting chapter dividers.
Insert Pages tool applied. Options panel on the left, imposed result on the right. Click to zoom.
Options Guide
Source File
Upload the PDF whose pages will be inserted into the main document.
Position
Set the page number before which the inserted pages appear.
Page 1 places the insert at the very beginning of the document. Higher numbers position the insert further into the document.
Repeat
Insert the page at regular intervals throughout the document.
When enabled, the source pages are inserted before the specified page and then again after every N pages. Useful for recurring dividers, slip sheets between signatures, or regular blank page insertion for duplex alignment.
Expert Tip
Insert Pages adds separator sheets, blank backs for duplex jobs, or tip-in cards at fixed intervals. Set the repeat interval to insert at every Nth page for consistent placement.
Inserted pages shift all subsequent page numbers. Update your table of contents or index references after insertion.
Mix
1 recipeInterleaves pages from two documents: combine front and back sides from a duplex scan.
Takes pages from the main document and a second uploaded PDF and weaves them together in alternating order. The classic use case: you scan all front sides, then all back sides, and Mix reassembles them into the correct page order.
How It Works
Takes pages from the main document and a second uploaded PDF and weaves them together in alternating order. The classic use case: you scan all front sides, then all back sides, and Mix reassembles them into the correct page order.
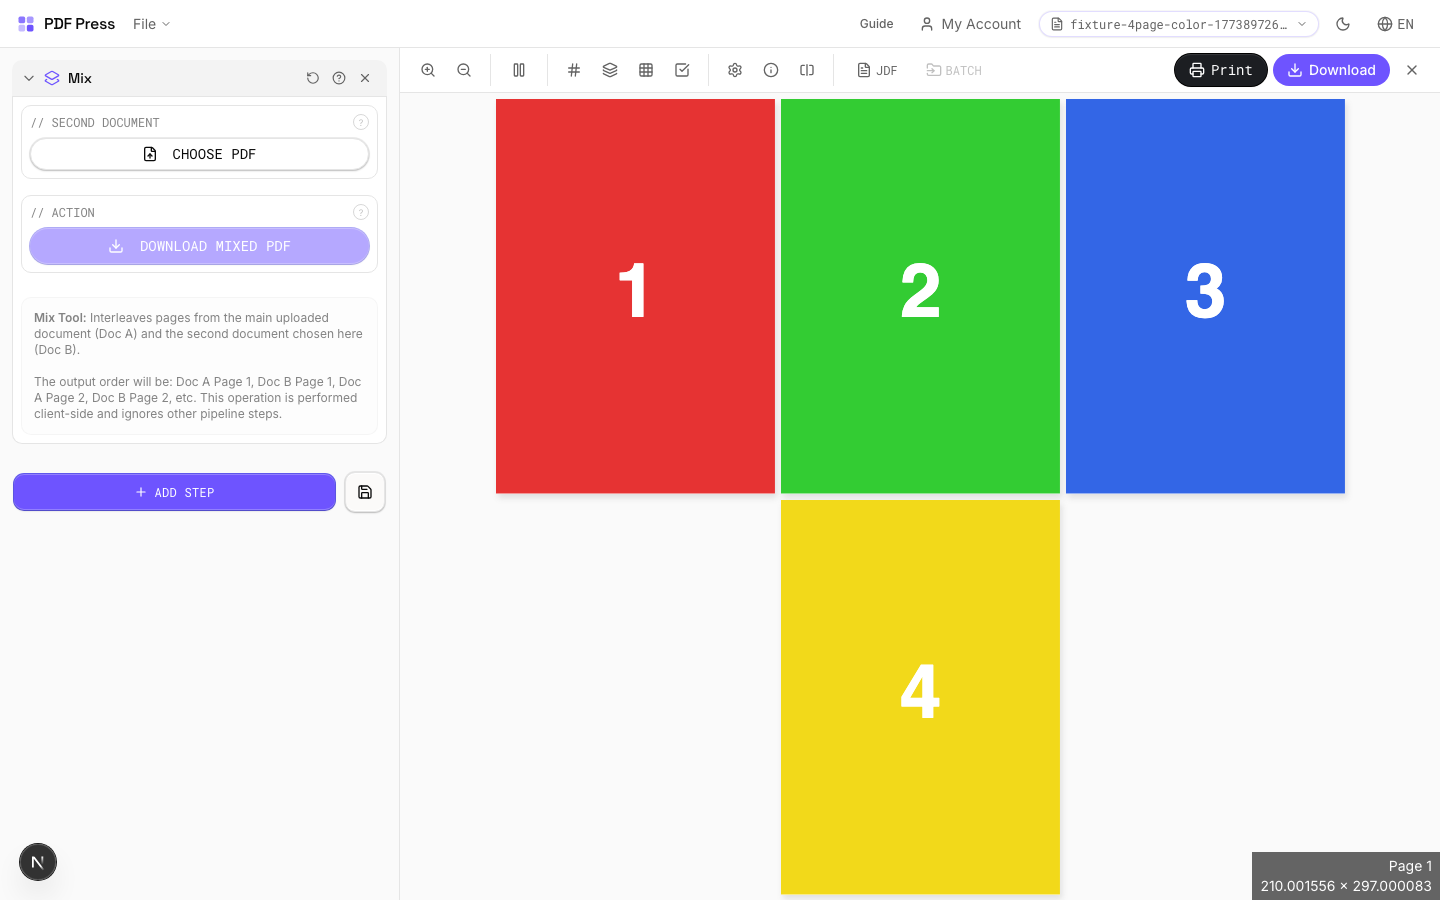
Mix tool applied. Options panel on the left, imposed result on the right. Click to zoom.
Options Guide
Second Document
Upload the second PDF to interleave with the main document.
The output alternates pages: main page 1, second page 1, main page 2, second page 2, and so on. If one document has more pages, the remaining pages are appended at the end.
Action
Download the mixed result as a single PDF file.
Expert Tip
Mix interleaves pages from two PDFs. The standard pattern (ABAB) creates duplex-ready output from separate front and back files.
Both source files must have the same page count for 1:1 interleaving. If the counts differ, excess pages from the longer file are appended at the end.
Learn More
Used in Recipes
Duplex Interleave
Interleave separate front and back files for duplex printing.
Slugline
2 recipesAdds job identification text in the slug area outside the trim edge: essential information for press operators and bindery.
Sluglines carry production metadata: job number, plate color, date, operator name, and instructions: printed outside the trim boundary where it's visible during production but removed after cutting. Supports dynamic variables that auto-fill with document properties. Standard practice in commercial printing to prevent mix-ups between jobs on the press floor.
How It Works
Sluglines carry production metadata: job number, plate color, date, operator name, and instructions: printed outside the trim boundary where it's visible during production but removed after cutting. Supports dynamic variables that auto-fill with document properties. Standard practice in commercial printing to prevent mix-ups between jobs on the press floor.

Slugline tool applied. Options panel on the left, imposed result on the right. Click to zoom.
Options Guide
Presets
Quick-start templates for common slugline formats: press sheet, job ticket, color proof, bindery, and more.
Each preset populates the template and job info fields with industry-standard slugline content. Customize further after selecting. Press preset includes job name, color, date; Bindery preset adds fold/bind instructions; Color proof preset includes proof number and approval fields.
Template
Compose the slug text using free text and dynamic variable tokens that auto-fill at output time.
Available tokens: [file-name] (source filename), [page-number] (current page), [page-count] (total pages), [sheet-number] (sheet index), [timestamp] (date/time). Combine freely: "Job: [file-name]:Sheet [sheet-number] of [sheet-count]:[timestamp:%Y-%m-%d]". Click variable buttons to insert tokens at the cursor position.
Job Info
Structured fields for common production details: job number, client, color, operator.
Fill in the fields relevant to your production workflow. These values are inserted into the template where the corresponding variables appear. Leave unused fields empty: they won't appear in the output. Job number and client name are the most commonly used fields in commercial print workflows.
Placement
Position the slugline along a page edge: typically the bottom or left side, outside the trim area.
Choose which edge of the page receives the slugline. The text is placed in the slug area beyond the bleed boundary, ensuring it's visible on the press sheet but trimmed away in the finished product. Left or bottom edges are most common. Rotation allows vertical text along side edges.
Appearance
Configure font, size, color, and style of the slugline text.
Standard PDF fonts are available (Helvetica, Times, Courier families). Size: 6–8pt is typical for sluglines: small enough not to waste paper but legible for press operators. Color: light gray (#999999) or process black for visibility without being obtrusive. Some shops prefer color-coded sluglines (cyan for job info, magenta for bindery notes).
Pages
Specify which pages to process using a range expression.
Examples: 'all' = every page. '1-5' = pages 1 through 5. '1,3,5' = specific pages. '1-10 odd' = odd pages 1-9. '2-20 even' = even pages 2-20. 'last' = last page. 'last-2' = third from last. Ranges are 1-based. Combine with commas: '1-5, 8, 12-15'.
Preview
Live rendering showing the slugline with sample values filled in, positioned on the page.
Configurations & Variations
Full Job Info Slugline
Enter full job identification in the template field. Example: Job #1234 / Heidelberg SM74 / 2026-03-19 / Plate: CMYK. This text prints in the slug area outside the trim zone and is the press operator's primary reference for identifying the job on the press floor.
Settings to change

Full app view

Output result
Expert Tip
Put the job number, version, and date in the slug area. When proofs pile up on the press floor, the slugline is the only reliable way to identify which file version you are looking at.
Some RIPs clip content outside the MediaBox. Make sure sluglines fall inside the bleed or slug box, not beyond it.
Used in Recipes
Full Press Marks
Complete press mark set for commercial offset production.
Gang Run with Full Marks
Ganged production sheet with complete finishing marks for commercial press.
Folding Marks
5 recipesAdds fold guide lines to pages: thin printed rules showing where to score and fold the sheet.
Folding marks are short dashed or solid lines printed at the sheet edge, indicating fold positions for bindery and finishing equipment. Essential for brochures, mailers, greeting cards, packaging, and any multi-panel product. Supports standard fold patterns (half, tri-fold, Z-fold, gate fold, accordion) and custom fold positions for non-standard layouts.
How It Works
Folding marks are short dashed or solid lines printed at the sheet edge, indicating fold positions for bindery and finishing equipment. Essential for brochures, mailers, greeting cards, packaging, and any multi-panel product. Supports standard fold patterns (half, tri-fold, Z-fold, gate fold, accordion) and custom fold positions for non-standard layouts.
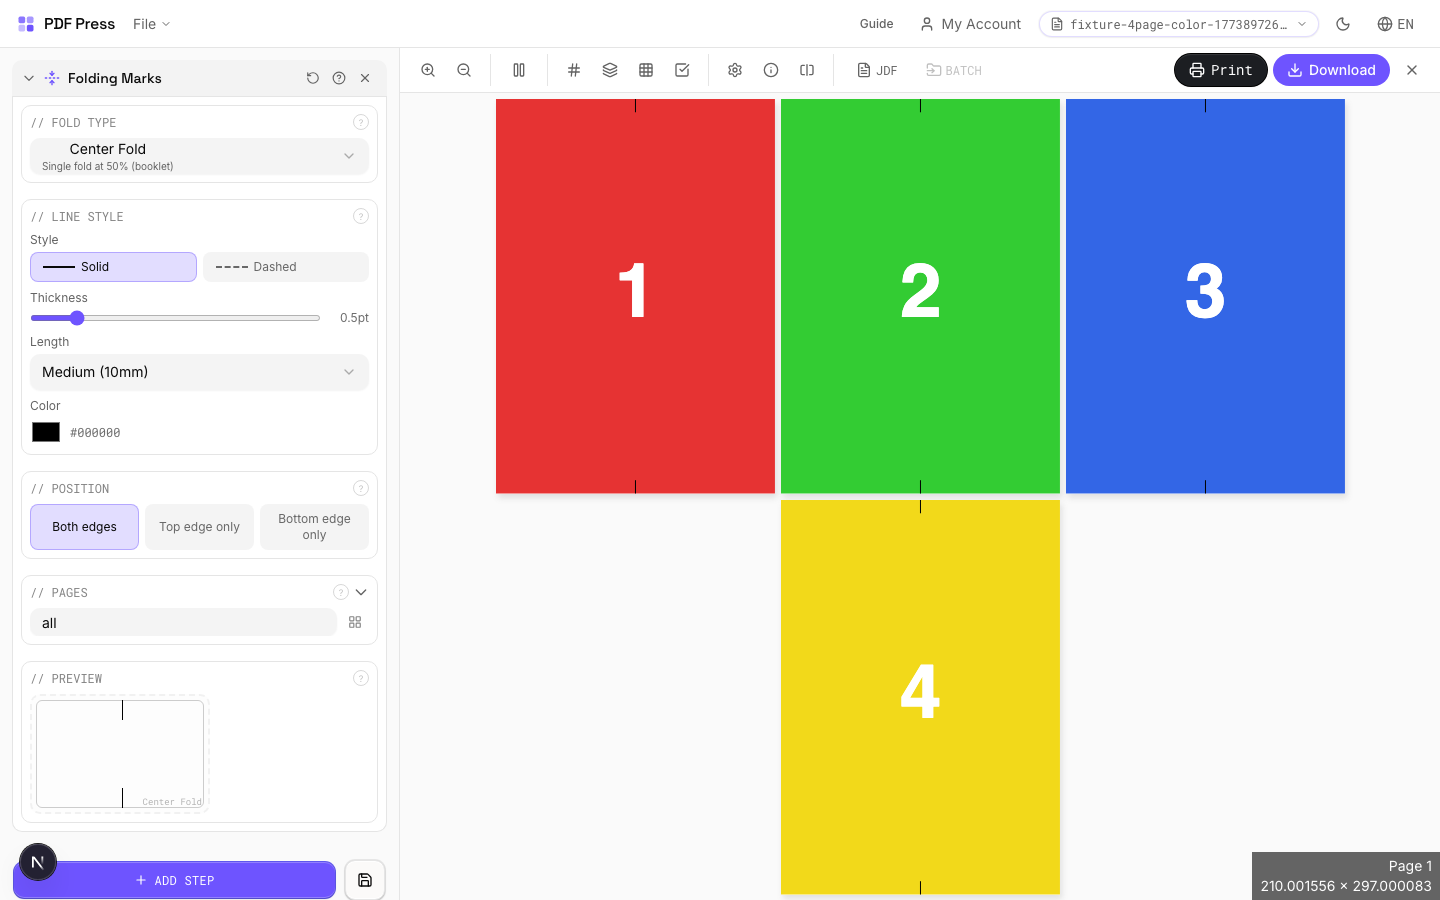
Folding Marks tool applied. Options panel on the left, imposed result on the right. Click to zoom.
Options Guide
Fold Type
Choose a standard fold pattern or enter custom fold positions.
Half fold: one fold at center (2 panels). Tri-fold (letter fold): two folds creating 3 panels: inside panel is slightly narrower to nest cleanly. Z-fold (accordion): two parallel folds with panels alternating direction. Gate fold: two folds bringing outer edges to center. Roll fold: panels fold inward sequentially. Custom: enter exact fold positions in your preferred unit for non-standard layouts.
Fold Positions
Enter custom fold positions as distances from the left or top edge.
Each position represents a fold line measured from the leading edge of the sheet. Enter multiple positions separated by commas. Values are in your selected unit (inches/mm/points). Example: for a custom tri-fold on Letter paper, enter "3.667, 7.333" (in inches) for equal panels.
Line Style
Configure the appearance of fold mark lines: style, weight, length, and color.
Solid lines are most visible; dashed lines (standard in commercial print) distinguish fold marks from crop marks at a glance. Line weight: 0.25–0.5pt is typical: thin enough to be unobtrusive but visible to finishing operators. Line length: how far the mark extends from the sheet edge into the margin area. Color: typically light gray or cyan to differentiate from trim marks.
Position
Which edges of the page receive fold marks: top, bottom, or both.
Both edges is standard: marks at top and bottom of the sheet let the finishing operator align the fold from either direction. Top-only or bottom-only can be used when one edge has artwork extending to the sheet edge.
Pages
Specify which pages to process using a range expression.
Examples: 'all' = every page. '1-5' = pages 1 through 5. '1,3,5' = specific pages. '1-10 odd' = odd pages 1-9. '2-20 even' = even pages 2-20. 'last' = last page. 'last-2' = third from last. Ranges are 1-based. Combine with commas: '1-5, 8, 12-15'.
Preview
Live rendering showing fold mark positions and appearance on the page.
Configurations & Variations
Fold Marks Applied
Fold marks appear as dashed or solid lines at each fold position, extending slightly past the trim edge. The bindery operator uses these to set up the buckle or knife folder. Mark length and thickness are configurable; use heavier marks for thicker stocks that are harder to fold precisely.
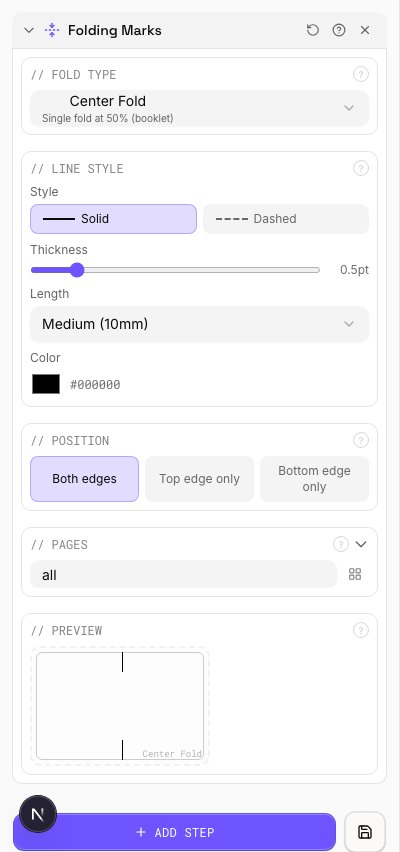
Settings to change

Full app view

Output result
Expert Tip
Place fold marks at every fold position. For a tri-fold brochure, remember the inside panel is typically 1-2 mm shorter than the outer panels, so adjust your fold mark positions to match.
Fold marks that extend into the live area will be visible on the finished piece. Keep them strictly in the bleed or trim zone.
Learn More
Used in Recipes
Zine / Mini Booklet
Small-format DIY zine from a single sheet of paper (8-page or 16-page fold).
Greeting Cards
Folded greeting cards imposed for duplex printing and fold finishing.
Saddle-Stitch Finishing Marks
Finishing marks specifically for saddle-stitch bindery operations.
Desk Calendar
Desk tent calendar with fold-and-stand construction.
Restaurant Menu
Folded restaurant menu (bi-fold, tri-fold, or booklet).
Registration Marks
9 recipesAdds precision alignment targets for multi-color plate registration: ensures each ink layer prints in perfect alignment.
Registration marks are placed outside the trim area and used by press operators to align color separation plates (CMYK and spot colors). Each plate prints through a different impression cylinder; misalignment between plates causes visible color fringing. Standard target marks, crosshairs, and bullseyes provide visual and measurement references for achieving tight registration on press.
How It Works
Registration marks are placed outside the trim area and used by press operators to align color separation plates (CMYK and spot colors). Each plate prints through a different impression cylinder; misalignment between plates causes visible color fringing. Standard target marks, crosshairs, and bullseyes provide visual and measurement references for achieving tight registration on press.

Registration Marks tool applied. Options panel on the left, imposed result on the right. Click to zoom.
Options Guide
Mark Style
Choose the registration mark design: standard target, crosshair, bullseye, or custom.
Standard target (concentric circles with crosshair): the universal registration mark recognized worldwide, compatible with all press equipment. Crosshair: simple plus-sign: lighter, takes less space, but provides less information about misregistration direction. Bullseye: concentric circles only: primarily decorative, rarely used in commercial production. Each style is printed in registration color (all plates), ensuring it appears identically on every separation.
Placement
Position marks along page edges: typically centered on each edge, outside the bleed area.
Standard placement: one mark centered on each of the four sheet edges. Marks should be positioned outside the bleed area but within the slug zone so they're visible on the press sheet. Distance from trim edge: typically 5–10mm (14–28pt). For large-format sheets, additional mid-span marks may improve registration accuracy.
Appearance
Configure mark size, line weight, and color.
Size: 5–10mm diameter is standard. Larger marks are easier to inspect but consume more slug space. Line weight: 0.25–0.5pt is typical: fine enough for precision but visible to the naked eye. Marks are always printed in registration color (all plates simultaneously), regardless of the color setting here: the color picker affects the on-screen preview appearance.
Pages
Specify which pages to process using a range expression.
Examples: 'all' = every page. '1-5' = pages 1 through 5. '1,3,5' = specific pages. '1-10 odd' = odd pages 1-9. '2-20 even' = even pages 2-20. 'last' = last page. 'last-2' = third from last. Ranges are 1-based. Combine with commas: '1-5, 8, 12-15'.
Preview
Live rendering showing mark positions and appearance on the page.
Configurations & Variations
Registration Marks Applied
Cross-hair registration targets appear at all four corners and at sheet midpoints. These targets print on all color separations (C, M, Y, K plus any spot colors) so the press operator can verify plate-to-plate alignment. Misaligned targets mean the plates need adjustment before the production run starts.
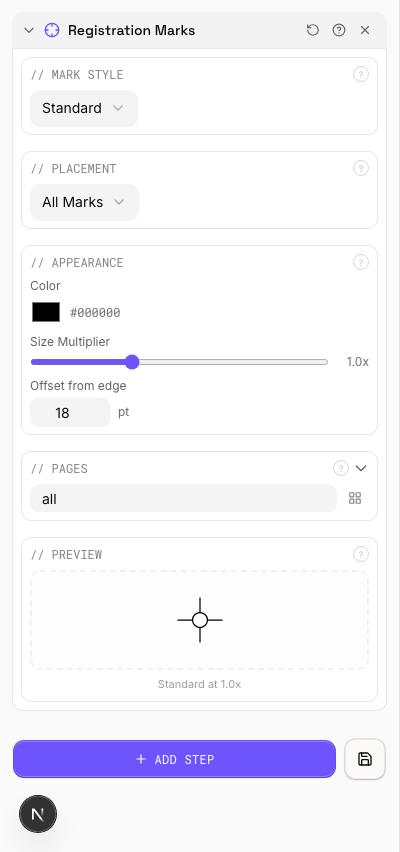
Settings to change
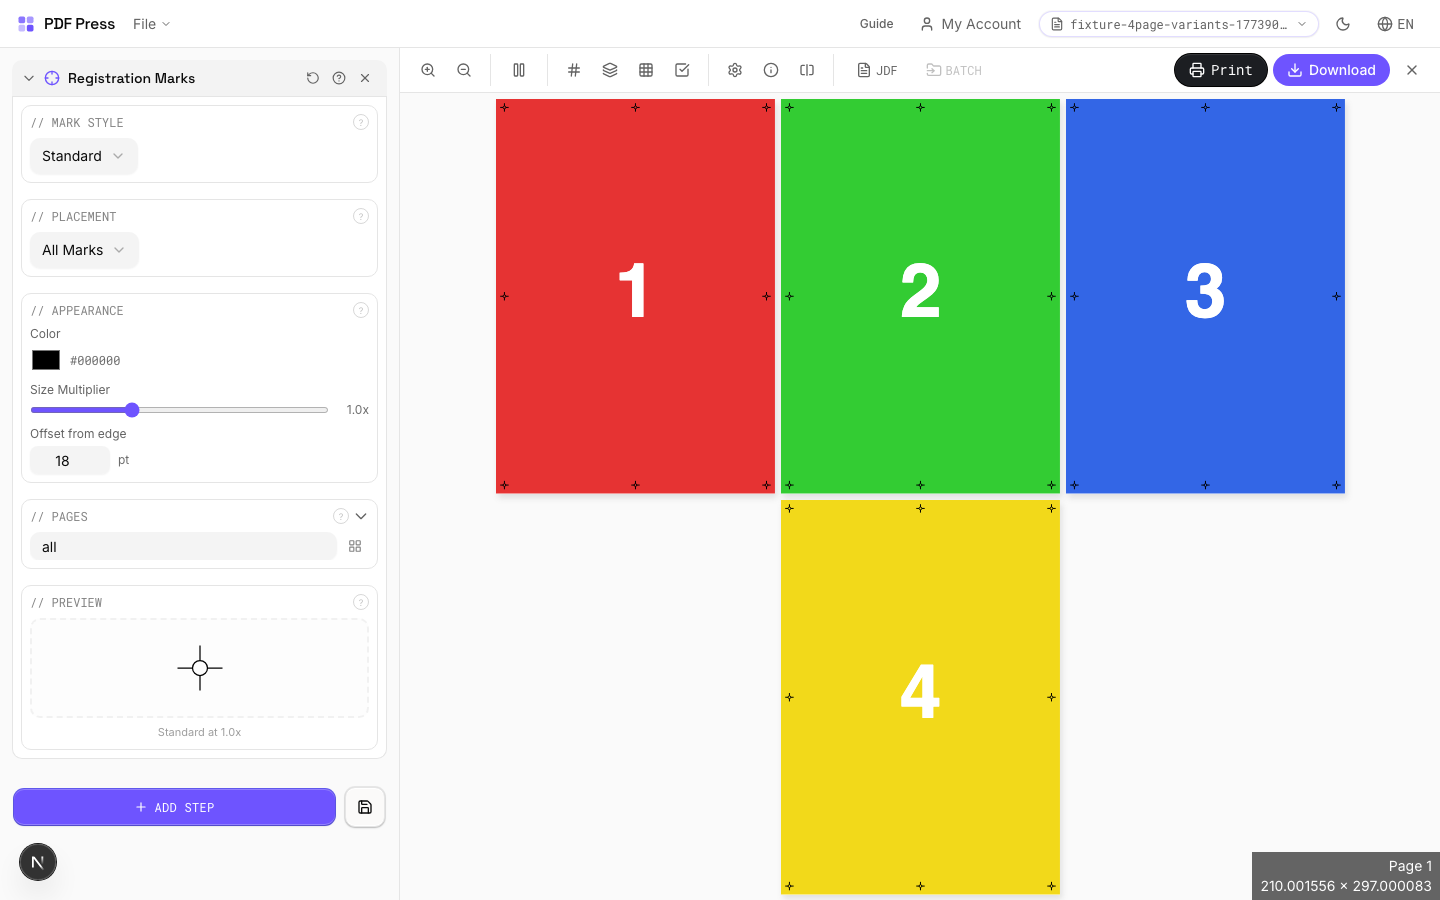
Full app view

Output result
Expert Tip
Place at least three registration targets: two on opposite edges for angle correction and one for position. This gives the press operator enough information to align all colour separations.
Registration marks print on all separations at 100%. Placing them in a high-coverage area will cause ink buildup.
Learn More
Used in Recipes
Playing Cards
Full deck of playing cards imposed for sheet-fed printing.
Sticker Sheets
Full sticker sheets with kiss-cut contours for peel-and-stick application.
Vinyl Stickers
Outdoor-rated vinyl stickers with laminate overprint and contour cut.
Sleeve / Band
Shrink sleeves or belly bands for product packaging.
Floor Graphics
Floor decals and wayfinding graphics with contour cutting.
Full Press Marks
Complete press mark set for commercial offset production.
Offset Press Ready
Full offset press preparation with all required finishing marks.
Die-Cut Production Marks
Complete die-cutting mark set for labels, stickers, and packaging.
Expert Grid with Finishing
Custom Expert Grid imposition with full finishing marks.
Collating Marks
4 recipesAdds staggered spine marks on folded signatures: a visual sequence check for correct gathering order.
After printing and folding, book signatures are gathered (collated) in sequence on the bindery line. Each signature gets a small black mark on the spine at a progressively offset position. When signatures are stacked correctly, the marks form a neat staircase pattern down the spine. A missing step or duplicate position instantly reveals a misplaced or missing signature: a critical quality control measure in book production.
How It Works
After printing and folding, book signatures are gathered (collated) in sequence on the bindery line. Each signature gets a small black mark on the spine at a progressively offset position. When signatures are stacked correctly, the marks form a neat staircase pattern down the spine. A missing step or duplicate position instantly reveals a misplaced or missing signature: a critical quality control measure in book production.

Collating Marks tool applied. Options panel on the left, imposed result on the right. Click to zoom.
Options Guide
Placement
Position the collating marks along the spine edge of each signature.
Marks are placed on the spine (binding edge) of each folded signature. The starting position defines where the first signature's mark appears. Each subsequent signature's mark is offset downward by a fixed increment, creating the staircase pattern. After all positions are used, the sequence resets (wraps) and repeats in a different color or style to distinguish the second pass.
Mark Size
Set the width and height of each collating mark rectangle.
Width: how far the mark extends from the spine edge: typically 3–5mm (enough to be visible on a gathered book block). Height: the vertical extent: typically 3–5mm. Marks must be large enough to spot at a glance on the bindery line but small enough that they don't encroach on the cover wrap or trim area. Offset increment: the vertical distance between successive marks: usually equal to the mark height.
Signatures
Define the number of signatures and pages per signature in your book.
Total signatures: how many folded sections make up the book. Pages per signature: typically 16 or 32 for commercial offset (4 or 8 sheets). The engine calculates mark positions based on these values. When the staircase reaches the bottom of the spine, it wraps back to the top: the second pass uses a contrasting appearance to remain distinguishable.
Appearance
Configure mark color, opacity, and wrap behavior.
Primary color: solid black is standard for maximum visibility against the paper edge. After the staircase wraps, alternating colors (e.g., black then cyan) help distinguish cycles. Opacity at 100% ensures marks are clearly visible during high-speed bindery operation.
Pages
Specify which pages to process using a range expression.
Examples: 'all' = every page. '1-5' = pages 1 through 5. '1,3,5' = specific pages. '1-10 odd' = odd pages 1-9. '2-20 even' = even pages 2-20. 'last' = last page. 'last-2' = third from last. Ranges are 1-based. Combine with commas: '1-5, 8, 12-15'.
Preview
Live rendering showing the staircase pattern of collating marks along the spine.
Configurations & Variations
Collating Marks Applied
Stair-step spine marks appear on each signature, shifting position progressively. When signatures are gathered in the correct order, the marks form a visible diagonal staircase on the spine edge. A break in the pattern instantly reveals a missing or duplicated signature.
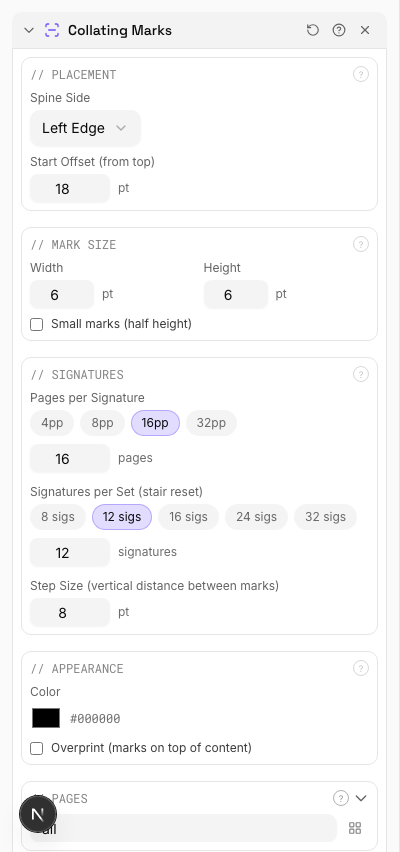
Settings to change
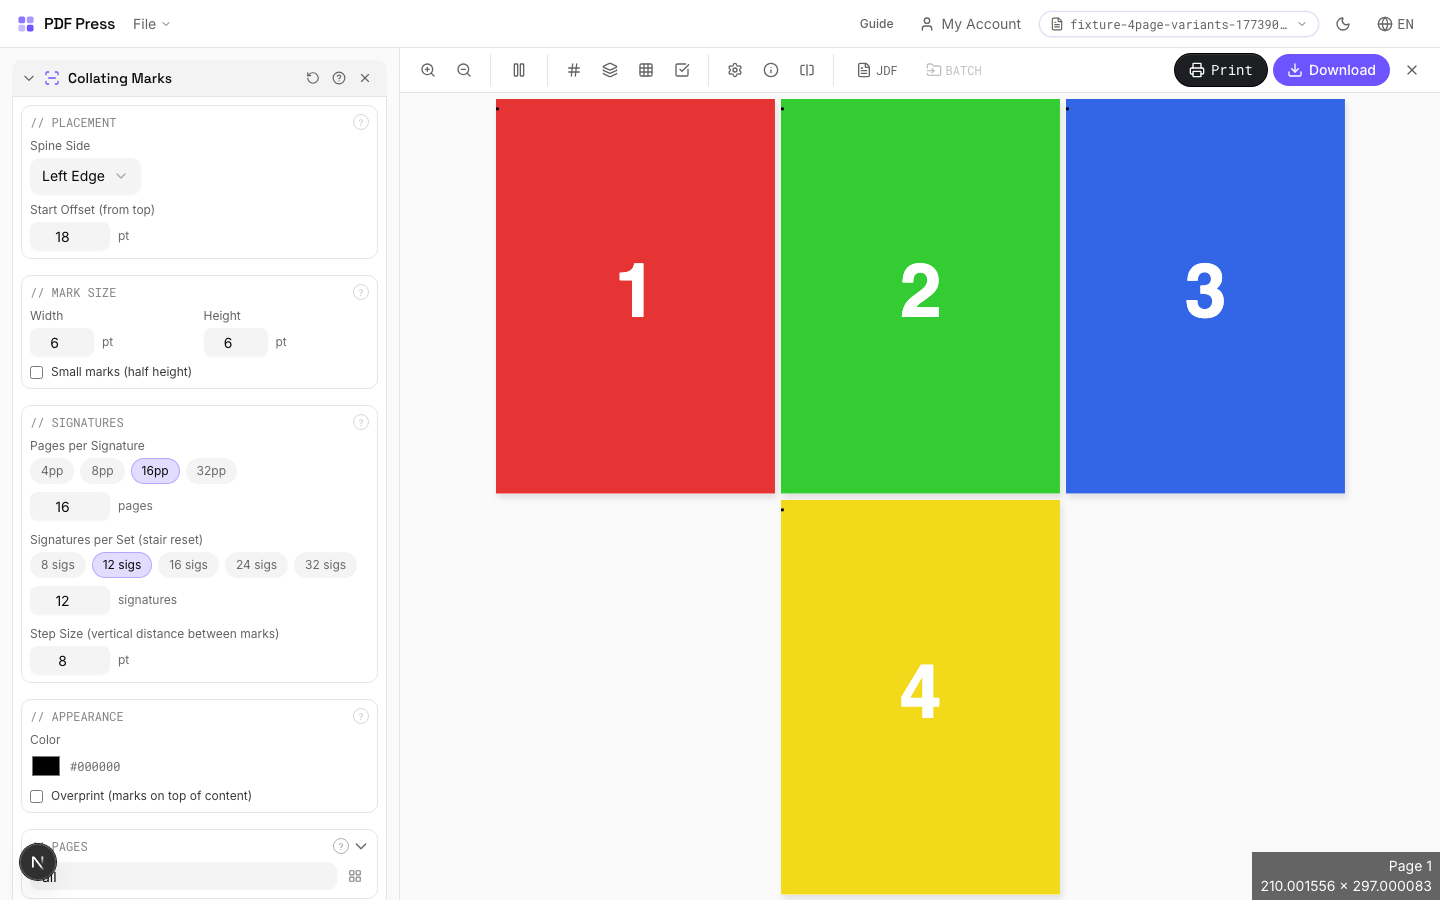
Full app view

Output result
Expert Tip
Stair-step spine marks let the bindery confirm correct gathering order at a glance. The marks should increment consistently across signatures so any break in the staircase pattern is immediately obvious.
If any signature is out of order, the staircase pattern shows a visible break. Make sure the mark increment matches across the full book.
Learn More
Used in Recipes
Perfect-Bound Book
PUR/hot-melt perfect binding for books with 48+ pages.
Perfect-Bound with Color Bar
Perfect-bound book signatures with inline color bars for press density control.
Catalog Signatures
Multi-signature catalog for perfect binding on commercial presses.
Saddle-Stitch Finishing Marks
Finishing marks specifically for saddle-stitch bindery operations.
OMR Marks
1 recipeAdds optical machine-readable marks for automated finishing equipment: triggers fold, cut, collate, and stack operations.
OMR (Optical Mark Recognition) marks are printed along a sheet edge as a sequence of black bars that encode instructions for automated bindery equipment. As sheets pass through the machine at high speed, a sensor reads the mark pattern and triggers the correct finishing operation: fold, collate, trim, or divert. OMR patterns are manufacturer-specific and must match your bindery equipment's expected encoding.
How It Works
OMR (Optical Mark Recognition) marks are printed along a sheet edge as a sequence of black bars that encode instructions for automated bindery equipment. As sheets pass through the machine at high speed, a sensor reads the mark pattern and triggers the correct finishing operation: fold, collate, trim, or divert. OMR patterns are manufacturer-specific and must match your bindery equipment's expected encoding.

OMR Marks tool applied. Options panel on the left, imposed result on the right. Click to zoom.
Options Guide
Edge & Encoding
Select which sheet edge carries the OMR marks and which encoding standard to use.
Edge: choose left, right, top, or bottom: must match where your finishing machine's sensor reads. Most common: left edge for portrait sheets, top for landscape. Encoding: select the mark pattern standard matching your equipment. Common standards include: standard binary (most universal), Hunkeler, Müller Martini, Horizon, and Duplo. Each manufacturer expects a specific bar spacing, thickness, and interpretation scheme.
Program
Configure the operation sequence encoded in the OMR pattern: fold, collate, cut, stack signals.
Each mark position in the sequence encodes a specific instruction: start-of-set (beginning of a new finished product), collate (add this sheet to the current set), fold (trigger a fold operation), cut (trigger trimming), divert (send to a different output path). The program defines which operations fire at which sheet position in the production run. Match the program to your finishing equipment's setup.
Mark Size
Set the physical dimensions of each OMR bar: width, height, and spacing.
Bar width: typically 0.5–1mm: must be within your equipment sensor's detection range. Bar height (length of the printed bar): typically 5–10mm for reliable sensor reading. Spacing between bars: determined by the encoding standard. Consult your finishing equipment manual for exact specifications: incorrect dimensions will cause misreads or equipment errors.
Appearance
Configure mark color and print quality settings.
OMR marks must be solid black for reliable optical detection: colored or translucent marks will cause sensor failures. Mark density should be 100% (solid fill, no screening or halftone). Some equipment requires marks in a specific ink (e.g., process black K-only, not rich black) for consistent reflectance readings.
Pages
Specify which pages to process using a range expression.
Examples: 'all' = every page. '1-5' = pages 1 through 5. '1,3,5' = specific pages. '1-10 odd' = odd pages 1-9. '2-20 even' = even pages 2-20. 'last' = last page. 'last-2' = third from last. Ranges are 1-based. Combine with commas: '1-5, 8, 12-15'.
Configurations & Variations
OMR Marks Applied
Optical Mark Recognition marks are machine-readable bars positioned along the sheet edge. Automated finishing equipment (inserters, folders, trimmers) reads these marks to control processing without manual intervention. The mark pattern encodes job ID, sequence number, and processing instructions specific to your finishing line.
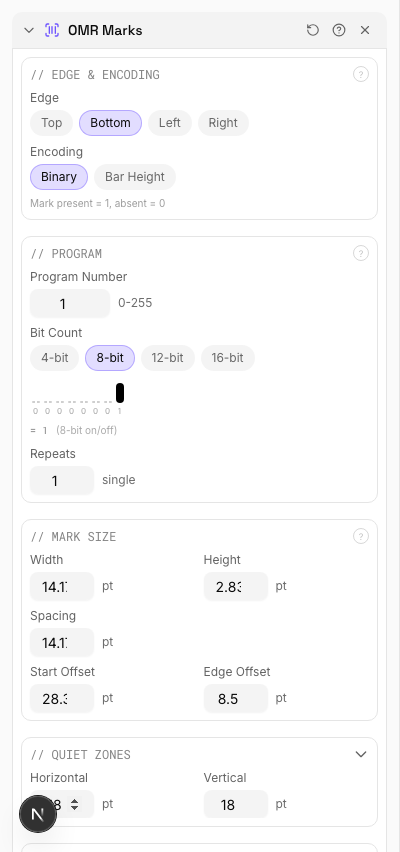
Settings to change

Full app view

Output result
Expert Tip
OMR (Optical Mark Recognition) marks drive automated inserting and finishing equipment. Match the mark pattern to your specific machine's protocol; most use a 3-channel system.
OMR marks are machine-specific. A pattern designed for one inserter model will not work on another. Confirm the spec with your finishing vendor before production.
Used in Recipes
Perfect Bind Finishing Marks
Finishing marks for perfect binding operations with gathering verification.
Gathering Marks
3 recipesAdds gripper-edge marks that verify correct sheet gathering order: a front-of-press quality check.
Gathering marks serve a similar purpose to collating marks but are positioned at the gripper edge (the leading edge that the press grippers grab) rather than the spine. After cutting and stacking, a progressive pattern of marks down the stack edge confirms sheets are in the correct sequence. Missing or duplicated marks indicate gathering errors before binding begins: catching problems early saves costly bindery rework.
How It Works
Gathering marks serve a similar purpose to collating marks but are positioned at the gripper edge (the leading edge that the press grippers grab) rather than the spine. After cutting and stacking, a progressive pattern of marks down the stack edge confirms sheets are in the correct sequence. Missing or duplicated marks indicate gathering errors before binding begins: catching problems early saves costly bindery rework.

Gathering Marks tool applied. Options panel on the left, imposed result on the right. Click to zoom.
Options Guide
Placement
Position gathering marks along the gripper edge: the leading edge of the press sheet.
Marks are placed along the gripper edge (typically the top or leading edge). Each successive sheet or signature gets a mark at a progressively offset position. The offset direction (left-to-right or top-to-bottom) creates a staircase or diagonal pattern when sheets are stacked. Distance from the sheet edge should clear the gripper zone: typically 10–15mm from the leading edge.
Mark Size
Set the width and height of each gathering mark.
Width and height should be large enough to see at a glance during production: typically 3–5mm. The offset increment between successive marks is usually equal to the mark width to create a clean staircase pattern. Marks must be positioned within the trim waste area so they're removed in the finished product.
Sections
Define the number of sections and sheets per section for the gathering sequence.
Total sections: how many distinct gathering groups make up the job. Sheets per section: how many sheets are in each gathered set. The mark pattern resets and changes appearance after completing one full sequence, allowing multiple books or sets to run consecutively on the same press sheet layout.
Appearance
Configure mark color, style, and visibility settings.
Solid black is standard for maximum contrast against paper. After the staircase pattern completes one cycle, the next cycle uses an alternate appearance (different color or hollow marks) to distinguish consecutive sequences. High-speed press operators need marks visible at arm's length: ensure adequate size and contrast.
Pages
Specify which pages to process using a range expression.
Examples: 'all' = every page. '1-5' = pages 1 through 5. '1,3,5' = specific pages. '1-10 odd' = odd pages 1-9. '2-20 even' = even pages 2-20. 'last' = last page. 'last-2' = third from last. Ranges are 1-based. Combine with commas: '1-5, 8, 12-15'.
Preview
Live rendering showing the gathering mark pattern across the press sheet.
Configurations & Variations
Gathering Marks Applied
Gripper-edge gathering marks confirm correct sheet sequence during saddle gathering. Each mark shifts by the paper thickness, creating a visible progression along the spine. If any mark is out of position, the wrong sheet was fed and the bindery operator catches it immediately.
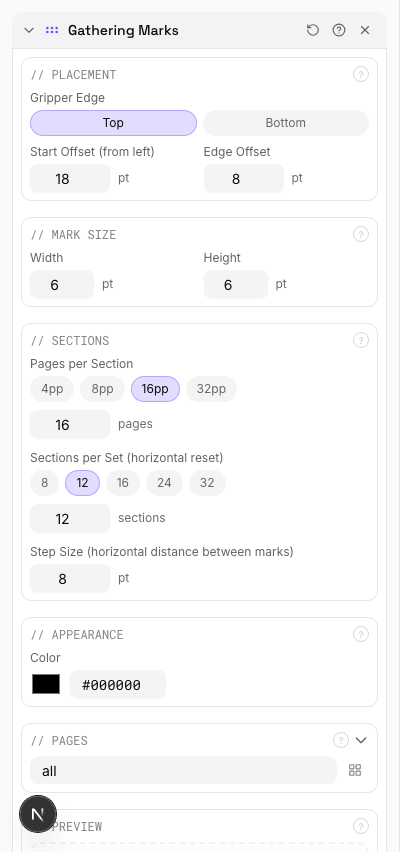
Settings to change
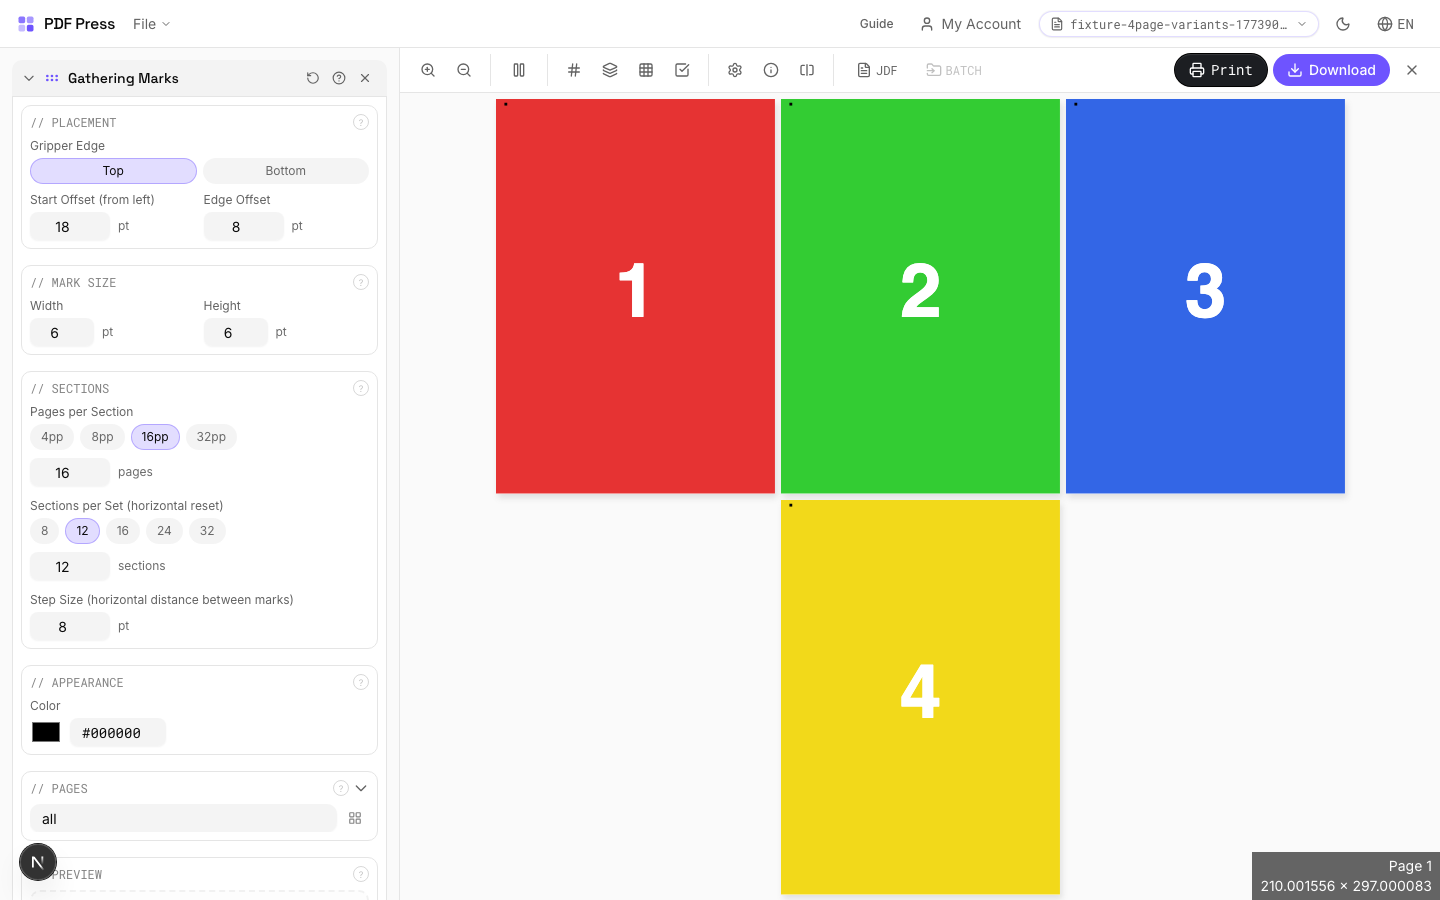
Full app view

Output result
Expert Tip
Place gathering marks on the spine of each signature. Each mark shifts position by the paper thickness, forming a visible staircase when signatures are stacked in the correct order.
If the paper weight changes mid-run, recalculate the mark shift. A wrong offset will break the staircase alignment and defeat the purpose of the marks.
Learn More
Used in Recipes
Case-Bound (Hardcover) Book
Smyth-sewn case-bound book with proper signature imposition and spine marks.
Catalog Signatures
Multi-signature catalog for perfect binding on commercial presses.
Perfect Bind Finishing Marks
Finishing marks for perfect binding operations with gathering verification.
Lay Marks
1 recipeAdds press sheet alignment marks that guide operators in feeding and positioning sheets on the printing press.
Lay marks indicate the correct orientation and positioning of each press sheet: ensuring consistent alignment throughout the print run. They include front lay (gripper-edge guides), side lay (lateral positioning guides), and orientation indicators (showing which way is "up" and which side is "front"). Essential for maintaining registration between colors and between front and back on duplex jobs.
How It Works
Lay marks indicate the correct orientation and positioning of each press sheet: ensuring consistent alignment throughout the print run. They include front lay (gripper-edge guides), side lay (lateral positioning guides), and orientation indicators (showing which way is "up" and which side is "front"). Essential for maintaining registration between colors and between front and back on duplex jobs.

Lay Marks tool applied. Options panel on the left, imposed result on the right. Click to zoom.
Options Guide
Mark Type
Choose the type of lay mark: front lay, side lay, center mark, or orientation indicator.
Front lay: marks at the gripper edge showing the correct feeding direction: the press operator aligns sheets against front lay stops. Side lay: marks along one side edge for lateral alignment: sheets are jogged against the side guide. Center mark: a crosshair at sheet center for front-to-back registration verification. Orientation: arrows or symbols indicating "this side up" and "front face": prevents sheets from being loaded upside-down or backwards.
Placement
Position lay marks along the appropriate sheet edges.
Front lay marks go on the gripper edge (leading edge). Side lay marks go on the guide side (operator side or drive side depending on press configuration). Center marks are placed at the exact center of both edges for duplex registration. Position all marks outside the trim boundary in the waste area so they don't appear in the finished product.
Size
Set the physical dimensions of each lay mark.
Marks should be visible during high-speed press operation: typically 5–10mm for main alignment marks, 3–5mm for secondary indicators. Line weight: 0.5–1pt for clear visibility. Marks that are too small are useless to press operators working at production speed; marks that are too large waste paper and may interfere with finishing.
Appearance
Configure mark color, line weight, and style.
Standard: process black (K-only) at 100%. Registration color (all plates) is used for duplex-alignment center marks so they appear identically on both front and back. Use a distinct style (solid, dashed, or double-line) to differentiate front lay marks from side lay marks at a glance.
Pages
Specify which pages to process using a range expression.
Examples: 'all' = every page. '1-5' = pages 1 through 5. '1,3,5' = specific pages. '1-10 odd' = odd pages 1-9. '2-20 even' = even pages 2-20. 'last' = last page. 'last-2' = third from last. Ranges are 1-based. Combine with commas: '1-5, 8, 12-15'.
Preview
Live rendering showing lay mark positions and appearance on the press sheet.
Configurations & Variations
Lay Marks Applied
Lay marks indicate the gripper edge (the edge that feeds into the press first) and the guide edge (the side that rides against the press side guides). These marks keep sheet orientation consistent through the press, which is critical for front-to-back registration on sheet-fed offset.
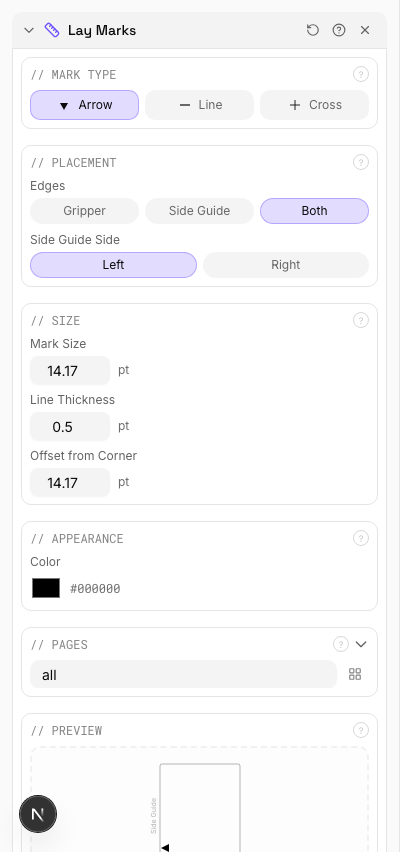
Settings to change

Full app view

Output result
Expert Tip
Lay marks (side and front lays) tell the operator which edge feeds first and which side rides the guide. Place them at the gripper and guide edges matching your press configuration.
Lay marks placed outside the physical sheet area will not print. Make sure they fall within the actual press sheet dimensions.
Learn More
Used in Recipes
Offset Press Ready
Full offset press preparation with all required finishing marks.
Die Lines
9 recipesDraws die-line paths on pages for die-cutting, kiss-cutting, creasing, and perforation workflows.
Cut Contour adds vector die-line paths to your PDF using industry-standard spot color names recognized by RIPs and digital die-cutters (Roland, Zünd, Summa, Mimaki, etc.). These paths define where the material should be cut, scored, perforated, or kiss-cut. The spot color channel separates the die line from print content so the cutter reads it as a toolpath, not artwork.
How It Works
Cut Contour adds vector die-line paths to your PDF using industry-standard spot color names recognized by RIPs and digital die-cutters (Roland, Zünd, Summa, Mimaki, etc.). These paths define where the material should be cut, scored, perforated, or kiss-cut. The spot color channel separates the die line from print content so the cutter reads it as a toolpath, not artwork.
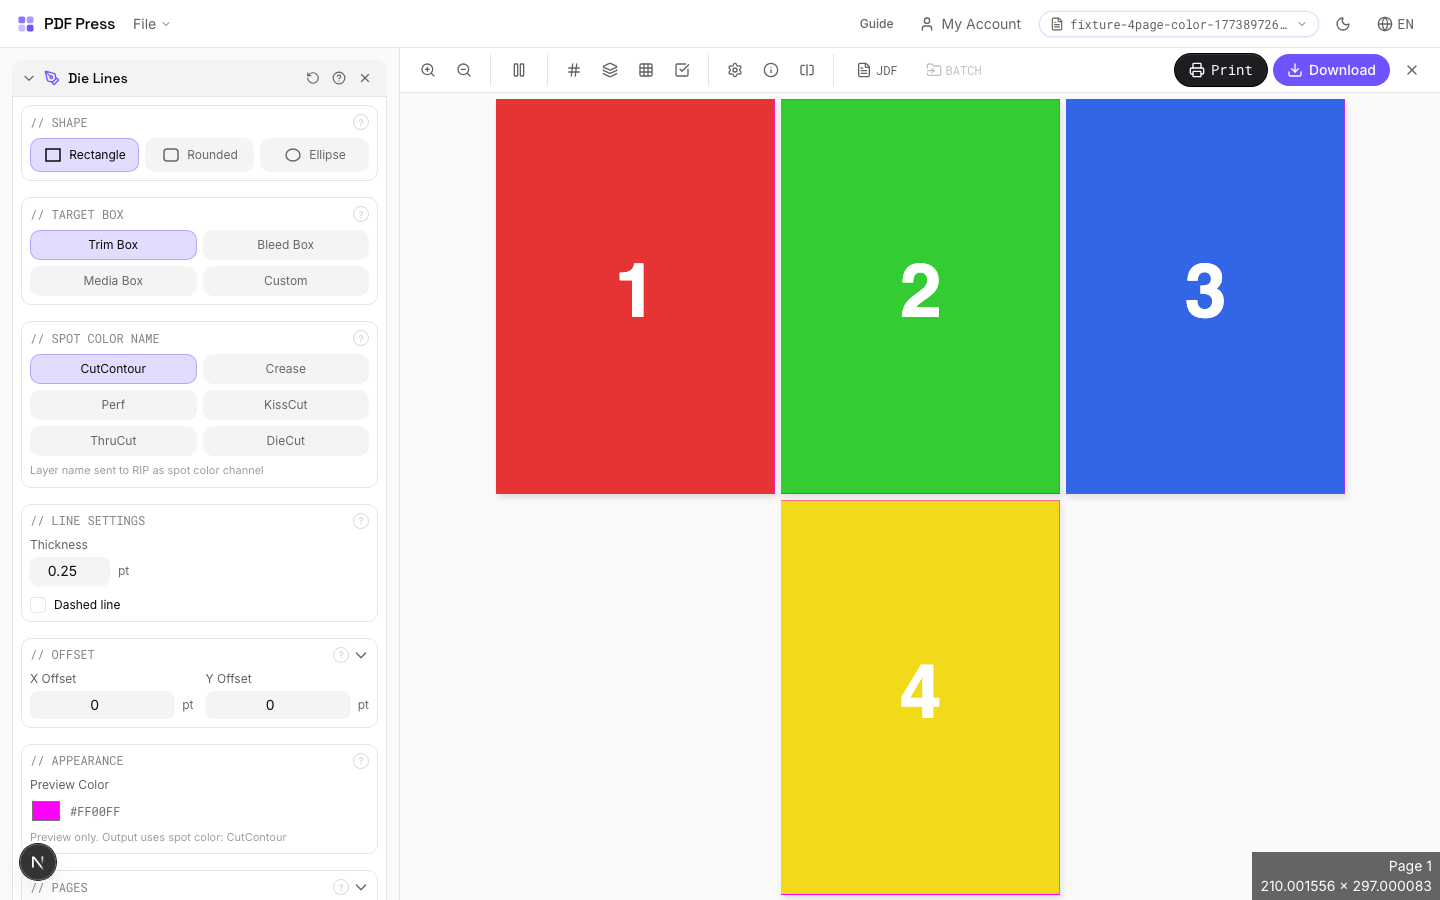
Die Lines tool applied. Options panel on the left, imposed result on the right. Click to zoom.
Options Guide
Shape
Choose the contour shape: rectangle, rounded rectangle, or ellipse.
Rectangle: standard die-cut box for cards, labels, and packaging flats. Rounded Rectangle: softened corners: specify the corner radius below. Common for stickers, hang tags, and ID badges (typical radius: 3–5mm / 8.5–14pt). Ellipse: oval or circular die line: used for round stickers, coasters, and specialty labels.
Target Box
Select which PDF box defines the die-line boundary.
Trim Box: the final finished size after cutting: most common choice for standard die lines. Bleed Box: includes the bleed area: use when you want the die line outside the visible print area. Media Box: the full page boundary including all marks and bleed. Custom: enter your own dimensions: use for die lines that don't match any standard PDF box (e.g., a centered label on an oversized sheet).
Custom Size
Set explicit width and height for the die-line path when Target is "Custom".
Enter dimensions in PDF points (72pt = 1 inch = 25.4mm). The custom shape is centered on the page. For a 3×2 inch label: width = 216pt, height = 144pt. Use the Offset fields below to shift the die line from center.
Spot Color Name
Choose the spot color channel name for the die-line layer: this is what your RIP or cutter reads.
CutContour: industry-standard thru-cut channel (default for Roland, Mimaki). KissCut: cuts through the vinyl/paper but not the backing liner: standard for sticker sheets. Crease: score/fold line for packaging and cartons. Perf: perforation line for tear-off sections. ThruCut: explicit thru-cut (alternative naming for some RIPs). DieCut: generic die-cut channel. Your RIP or cutter software maps these spot names to specific tool actions.
Line Settings
Configure line thickness, corner radius, and dash pattern for the die-line stroke.
Thickness: the stroke weight of the die-line path: typically 0.25–1pt. This is the vector path width in the PDF; the actual cut kerf depends on your blade/tool. Corner Radius (rounded rect only): the fillet radius for rounded corners in PDF points. Dashed: enables a dashed stroke pattern: useful for visually distinguishing fold/score lines from cut lines. Dash Length/Gap: controls the on/off pattern of the dashed stroke.
Offset
Shift the die-line position from the target box.
X Offset: horizontal shift in PDF points (positive = right, negative = left). Y Offset: vertical shift in points (positive = down, negative = up). Use offset to position die lines precisely when they don't align with a standard PDF box: for instance, centering a smaller die-cut area on an oversized press sheet.
Appearance
Set the preview display color: output always uses the selected spot color channel.
The preview color is for on-screen visualization only. The actual PDF output uses a spot color separation with the name you selected above. Most workflows use magenta or green as preview colors to clearly distinguish die lines from artwork on screen.
Pages
Specify which pages to process using a range expression.
Examples: 'all' = every page. '1-5' = pages 1 through 5. '1,3,5' = specific pages. '1-10 odd' = odd pages 1-9. '2-20 even' = even pages 2-20. 'last' = last page. 'last-2' = third from last. Ranges are 1-based. Combine with commas: '1-5, 8, 12-15'.
Preview
Schematic showing the die-line shape, position, and target box on the page.
Configurations & Variations
Die Lines Applied
Cut contour paths appear as colored vector lines on spot color layers. Thru-cut (solid line), kiss-cut (dashed), crease (dotted), and perforation each use a distinct color. The die maker reads these layers to build the cutting die. Lines extend slightly past the artwork edge (overshoot) to guarantee complete cuts at every corner.
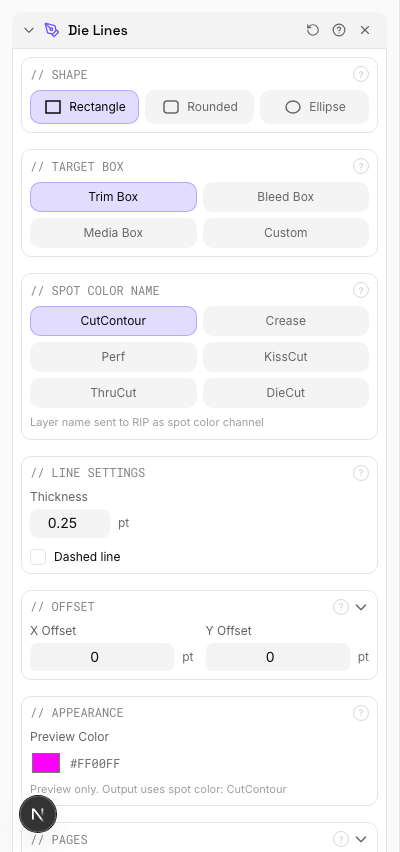
Settings to change

Full app view

Output result
Expert Tip
Put cut contours on a spot colour layer named CutContour or DieCut. Set the stroke to hairline (0.25 pt) and enable overprint so the contour does not knock out underlying artwork.
If the contour path is not closed, the cutter will leave an uncut segment. Run preflight to verify path closure before sending to the die maker.
Learn More
Used in Recipes
Door Hangers
Multi-up door hangers with die-cut hook hole.
Sticker Sheets
Full sticker sheets with kiss-cut contours for peel-and-stick application.
Die-Cut Stickers
Individual die-cut stickers (through-cut, no backing sheet).
Vinyl Stickers
Outdoor-rated vinyl stickers with laminate overprint and contour cut.
Coasters
Printed coasters (round or square) imposed for die cutting.
Box Layout
Folding carton box flat (die-line) with artwork positioned for die cutting.
Envelope Layout
Printed envelopes imposed for flatbed or rotary die cutting.
Floor Graphics
Floor decals and wayfinding graphics with contour cutting.
Die-Cut Production Marks
Complete die-cutting mark set for labels, stickers, and packaging.
Barcode / QR
3 recipesAdds QR codes, Code 128, DataMatrix, or EAN-13 barcodes to pages — with optional CSV/Excel variable data.
Two modes: Static places the same barcode on every page (or a page range). CSV mode reads a spreadsheet where each row produces a unique page with its own barcode — ideal for tickets, badges, labels, and serialized packaging. Supports four symbologies: QR Code (URLs, text), Code 128 (alphanumeric IDs), DataMatrix (compact 2D, pharma/packaging), and EAN-13 (retail).
How It Works
Two modes: Static places the same barcode on every page (or a page range). CSV mode reads a spreadsheet where each row produces a unique page with its own barcode — ideal for tickets, badges, labels, and serialized packaging. Supports four symbologies: QR Code (URLs, text), Code 128 (alphanumeric IDs), DataMatrix (compact 2D, pharma/packaging), and EAN-13 (retail).
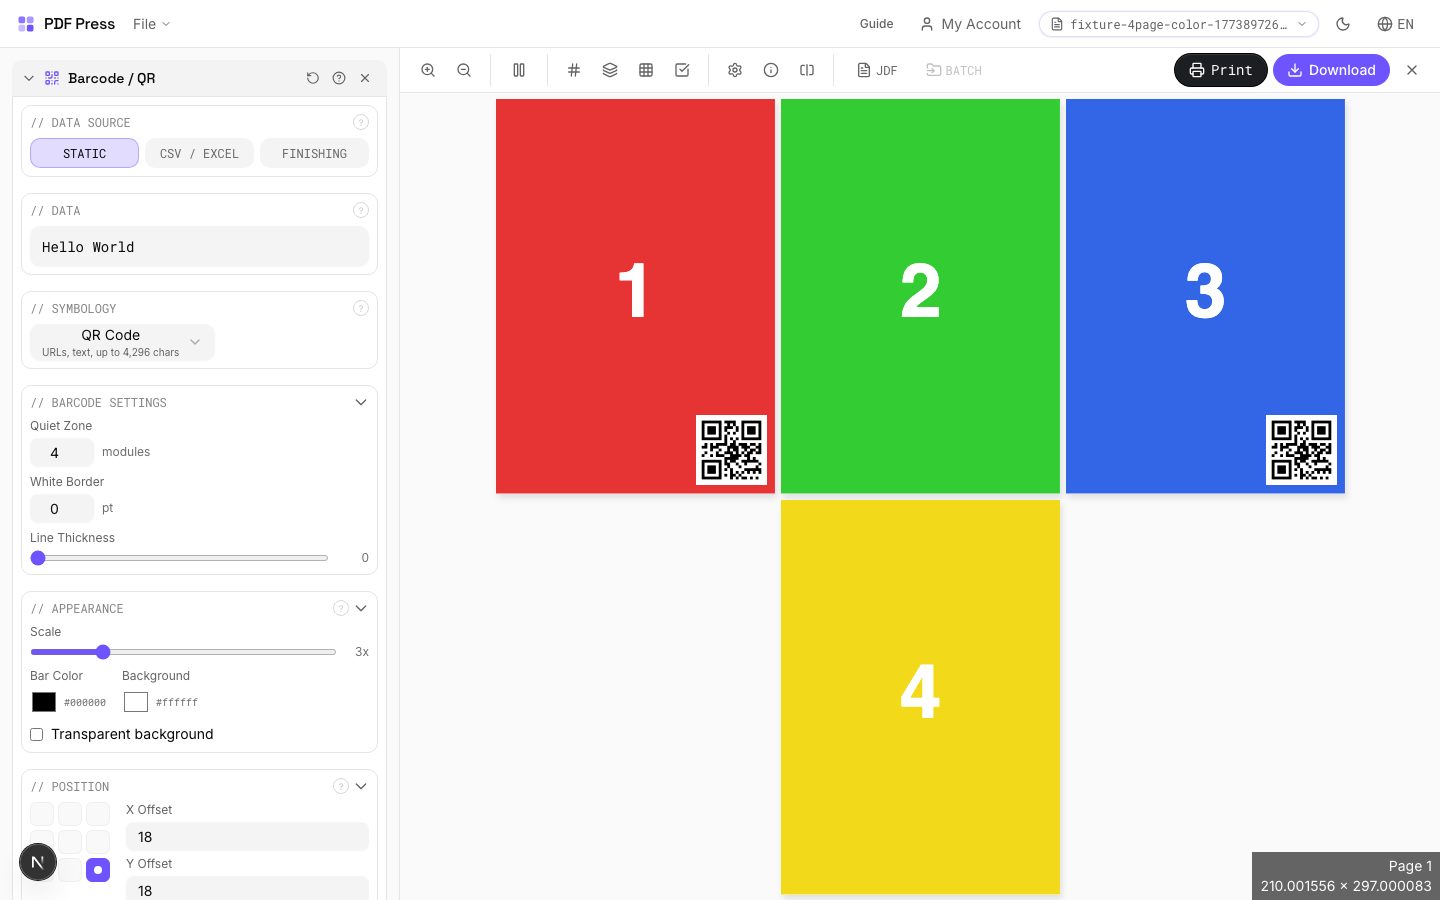
Barcode / QR tool applied. Options panel on the left, imposed result on the right. Click to zoom.
Options Guide
Data Source
Choose Static (same barcode on all pages) or CSV/Excel (unique barcode per row).
Static: enter one value — it goes on every page in the selected range. CSV/Excel: upload a spreadsheet file (.csv, .xlsx, .xls, .tsv) where each row generates one output page with a unique barcode. CSV mode supports Simple (preset categories) and Advanced (full control) sub-modes.
Data
The content to encode in the barcode. What you enter here becomes the scannable value.
For QR codes: URLs, plain text, vCard data, or any string up to ~4,000 characters. For Code 128: any ASCII text, commonly used for order IDs, SKU numbers, serial numbers. For EAN-13: exactly 12 digits — the 13th check digit is calculated automatically. For DataMatrix: compact binary or text data, common in pharmaceutical and electronic component labeling.
Quick Setup
Preset categories for common CSV barcode workflows — Tickets, Labels, Badges, Raffle, Vouchers, Tags.
Each preset configures the optimal symbology and position for its use case. Tickets: QR at bottom-right. Labels: Code 128 at top-right. Badges: QR centered. Raffle: Code 128 at bottom-center. Vouchers: QR at top-left. Tags: DataMatrix centered. You can customize further after selecting a preset.
Barcode Data
Choose which CSV column to encode, or build a template combining multiple columns.
Column mode: select one column — its value becomes the barcode content for each row. Template mode: combine columns with literal text using {column_name} placeholders. Example: "{event}-{row}{seat}" produces "CONF-A12". Templates support any number of columns and static separators.
Upload Data
Drag and drop or click to upload a CSV or Excel spreadsheet.
Supports .csv, .xlsx, .xls, and .tsv files. The first row must be column headers. The symbology is auto-detected from the first column's data patterns. After upload, choose which column or template to use for barcode values.
Symbology
The barcode format — determines encoding capacity, physical shape, and scanner compatibility.
QR Code: 2D square matrix, scannable by any smartphone. Best for URLs, text, vCards. Up to 4,296 characters. Code 128: linear (1D) barcode, any ASCII character. Variable length. Standard for shipping labels, inventory, order IDs. DataMatrix: compact 2D matrix. Popular in pharma, electronics, and packaging where space is tight. EAN-13: retail barcode (the one on groceries). Exactly 12 digits + auto check digit. Required for retail/POS systems.
Appearance
Controls barcode size (scale), bar height, text visibility, and colors.
Scale: module size multiplier (1×–10×). Higher = larger barcode. 3× is good for screen proofing, 4–6× for print. Bar Height: height of bars in linear barcodes (mm). Ignored for 2D codes (QR, DataMatrix). Standard: 15mm. Show text: displays human-readable value below linear barcodes. Bar/Background color: defaults to black-on-white for maximum contrast and scannability. Colored barcodes may not scan reliably — test with your target scanner.
Position
Where the barcode is placed on the page — 9-point grid with fine-tuning offsets.
Click a position on the 3×3 grid to set the anchor point (top-left, center, bottom-right, etc.). X/Y offsets fine-tune placement in points from the anchor. Rotation: 0°, 90°, 180°, 270° — useful for vertical labels or rotated layouts.
Data Preview
Shows resolved barcode values from your CSV data with a row navigator.
Browse through rows to verify each barcode value before generating. The table shows row number and resolved value (after column selection or template interpolation). The count at the bottom shows how many valid rows will produce output pages.
Pages
Specify which pages to process using a range expression.
Examples: 'all' = every page. '1-5' = pages 1 through 5. '1,3,5' = specific pages. '1-10 odd' = odd pages 1-9. '2-20 even' = even pages 2-20. 'last' = last page. 'last-2' = third from last. Ranges are 1-based. Combine with commas: '1-5, 8, 12-15'.
Preview
Live barcode image rendered from the current data and settings.
Updates automatically as you change data, symbology, scale, or colors. In CSV mode, shows the barcode for the currently selected preview row. If the preview shows an error, the data may be invalid for the chosen symbology (e.g., non-numeric text for EAN-13).
Configurations & Variations
QR Code Mode
Pick QR Code from the barcode type dropdown. QR codes hold URLs, vCard data, or free text up to roughly 4,000 characters. Print at 15 mm minimum width for reliable smartphone scanning. Error correction level M (15% recovery) suits standard coated stock; bump to H (30%) on textured or outdoor materials where partial obstruction is likely.
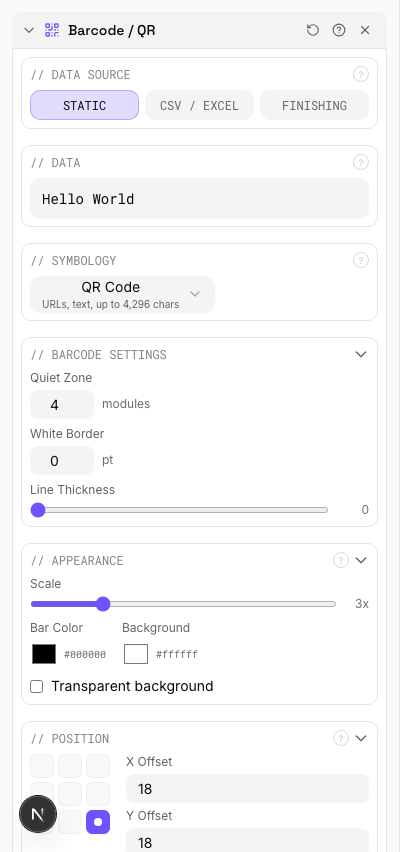
Settings to change

Full app view

Output result
EAN-13 Product Barcode
Pick EAN-13 for the standard retail barcode used across Europe, Asia, and most markets outside North America (US/Canada use UPC-A). Enter the 12-digit product number and the 13th check digit is calculated automatically. Keep 5 mm quiet zones on both sides and do not scale below 80% magnification or the scanner rejection rate climbs fast.
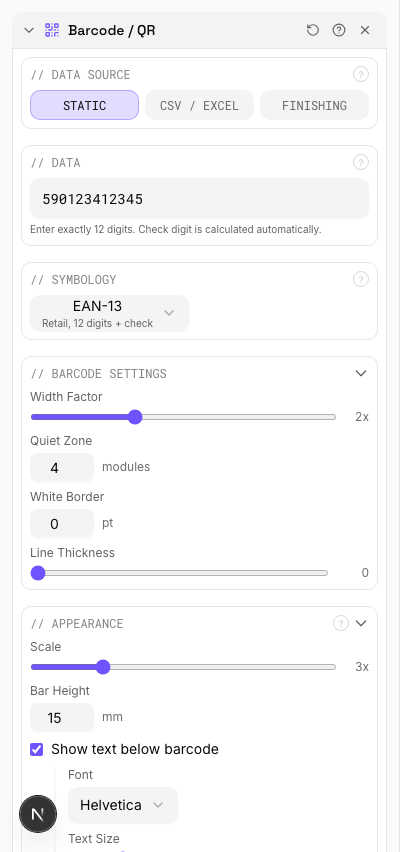
Settings to change
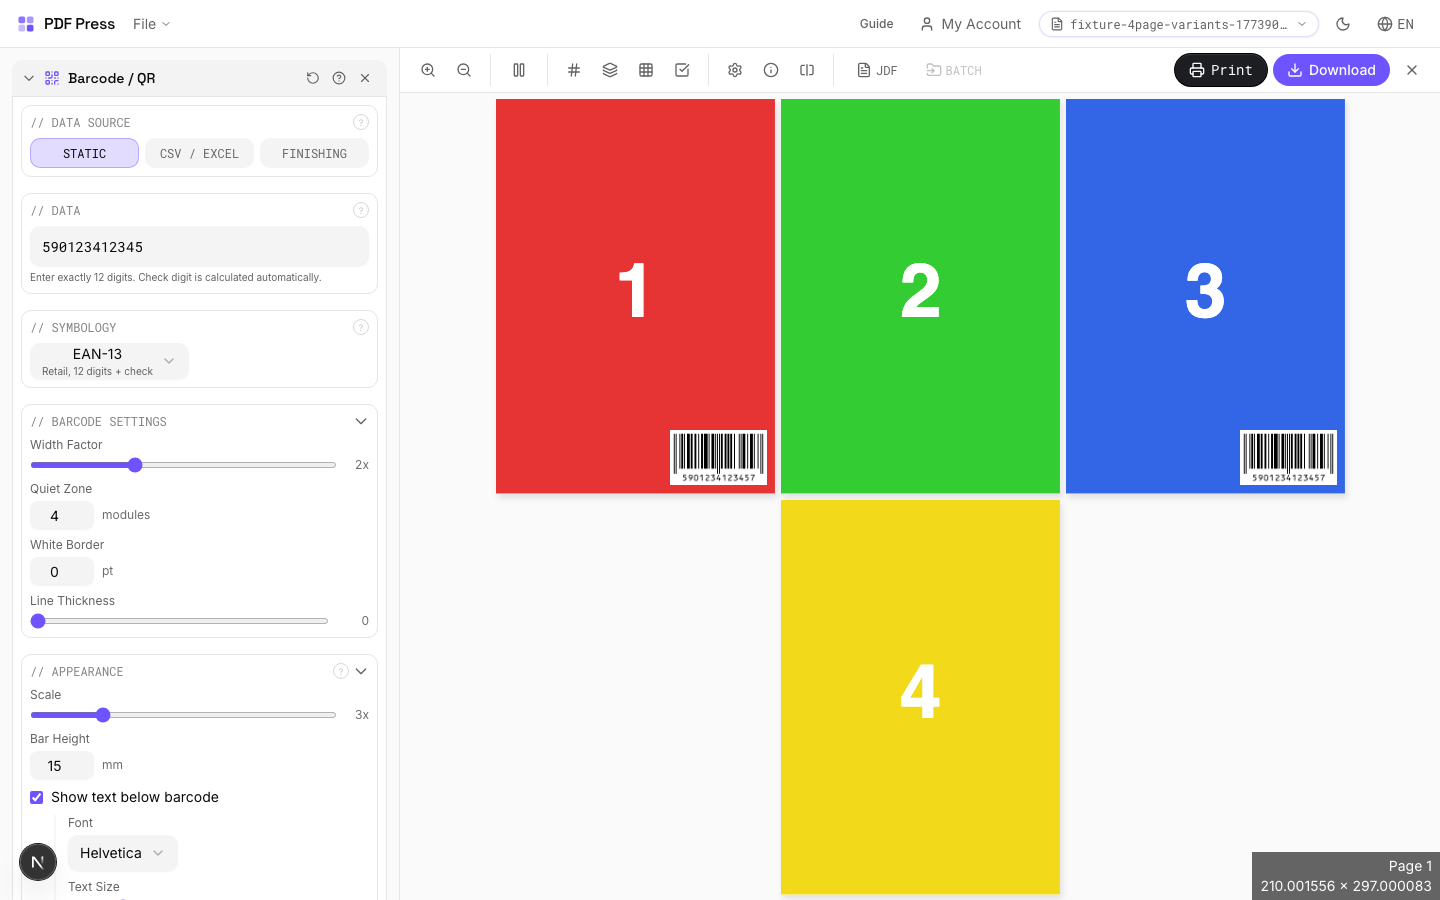
Full app view

Output result
Expert Tip
Barcodes need at least 2.5 mm quiet zone on all sides. Print in 100% K only, never in rich black or a CMYK build, which blurs at the module level and kills scanner readability.
Scaling a barcode after generation changes the module width and can make it unscannable. Always generate at the final print size.
Learn More
Used in Recipes
Variable Data Tickets
Tickets with variable data (barcodes, names, seat numbers) imposed efficiently.
Shipping Labels
Shipping labels (4x6 inch) on self-adhesive A4/Letter sheets.
QR Code Labels
Unique QR code labels for product tracking or authentication.
Watermark
2 recipesStamps text across every page — for marking drafts, proofs, confidential documents, or copies.
Generates a transparent text overlay rendered diagonally (or at any angle) across each page. Adjustable font size, color, opacity, and rotation angle. Common presets (DRAFT, CONFIDENTIAL, PROOF, COPY, SAMPLE) are one click away.
How It Works
Generates a transparent text overlay rendered diagonally (or at any angle) across each page. Adjustable font size, color, opacity, and rotation angle. Common presets (DRAFT, CONFIDENTIAL, PROOF, COPY, SAMPLE) are one click away.
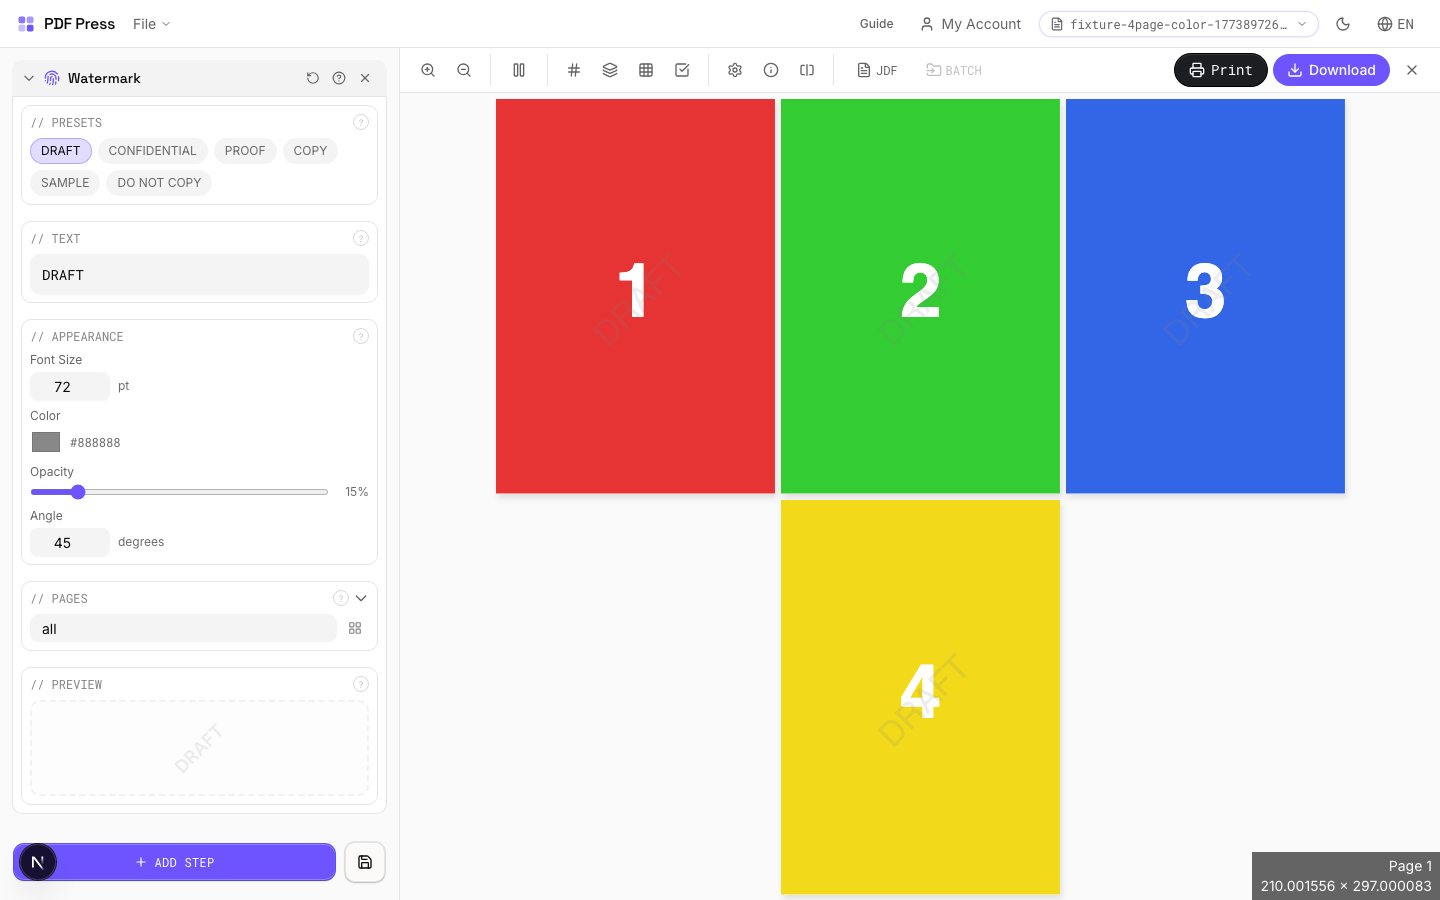
Watermark tool applied. Options panel on the left, imposed result on the right. Click to zoom.
Options Guide
Presets
One-click common watermark texts — DRAFT, CONFIDENTIAL, PROOF, COPY, SAMPLE, DO NOT COPY.
Clicking a preset fills the text field. You can further customize after selecting a preset. Presets use the current appearance settings (font size, color, opacity, angle).
Text
The watermark message displayed on every page. Short, all-caps text works best.
Supports any text string. Longer text may need a smaller font size to fit. Common patterns: "DRAFT", "PROOF #3", "CONFIDENTIAL", "FOR REVIEW ONLY", "SAMPLE — NOT FOR DISTRIBUTION".
Appearance
Controls font size, color, opacity, and rotation angle of the watermark text.
Font size: in points — 72pt is typical for full-page diagonal watermarks on Letter/A4. Larger pages may need 96–144pt. Color: any hex color — gray (#888888) is standard for subtle marks, red (#cc0000) for attention-grabbing. Opacity: 10–20% for subtle background marks, 30–50% for clearly visible stamps. Angle: 45° for classic diagonal, 0° for horizontal, 90° for vertical.
Pages
Specify which pages to process using a range expression.
Examples: 'all' = every page. '1-5' = pages 1 through 5. '1,3,5' = specific pages. '1-10 odd' = odd pages 1-9. '2-20 even' = even pages 2-20. 'last' = last page. 'last-2' = third from last. Ranges are 1-based. Combine with commas: '1-5, 8, 12-15'.
Preview
Live preview showing the watermark text at current size, color, opacity, and angle.
Configurations & Variations
DRAFT Watermark
Type DRAFT in the watermark text field. The text renders diagonally across every page at reduced opacity (15-25% is typical). Reviewers can still read the content clearly, but the proof cannot be mistaken for final production artwork. Strip the watermark before sending approved files to plate.
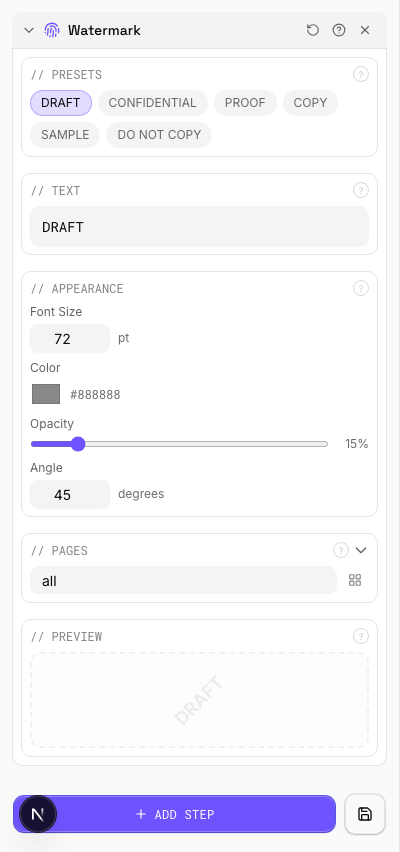
Settings to change

Full app view

Output result
CONFIDENTIAL Watermark
Type CONFIDENTIAL and raise the opacity to 30-40% for documents where unauthorized distribution is a real risk. The watermark prints on every page, so there is no way to extract a clean page from the proofing PDF.
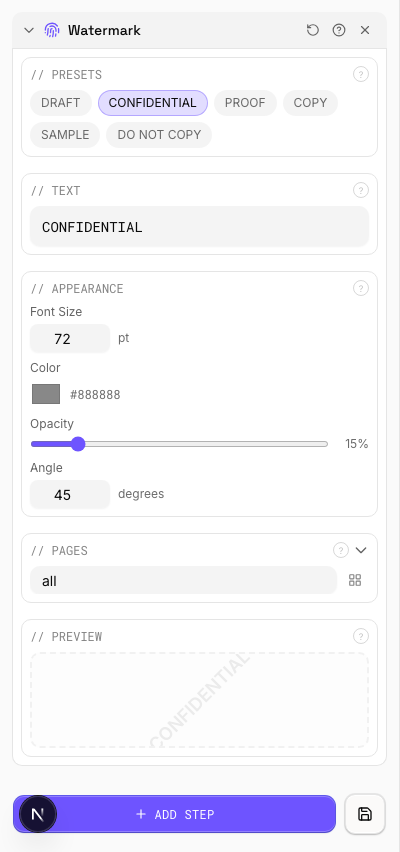
Settings to change
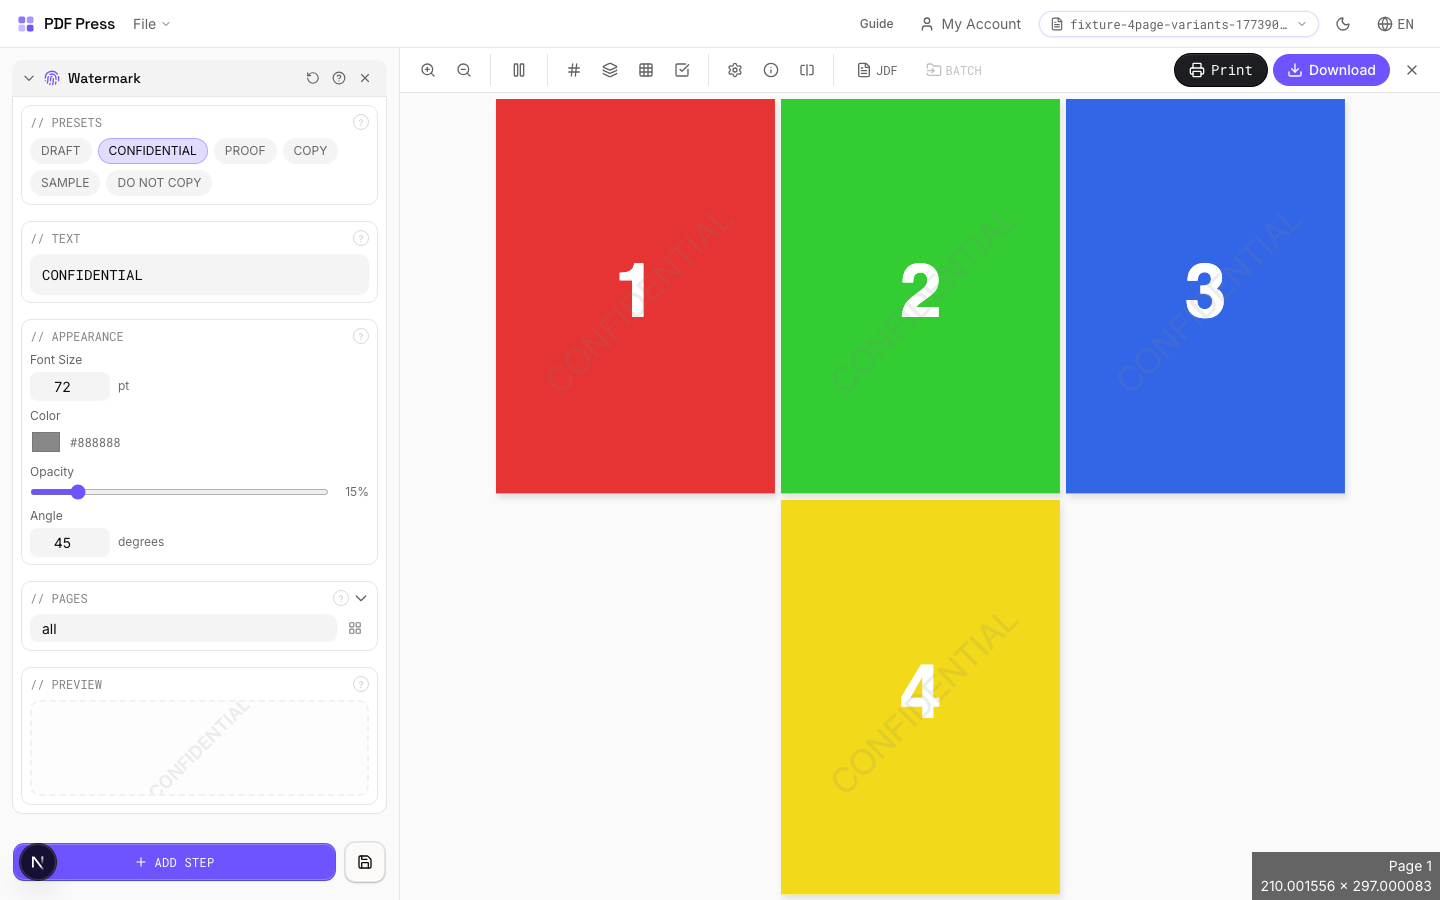
Full app view
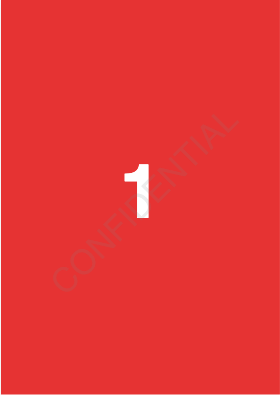
Output result
Expert Tip
For proofs, use 45-degree rotated text at 10-15% opacity across each page. The watermark should be obvious enough to deter unauthorised use but light enough not to obscure the content.
Watermarks at very low opacity (below 5%) may not survive JPEG compression in digital proofing systems. Test visibility on your actual proofing workflow.
Learn More
Used in Recipes
Watermarked Proof
Draft proof with watermark and job information for client approval.
Branded Proof
Client proof with your shop's branding, job info, and color patches.
Backdrop
Places an uploaded PDF or image behind your page content as a background layer.
Upload a PDF or image file using the file upload area in the Backdrop File section. The file is inserted underneath existing page content (the opposite of Overlay, which goes on top). Common uses include pre-printed stationery, textured paper backgrounds, watermark templates, or brand frames. The backdrop is composited at the specified scale and position on each targeted page.
How It Works
Upload a PDF or image file using the file upload area in the Backdrop File section. The file is inserted underneath existing page content (the opposite of Overlay, which goes on top). Common uses include pre-printed stationery, textured paper backgrounds, watermark templates, or brand frames. The backdrop is composited at the specified scale and position on each targeted page.

Backdrop tool applied. Options panel on the left, imposed result on the right. Click to zoom.
Options Guide
Backdrop File
Upload the PDF to be placed behind page content.
Upload a single-page PDF containing your background artwork. If the backdrop is multi-page, page 1 is used. For best results, the backdrop should match or exceed the target page dimensions. If "Repeat" is enabled, the same backdrop appears on every page in the range; otherwise it appears only on page 1.
Settings
Control placement, size, and transparency of the backdrop layer.
Repeat: applies the backdrop to all pages in the range (ideal for stationery). Offset X/Y: shifts the backdrop from its default position in PDF points (1pt = 1/72in). Scale: enlarges or reduces the backdrop relative to its native size:100% = original. Opacity: controls transparency:100% is fully opaque, lower values let the page content show through the backdrop.
Pages
Specify which pages to process using a range expression.
Examples: 'all' = every page. '1-5' = pages 1 through 5. '1,3,5' = specific pages. '1-10 odd' = odd pages 1-9. '2-20 even' = even pages 2-20. 'last' = last page. 'last-2' = third from last. Ranges are 1-based. Combine with commas: '1-5, 8, 12-15'.
Configurations & Variations
Backdrop Applied
Click the file upload area in the Backdrop section to load a background PDF or image. The backdrop is placed behind your imposed content on every output page. Common uses: textured paper simulation, branded background, or a pre-printed shell layout. Set opacity to 100% for production shells and 10-20% for subtle textures. The backdrop file must match or exceed the output sheet dimensions; undersized backdrops leave white edges.
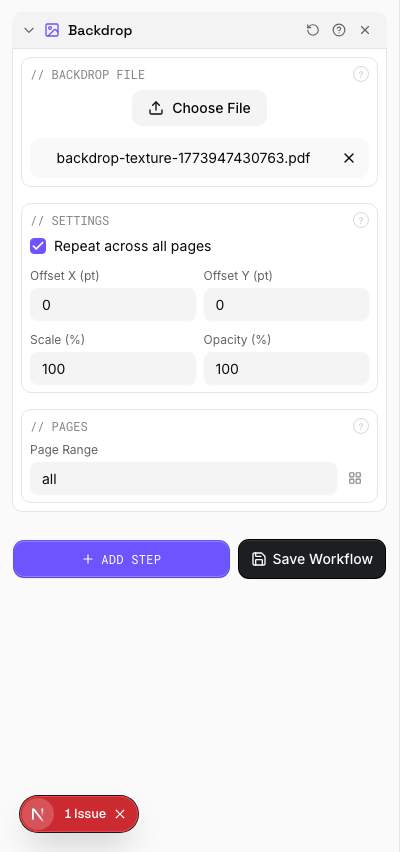
Settings to change
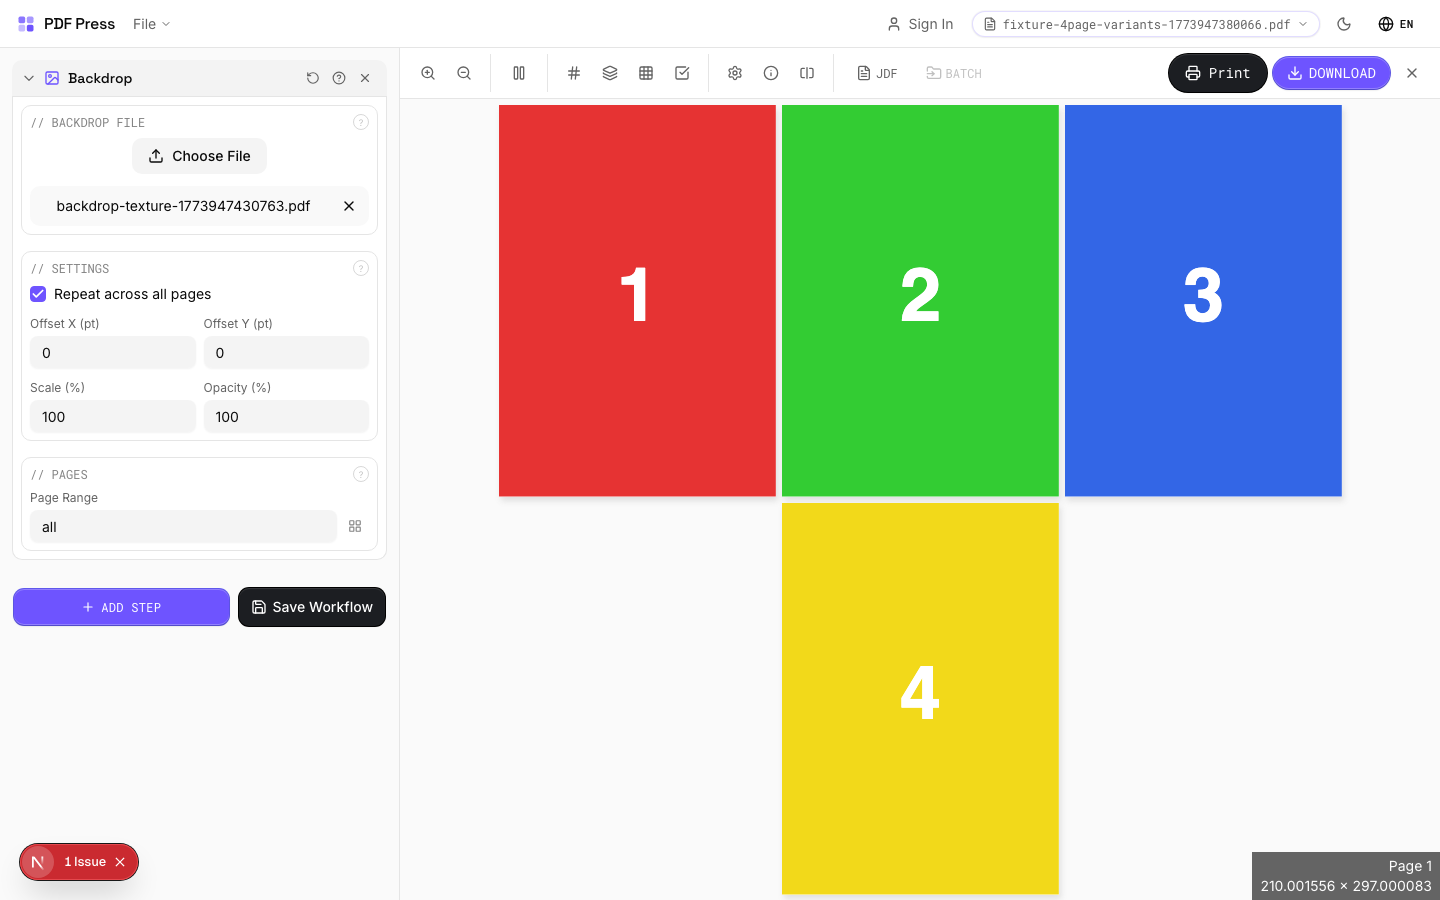
Full app view

Output result
Expert Tip
Backdrop places a full-bleed background (texture, solid fill, or repeating pattern) behind your imposed content. Upload a PDF or image file as the backdrop. Faster than editing every source page individually when you need a uniform background across the job.
A backdrop with transparency or live effects can dramatically increase RIP time. Flatten the backdrop PDF first if your RIP is struggling.
Color Effects
Applies brightness, contrast, saturation, and color effects to PDF pages.
Color Grading adjusts the visual appearance of PDF pages through rasterization. It's useful for quick creative adjustments, proof corrections, or converting pages to grayscale/sepia without re-exporting from the design application. Note: this rasterizes targeted pages: vector text and paths become bitmap images. For press-accurate color space conversion, use Color Convert with ICC profiles instead.
How It Works
Color Grading adjusts the visual appearance of PDF pages through rasterization. It's useful for quick creative adjustments, proof corrections, or converting pages to grayscale/sepia without re-exporting from the design application. Note: this rasterizes targeted pages: vector text and paths become bitmap images. For press-accurate color space conversion, use Color Convert with ICC profiles instead.

Color Effects tool applied. Options panel on the left, imposed result on the right. Click to zoom.
Options Guide
Color Adjustments
Fine-tune brightness, contrast, and saturation of the page content.
Brightness (0–200): 100 = original. Below 100 darkens, above 100 lightens. Contrast (0–200): 100 = original. Higher values increase the difference between light and dark tones: useful for washed-out scans. Saturation (0–200): 100 = original. 0 = fully desaturated (grayscale equivalent). Above 100 boosts color intensity.
Effects
Apply creative color effects: grayscale, warm tone, invert, or hue shift.
Grayscale (0–100%): progressively removes color information. 100% = full grayscale: an alternative to desaturation that uses a luminance-weighted conversion. Warm Tone (0–100%): applies a sepia/warm cast:20–30% adds subtle warmth, 100% is full vintage sepia. Invert (0–100%): reverses tonal values. 100% = full negative. Hue Rotate (0–360°): shifts all colors around the color wheel. 180° inverts hue (red↔cyan, blue↔yellow). Effects are cumulative and applied in order.
Output Quality
Set the rasterization resolution for the color-graded output.
Color grading rasterizes targeted pages: vector content (text, paths, gradients) becomes a bitmap image. Choose DPI based on your output: 150 DPI for screen/web (fast, small files). 300 DPI for standard commercial print. 600 DPI for high-detail fine art or text-heavy pages (large files, slow processing). Warning: if Color Convert is also in the pipeline, pages will be rasterized twice: compounding quality loss.
Pages
Specify which pages to process using a range expression.
Examples: 'all' = every page. '1-5' = pages 1 through 5. '1,3,5' = specific pages. '1-10 odd' = odd pages 1-9. '2-20 even' = even pages 2-20. 'last' = last page. 'last-2' = third from last. Ranges are 1-based. Combine with commas: '1-5, 8, 12-15'.
Configurations & Variations
Grayscale Conversion
Select the grayscale preset to convert all pages to monochrome. Good for checking tonal range before sending to a black-and-white printer, or previewing how a color design will reproduce in newspaper (single-ink) printing. If any colored elements become indistinguishable in grayscale, they need more tonal separation in the original design.

Settings to change

Full app view

Output result
High Contrast Effect
Apply the high-contrast preset to push light and dark areas further apart. Useful for checking whether barcodes meet the minimum contrast ratio for scanner readability, or whether reversed-out text on a tinted background will survive halftone dot gain on press.
Settings to change
Full app view

Output result
Expert Tip
Colour grading handles press-specific adjustments, such as reducing total ink coverage to 300% or below for heatset web, or boosting saturation for uncoated stock.
Grading applied after imposition also affects marks and colour bars. Apply it to source pages before imposition so your control strips stay accurate.
PDF Repair
1 recipeFixes common PDF structural issues by re-serializing and optionally cleaning up metadata and annotations.
PDF Repair re-writes the PDF from scratch: fixing broken cross-reference tables, invalid stream lengths, corrupt object numbering, and other structural damage that can cause RIPs and prepress software to reject files. Optional cleanup removes metadata (title, author, creation dates), flattens annotations, and strips embedded JavaScript: all common requirements for prepress-clean PDF delivery.
How It Works
PDF Repair re-writes the PDF from scratch: fixing broken cross-reference tables, invalid stream lengths, corrupt object numbering, and other structural damage that can cause RIPs and prepress software to reject files. Optional cleanup removes metadata (title, author, creation dates), flattens annotations, and strips embedded JavaScript: all common requirements for prepress-clean PDF delivery.
PDF Repair tool applied. Options panel on the left, imposed result on the right. Click to zoom.
Options Guide
Repair Options
Select which repair and cleanup operations to apply.
Re-serialize (always on): rebuilds the entire PDF structure from scratch: fixes xref tables, stream lengths, and object numbering. Strip metadata: removes document info (title, author, creator, dates): standard for press-ready files to avoid leaking client data. Remove annotations: flattens or deletes annotations (comments, stamps, highlights) that can cause unexpected marks in print output. Remove JavaScript: strips embedded scripts and actions: eliminates security risks and RIP compatibility issues.
Pages
Specify which pages to process using a range expression.
Examples: 'all' = every page. '1-5' = pages 1 through 5. '1,3,5' = specific pages. '1-10 odd' = odd pages 1-9. '2-20 even' = even pages 2-20. 'last' = last page. 'last-2' = third from last. Ranges are 1-based. Combine with commas: '1-5, 8, 12-15'.
Expert Tip
Run PDF repair on files that crash the RIP or show rendering artefacts. It rebuilds the cross-reference table, fixes broken font references, and re-encodes damaged streams.
Repair cannot reconstruct severely corrupted files with missing page streams. Always keep the original file as a backup.
Learn More
Used in Recipes
Preflight and Fix
Identify and repair common PDF issues before production.
Color Management
5 recipesICC color management: convert between color spaces, soft-proof on screen, and check gamut boundaries.
Color Convert uses Little CMS (lcms-wasm) to perform ICC-based color space transformations. Upload your target device ICC profile (FOGRA39, GRACoL, SWOP, or custom) and convert pages from one color space to another using the correct rendering intent. Soft proofing simulates how colors will look on the target device without altering the file. Gamut warning highlights colors that fall outside the destination profile's reproducible range.
How It Works
Color Convert uses Little CMS (lcms-wasm) to perform ICC-based color space transformations. Upload your target device ICC profile (FOGRA39, GRACoL, SWOP, or custom) and convert pages from one color space to another using the correct rendering intent. Soft proofing simulates how colors will look on the target device without altering the file. Gamut warning highlights colors that fall outside the destination profile's reproducible range.

Color Management tool applied. Options panel on the left, imposed result on the right. Click to zoom.
Options Guide
ICC Profile
Upload and manage ICC/ICM profiles for color-accurate transformations.
Upload .icc or .icm files from your print provider or download standard profiles (e.g., FOGRA39 for European coated offset, GRACoL 2006 for US sheetfed, SWOP for US web offset, ISO Coated v2 for general commercial). CMYK profiles are not bundled due to licensing: you must upload your own. The built-in sRGB profile covers standard screen color. Multiple profiles can be loaded simultaneously.
Color Transform
Configure the source and destination profiles and rendering intent for the conversion.
Source Profile: the color space your document is currently in (usually sRGB for screen-designed files). Destination Profile: the target device profile to convert into. Rendering Intent: how out-of-gamut colors are handled:Perceptual (compresses all colors proportionally, best for photos), Relative Colorimetric (preserves in-gamut colors exactly, clips out-of-gamut, best for logos/brand colors), Saturation (maximizes saturation, best for charts/graphics), Absolute Colorimetric (preserves colors exactly including paper white simulation, best for proofing). Rasterize DPI: resolution for the pixel-based conversion:300 DPI for print, 150 DPI for proofing speed.
Soft Proofing
Preview how colors will appear on the target device without modifying the file.
Soft proofing renders the preview through the proofing profile to simulate the target output device on your monitor. This is non-destructive: only the canvas preview changes, not the PDF data. Simulate Paper White: accounts for the paper stock's whiteness: important for uncoated stocks where "white" is actually cream/gray. Accurate soft proofing requires a calibrated monitor (ideally with a hardware calibrator like an i1Display or SpyderX).
Gamut Warning
Highlight colors in the preview that cannot be reproduced by the destination profile.
Out-of-gamut colors are replaced with a solid warning color (default: bright green) in the preview so you can see exactly which areas will lose saturation or shift hue during conversion. This is preview-only: the PDF is not modified. Requires a destination profile to be set. Common problem areas: saturated blues/greens in RGB that can't be reproduced in CMYK, and neon/fluorescent colors.
Pages
Specify which pages to process using a range expression.
Examples: 'all' = every page. '1-5' = pages 1 through 5. '1,3,5' = specific pages. '1-10 odd' = odd pages 1-9. '2-20 even' = even pages 2-20. 'last' = last page. 'last-2' = third from last. Ranges are 1-based. Combine with commas: '1-5, 8, 12-15'.
Expert Tip
Convert RGB sources to CMYK using your press profile (FOGRA39 for European coated, GRACoL for US sheetfed) before imposition. This keeps colour consistent across all pages.
Converting CMYK-to-CMYK with mismatched profiles will shift your colours. Only re-profile when you are actually changing the target press condition.
Learn More
Used in Recipes
Comic Book Signatures
Comic book or graphic novel imposed in saddle-stitch or perfect-bound signatures.
Photo Book
Lay-flat photo book with flush-mount or perfect binding.
Corrugated Packaging
Large-format corrugated box or display printed on flatbed or flexo.
Print-Ready Preparation
Standard pre-flight and preparation workflow for incoming files.
Flexo Distortion
Pre-distort artwork for flexographic plate mounting on cylinders.
Advanced Tools(6)
Gang Sheet
3 recipesPacks multiple different-sized print jobs onto shared sheets for maximum material efficiency.
Uses strip-based (shelf) bin-packing to place items in rows or columns. The output sheet must be large enough to fit at least 3–4 items in one dimension. Paper size is auto-calculated based on your source files. Quantity sets how many copies of each item are needed — the engine calculates total sheet count including makeready and spoilage waste.
How It Works
Uses strip-based (shelf) bin-packing to place items in rows or columns. The output sheet must be large enough to fit at least 3–4 items in one dimension. Paper size is auto-calculated based on your source files. Quantity sets how many copies of each item are needed — the engine calculates total sheet count including makeready and spoilage waste.
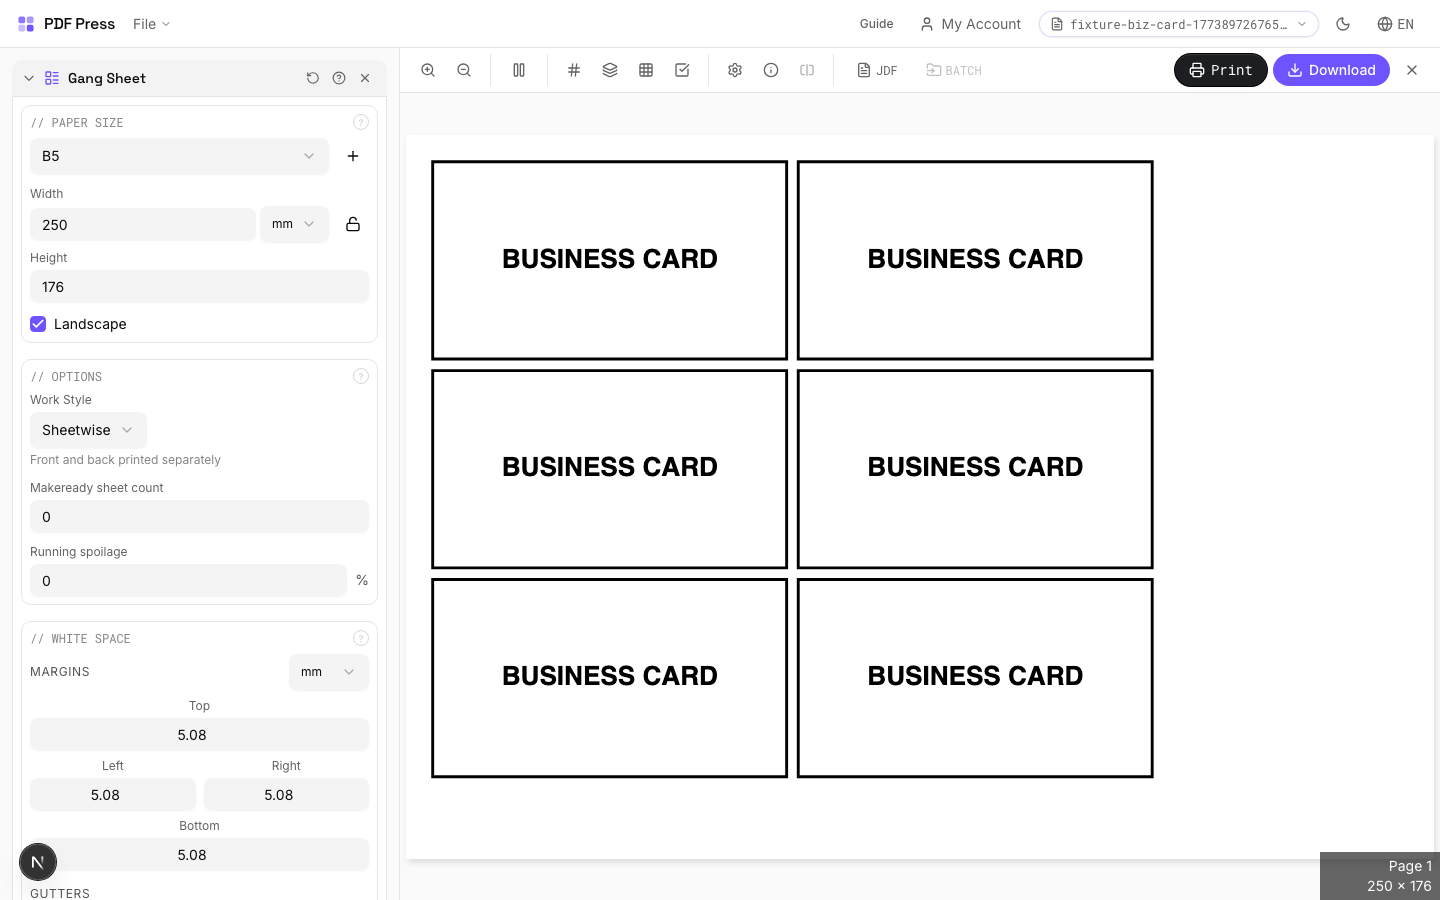
Gang Sheet tool applied. Options panel on the left, imposed result on the right. Click to zoom.
Options Guide
Paper Size
Sets the output sheet dimensions. This is the physical paper going through your printer or press.
Standard presets: Letter (8.5×11in), Legal (8.5×14in), Tabloid (11×17in), A4 (210×297mm), A3 (297×420mm). Landscape swaps width↔height. Lock icon links dimensions to preserve aspect ratio. Custom lets you enter any size in inches, mm, or points (1in = 72pt = 25.4mm).
White Space
Controls margins around the sheet edges and gutters between items in the grid.
Left margin = space from the left sheet edge to the first column. Top margin = space from the top edge to the first row. Horizontal gutter = gap between columns. Vertical gutter = gap between rows. All values are in your selected unit (inches/mm/points). 'Center output on page' distributes leftover space evenly instead of anchoring content to the top-left corner.
Printer's Marks
Adds trim guides and alignment marks outside the live area for accurate cutting and registration.
Crop marks: short lines at each corner showing where to trim. Center marks: crosshairs at sheet midpoints for front/back alignment on duplex jobs. Line length (default 0.43in/31pt): how long each mark line extends. Line thickness (default 0.014in/1pt): mark stroke weight. Line distance (default 0.139in/10pt): gap between the mark and the artwork edge. Four-color black: prints marks in C+M+Y+K for visibility on color proofs. Knockout: adds a white halo around marks so they show on dark backgrounds.
Bleeds
Extends artwork beyond the trim edge to prevent white strips after cutting.
Three modes: 'No bleeds' trims exactly at the page boundary. 'Pull from document' uses bleed info already embedded in the PDF (TrimBox/BleedBox metadata). 'Fixed' lets you manually set bleed on each side, typically 3mm (0.125in / 9pt) for commercial print, 1-2mm for digital. Bleed values define how far past the trim edge the artwork extends.
Options
Work style (duplex method), makeready waste, and running spoilage for production planning.
Work style: 'Sheetwise' uses separate plates for front and back (most common for short runs). 'Work-and-turn' shares one plate, prints both sides by flipping on the long edge — halves plate cost. 'Work-and-tumble' flips on the short edge. 'Perfecting' prints both sides simultaneously (requires a perfecting press). Makeready: sheets consumed during press setup (ink-up, registration). Typical: 50–200 for offset, 0–5 for digital. Spoilage: production waste percentage. Typical: 2–5% offset, <1% digital.
Jobs
Configure print items — each with its own quantity and optional source file.
Each job row shows: item name, quantity needed, and source PDF. The engine calculates optimal strip placement across sheets. The summary below shows: items per sheet, total sheets needed, makeready sheets, spoilage sheets, and grand total. Auto-paper-detection picks the smallest sheet that fits all items.
Add Files
Drag and drop or browse to add additional source PDFs for the gang layout.
Expert Tip
Gang different jobs on a single press sheet to get the most out of the material. Place the highest-volume item first, then fill remaining space with smaller jobs. Turn on full marks for automated cutting.
The algorithm uses strip-based packing. If items do not fit in a single row or column, increase the sheet size or reduce the item count per sheet.
Learn More
Used in Recipes
Wedding Invitations
Premium wedding invitations with RSVP cards and envelopes imposed together.
Mixed Gang Run
Multiple different jobs ganged on a single press sheet for cost efficiency.
Gang Run with Full Marks
Ganged production sheet with complete finishing marks for commercial press.
Cutter Marks
53 recipesAdds machine-readable registration marks for automated cutting, creasing, and perforation equipment.
Unlike simple crop marks (visual trimming guides), these registration marks are read by optical sensors on digital cutting systems (Zünd, Kongsberg, Esko, Graphtec). The camera detects mark positions to align the cut path with the printed image. Supports configurable shapes, key marks for orientation detection, and separate dieline layers for different finishing operations.
How It Works
Unlike simple crop marks (visual trimming guides), these registration marks are read by optical sensors on digital cutting systems (Zünd, Kongsberg, Esko, Graphtec). The camera detects mark positions to align the cut path with the printed image. Supports configurable shapes, key marks for orientation detection, and separate dieline layers for different finishing operations.
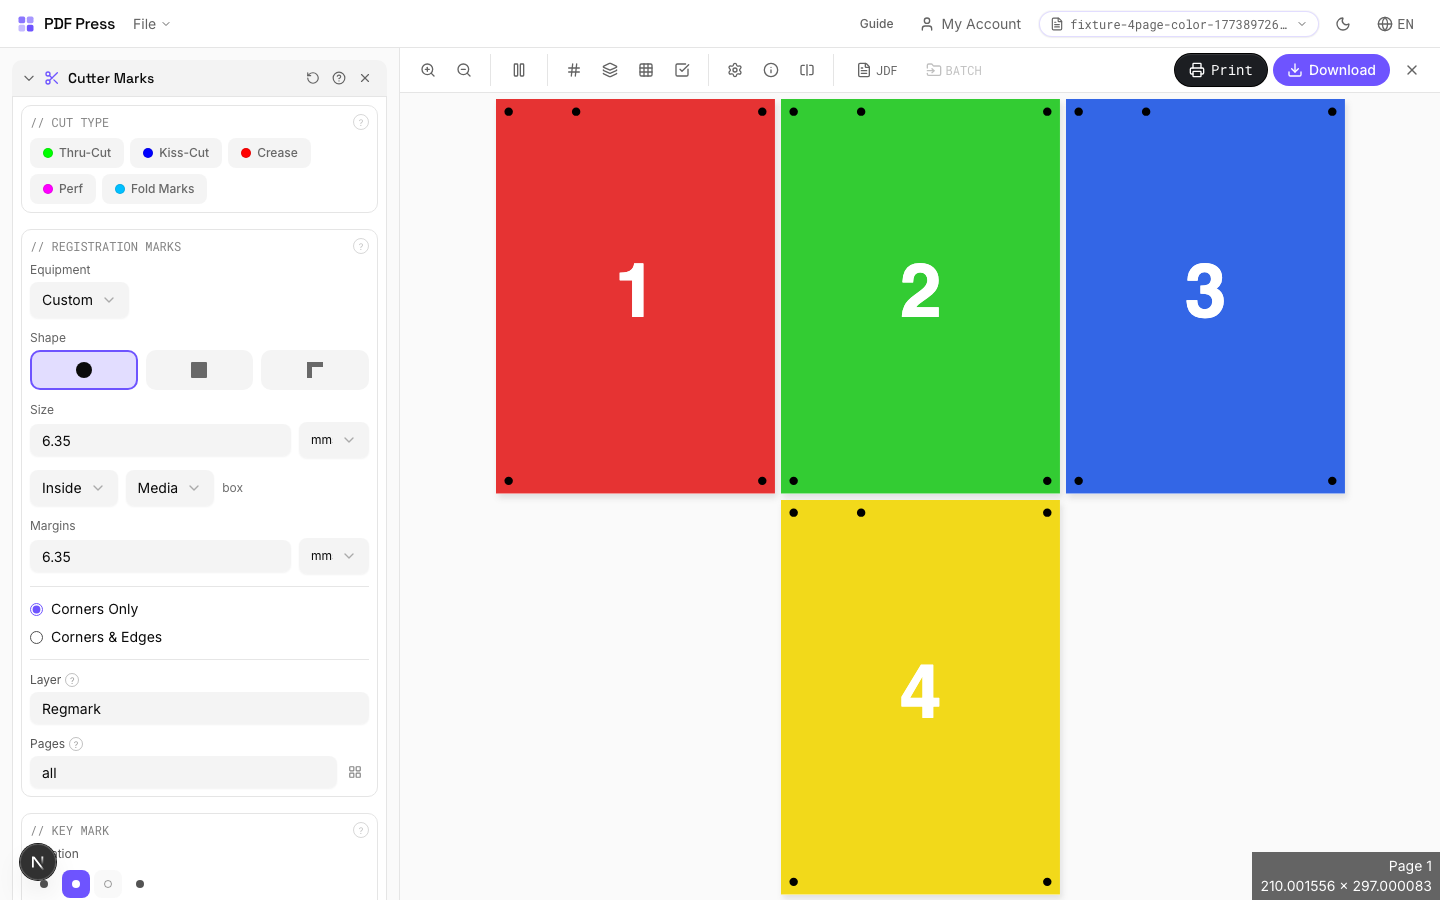
Cutter Marks tool applied. Options panel on the left, imposed result on the right. Click to zoom.
Options Guide
Cut Type
Choose the primary finishing operation: thru-cut, kiss-cut, crease, or perforation.
Thru-cut: blade goes completely through the material (standard trimming, die-cutting). Kiss-cut: penetrates only the top layer, backing stays intact — standard for peel-off sticker sheets. Crease: creates a fold line without cutting through — for boxes, cards, and folded items. Perforation: alternating cut/uncut segments for tear-away sections (tickets, coupons, response cards).
Registration Marks
Configure the shape, size, spacing, and placement of the marks the cutter camera reads.
Circle (most universal): compatible with nearly all cutting equipment brands. Square: slightly faster camera detection on some systems. Corner (L-shape): encodes both position and orientation in a single mark. Size: typically 5–10mm. Distance from artwork: 3–5mm. Knockout: adds a white halo around each mark so it remains visible on dark or colored stock — essential for non-white substrates.
Key Mark
An asymmetric orientation mark that prevents the cutter from processing sheets 180° rotated.
Placed near one corner (configurable: any of the 8 edge positions). The cutter's camera uses this mark to determine sheet orientation. Critical for asymmetric designs where a 180° rotation error would ruin the output. Without a key mark, perfectly symmetric designs may be processed upside-down without detection.
Dielines
Vector paths defining different finishing operations on the cutting table, each as a separate layer.
Thru-cut line: full cut through material. Kiss-cut line: partial-depth cut (top layer only). Crease line: score/fold without cutting. Perforation line: alternating cut/uncut for tear-off sections. Overshoot: how far each line extends past the artwork edge — ensures complete cuts even with slight registration drift. Typical overshoot: 0.5–1mm.
Artwork
Defines which PDF box type determines the artwork boundary for mark placement.
TrimBox: the intended final trim size (most common choice). BleedBox: includes bleed area beyond trim. MediaBox: full page including all margins. CropBox: the visible area in most PDF viewers. Registration marks and dielines are placed relative to the selected box type. Using the wrong box type causes marks to be offset from the actual artwork.
Configurations & Variations
Line Style Marks
Switch from circle (default) to line-style marks. Lines extend from each corner toward the trim edge. This is the standard for digital printing workflows and most packaging finishing equipment. Check with your finishing vendor which style their cutter camera expects.

Settings to change

Full app view
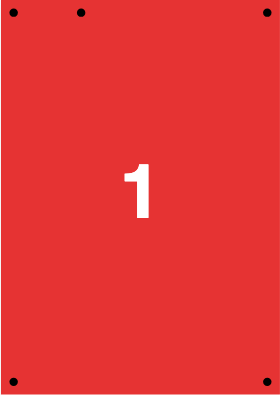
Output result
Knockout White Border
Tick the Knockout checkbox to add a white halo around each mark. Essential on dark, metallic, or kraft stock where the camera cannot pick up marks against the background. The white border creates the contrast needed for reliable optical detection.
Settings to change

Full app view

Output result
Expert Tip
Keep mark distance at 3 mm minimum from the trim edge so the marks do not appear on the finished piece. Use thru-cut marks for standard trim and kiss-cut marks for peel-off stickers.
If you have both crop marks and registration marks, offset them so they do not overlap. Overlapping marks confuse automated cutting cameras.
Learn More
Used in Recipes
Saddle-Stitch Booklet
Standard saddle-stitched booklet. The most common short-run binding method.
Saddle-Stitch with Bleeds
Saddle-stitch booklet with synthetic bleed generation for artwork delivered without bleeds.
Perfect-Bound Book
PUR/hot-melt perfect binding for books with 48+ pages.
Perfect-Bound with Color Bar
Perfect-bound book signatures with inline color bars for press density control.
Case-Bound (Hardcover) Book
Smyth-sewn case-bound book with proper signature imposition and spine marks.
Comic Book Signatures
Comic book or graphic novel imposed in saddle-stitch or perfect-bound signatures.
Children's Book
Full-color children's picture book with heavy stock and case binding.
Photo Book
Lay-flat photo book with flush-mount or perfect binding.
Magazine Production
Full commercial magazine with saddle-stitch or perfect binding and press marks.
Catalog Signatures
Multi-signature catalog for perfect binding on commercial presses.
Annual Report
Corporate annual report with mixed content (text, charts, photos) and premium finishing.
Business Cards
Standard multi-up business card layout on a press sheet.
Business Cards (No-Bleed Rescue)
Business cards from artwork delivered without bleeds.
Postcards
Multi-up postcards (4x6 or A6) on press sheets.
Greeting Cards
Folded greeting cards imposed for duplex printing and fold finishing.
Playing Cards
Full deck of playing cards imposed for sheet-fed printing.
Door Hangers
Multi-up door hangers with die-cut hook hole.
Rack Cards
4x9 inch rack cards imposed for multi-up printing.
Numbered Tickets
Sequential numbered tickets with cut-and-stack imposition.
Variable Data Tickets
Tickets with variable data (barcodes, names, seat numbers) imposed efficiently.
Wedding Invitations
Premium wedding invitations with RSVP cards and envelopes imposed together.
Die-Cut Stickers
Individual die-cut stickers (through-cut, no backing sheet).
Product Labels
Multi-up product labels for bottles, jars, and boxes.
Address Labels
Avery-style address labels on standard label sheets.
QR Code Labels
Unique QR code labels for product tracking or authentication.
Coasters
Printed coasters (round or square) imposed for die cutting.
Box Layout
Folding carton box flat (die-line) with artwork positioned for die cutting.
Label Wrap
Wraparound labels for bottles, cans, or tubes with distortion compensation.
Corrugated Packaging
Large-format corrugated box or display printed on flatbed or flexo.
Bag Layout
Paper or poly bag printed flat and imposed for production.
Poster Tiling
Large poster split into printable tiles with overlap for assembly.
Banner Printing
Wide-format banners with tiling for roll-fed printers.
Signage Repeat
Repeated signage (e.g., shelf talkers, aisle signs) ganged on large-format sheets.
Trade Show Panels
Multi-panel trade show displays split for separate printing and assembly.
Vehicle Wrap
Vehicle wrap panels split for contour-cut application.
Full Press Marks
Complete press mark set for commercial offset production.
Digital Press Ready
Mark set optimized for digital presses (HP Indigo, Xerox iGen, etc.).
Offset Press Ready
Full offset press preparation with all required finishing marks.
Saddle-Stitch Finishing Marks
Finishing marks specifically for saddle-stitch bindery operations.
Perfect Bind Finishing Marks
Finishing marks for perfect binding operations with gathering verification.
Die-Cut Production Marks
Complete die-cutting mark set for labels, stickers, and packaging.
Wall Calendar
12-month wall calendar with saddle-stitch or wire-o binding.
Planner / Diary
Wire-o or perfect-bound planner with weekly/daily layouts.
Restaurant Menu
Folded restaurant menu (bi-fold, tri-fold, or booklet).
Newsletter
Folded newsletter (4-8 pages) for mailing or distribution.
Envelope Production
Printed envelopes imposed and prepared for envelope-making machinery.
Mixed Gang Run
Multiple different jobs ganged on a single press sheet for cost efficiency.
Gang Run with Full Marks
Ganged production sheet with complete finishing marks for commercial press.
Expert Custom Imposition
Fully custom imposition using Expert Grid for non-standard layouts.
Expert Grid with Finishing
Custom Expert Grid imposition with full finishing marks.
Cut-and-Stack Numbering
Sequential numbering with cut-and-stack page ordering for tickets, NCR forms, or raffle books.
Work and Tumble
Flip backup for work-and-tumble duplex printing method.
Flexo Distortion
Pre-distort artwork for flexographic plate mounting on cylinders.
Layers
Shows or hides named PDF layers (Optional Content Groups) in the pipeline output.
This tool reads layers from the pipeline output, not from the source PDF. To see layers here, first add at least one upstream step that creates a named layer: Colour Bar, Cutter Marks, or Header/Footer each generate their own layer. Once layers exist, toggle them on or off to control which content appears in the final output. Three states are available per layer: Off (force hidden), Default (keep PDF original), On (force visible). Useful when the same imposed sheet needs variants with and without marks.
How It Works
This tool reads layers from the pipeline output, not from the source PDF. To see layers here, first add at least one upstream step that creates a named layer: Colour Bar, Cutter Marks, or Header/Footer each generate their own layer. Once layers exist, toggle them on or off to control which content appears in the final output. Three states are available per layer: Off (force hidden), Default (keep PDF original), On (force visible). Useful when the same imposed sheet needs variants with and without marks.
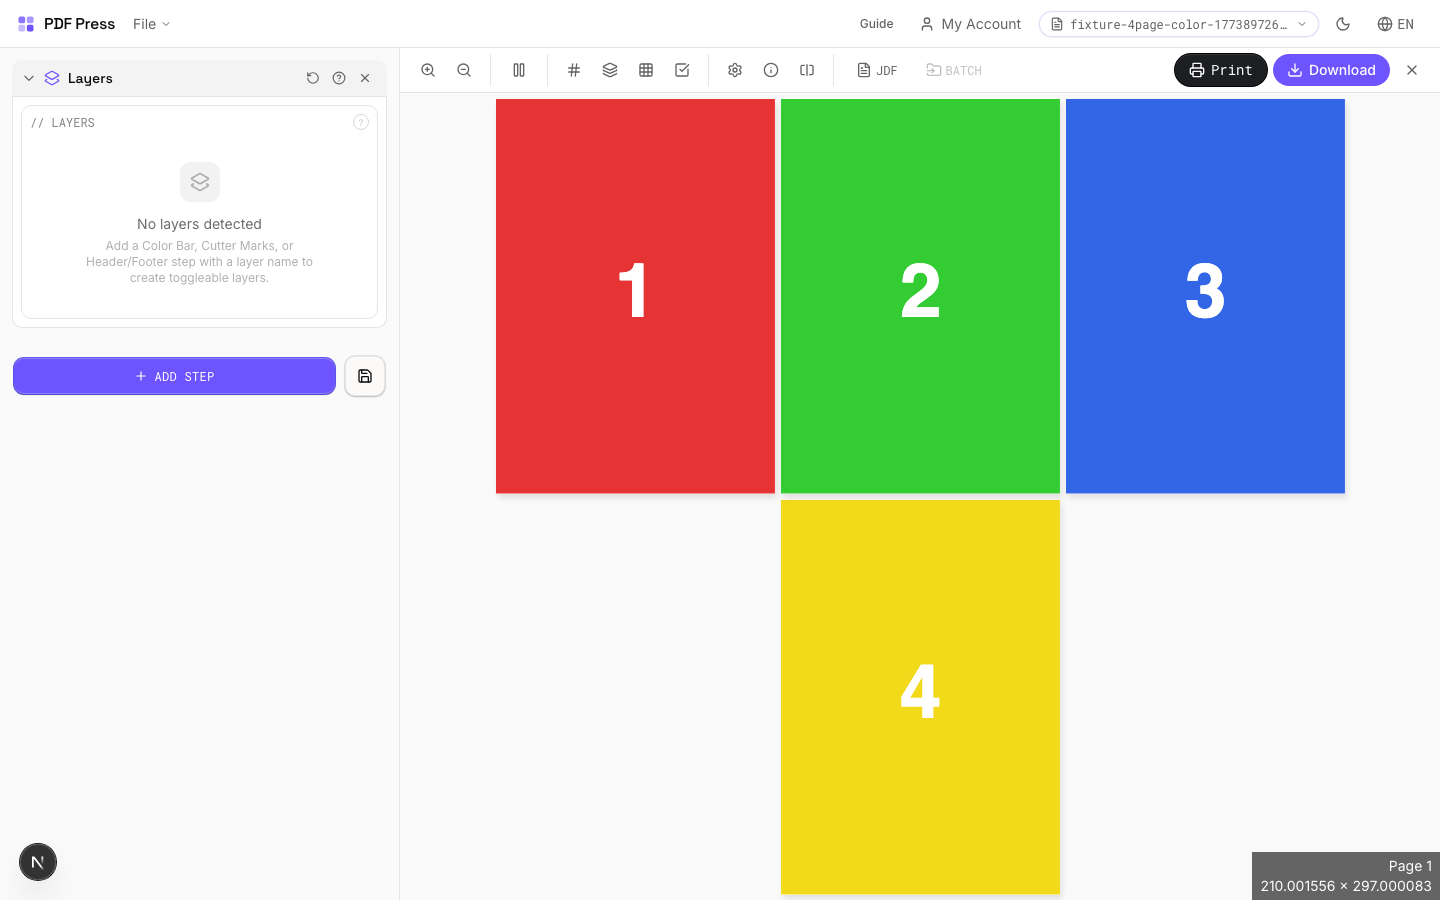
Layers tool applied. Options panel on the left, imposed result on the right. Click to zoom.
Options Guide
Layers
Toggle individual layers on or off. Only visible (enabled) layers appear in the output.
Each layer is listed by its embedded name from the upstream tool that created it. Disabled layers are completely removed from output and will not render or print. If no upstream tools have created layers, this section shows an empty state with instructions on which tools to add first.
Configurations & Variations
Toggle Layer Visibility
The Layers tool reads OCG (Optional Content Group) layers from the pipeline output, not from the source PDF directly. Before using Layers, add at least one upstream step that creates named layers: Color Bar, Cutter Marks, or Header/Footer each generate their own layer. Once layers exist, each one shows a three-state toggle: Off (force hidden), Default (keep the PDF's original visibility), and On (force visible). Click the eye icon or the segmented control to cycle states.
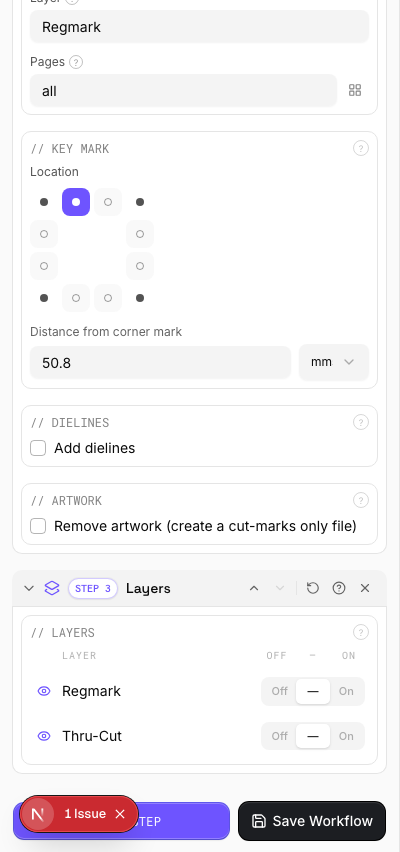
Settings to change
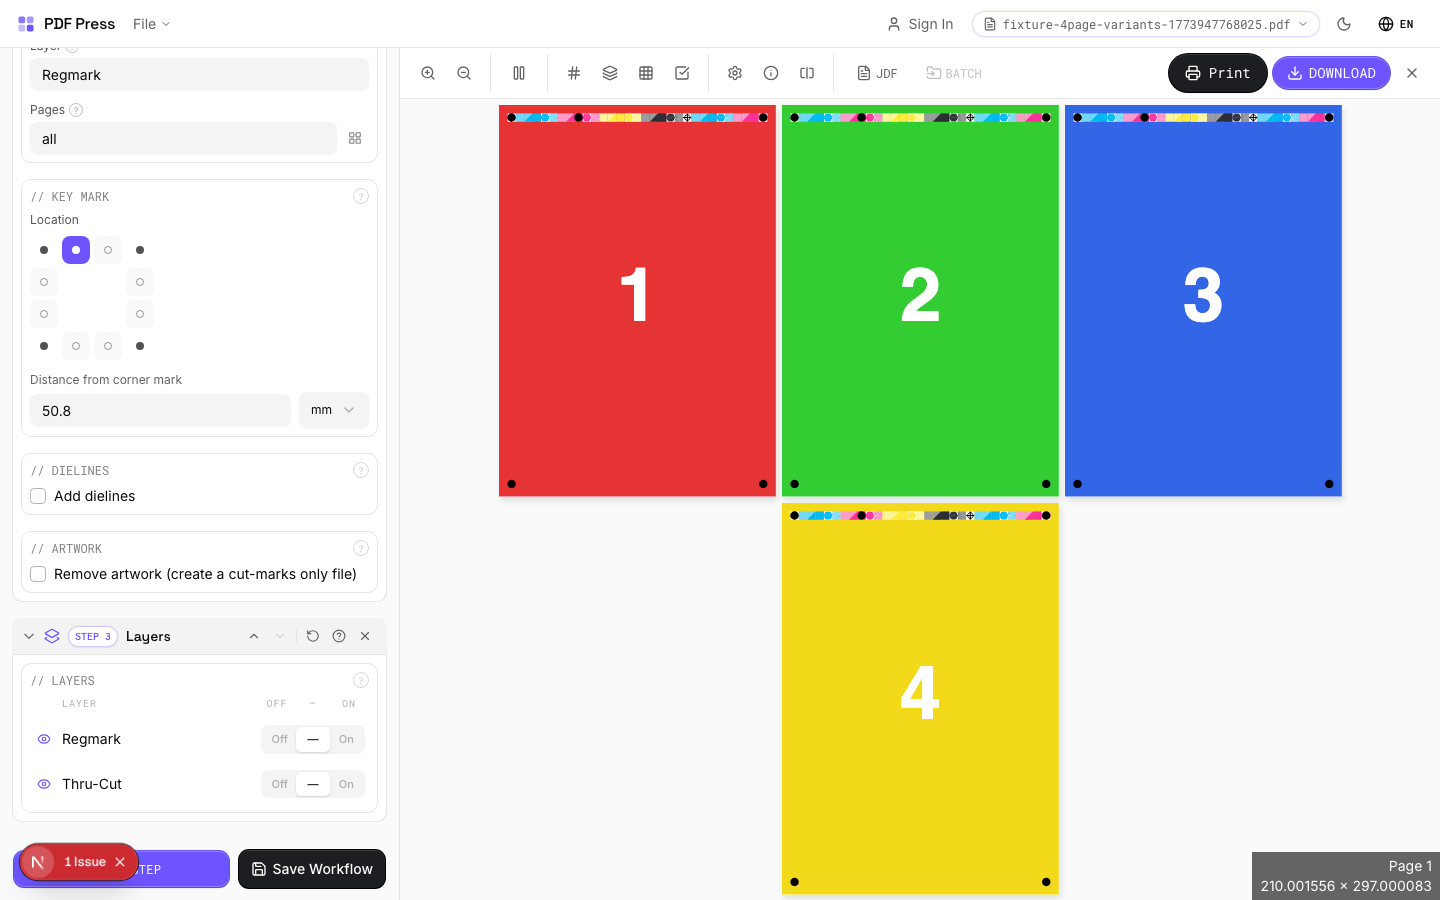
Full app view

Output result
Expert Tip
Layers reads OCG (Optional Content Group) data from the pipeline output, not from the source PDF directly. Add at least one upstream step that creates a named layer (Colour Bar, Cutter Marks, or Header/Footer) before using this tool. Each layer then gets a three-state toggle: Off, Default, or On.
Not all RIPs honour PDF layer visibility. Some will print all layers regardless of the visibility flag. Test with your specific RIP before production.
Custom Impose
2 recipesFull manual control over page placement. Assign any source page to any grid cell with per-cell rotation and creep.
The most flexible imposition tool in the app. Define a column-by-row grid, then manually assign which source page goes in each cell and at what rotation angle. Click Edit Grid Layout to open the full dialog where you can set per-cell creep, independent gutter widths per column/row, duplicate sheets with all their settings, and toggle double-sided mode. Use this for complex or non-standard signature layouts that no automated tool handles.
How It Works
The most flexible imposition tool in the app. Define a column-by-row grid, then manually assign which source page goes in each cell and at what rotation angle. Click Edit Grid Layout to open the full dialog where you can set per-cell creep, independent gutter widths per column/row, duplicate sheets with all their settings, and toggle double-sided mode. Use this for complex or non-standard signature layouts that no automated tool handles.
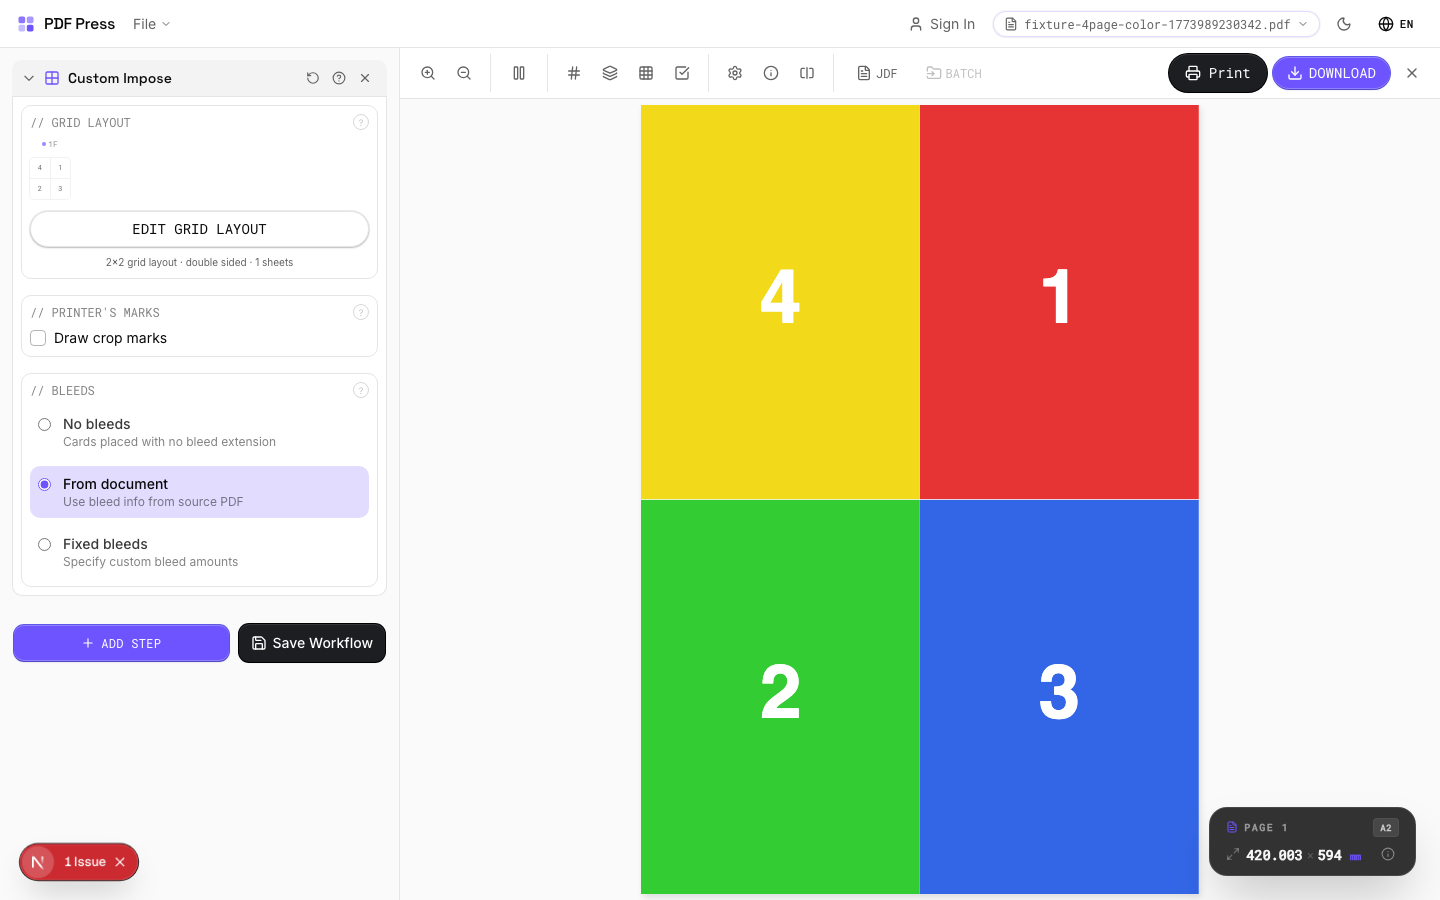
Custom Impose tool applied. Options panel on the left, imposed result on the right. Click to zoom.
Options Guide
Printer's Marks
Adds trim guides and alignment marks outside the live area for accurate cutting and registration.
Crop marks: short lines at each corner showing where to trim. Center marks: crosshairs at sheet midpoints for front/back alignment on duplex jobs. Line length (default 0.43in/31pt): how long each mark line extends. Line thickness (default 0.014in/1pt): mark stroke weight. Line distance (default 0.139in/10pt): gap between the mark and the artwork edge. Four-color black: prints marks in C+M+Y+K for visibility on color proofs. Knockout: adds a white halo around marks so they show on dark backgrounds.
Bleeds
Extends artwork beyond the trim edge to prevent white strips after cutting.
Three modes: 'No bleeds' trims exactly at the page boundary. 'Pull from document' uses bleed info already embedded in the PDF (TrimBox/BleedBox metadata). 'Fixed' lets you manually set bleed on each side, typically 3mm (0.125in / 9pt) for commercial print, 1-2mm for digital. Bleed values define how far past the trim edge the artwork extends.
Grid Layout
Set columns and rows, then assign page numbers and rotations to each cell individually via the Edit Grid Layout dialog.
Grid dimensions: columns x rows define the cell layout. Page assignment: type a source page number into each cell (empty = no page). Rotation: set per-cell rotation (0, 90, 180, 270 degrees) using the rotate buttons on each cell. Sheets: define multiple sheet layouts for multi-signature work; duplicate a sheet with the Copy button to carry over all rotations, gutters, and creep. Double-sided: pairs sheets as front/back of the same physical sheet. Gutters: set independently per column and row gap, useful when some folds need more clearance than others. Creep: hover over a cell to reveal the D-pad arrows for per-cell creep adjustments.
Configurations & Variations
3×3 Expert Grid
Set columns to 3 and rows to 3 in the dialog for a 9-cell grid with full per-cell control. Unlike the standard Grid tool, Expert Grid lets you assign a different source page to each cell, rotate individual cells independently, and set custom gutter widths per column and row. Open the Edit Grid Layout dialog to access the full grid surface.
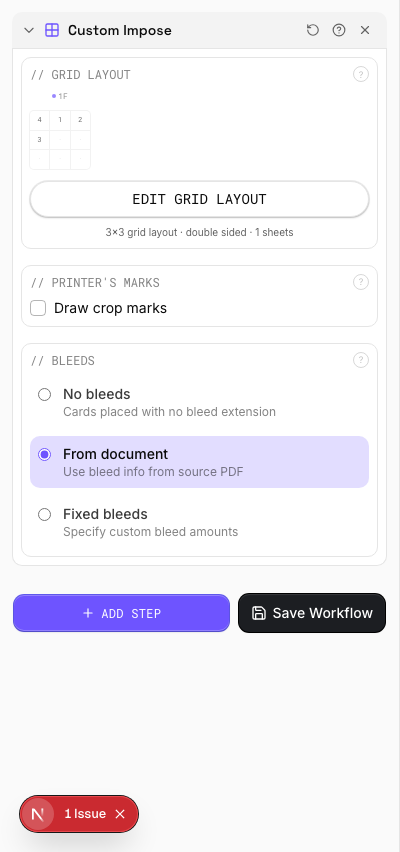
Settings to change

Full app view
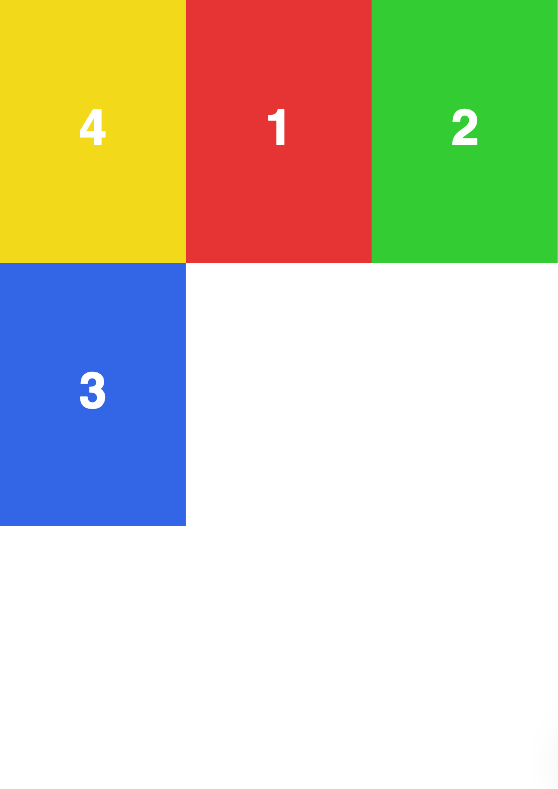
Output result
Per-Cell Creep Adjustment
Open the Edit Grid Layout dialog and hover over any cell to reveal the creep D-pad (arrow buttons). Each click shifts that cell's content by the global creep step value (set in the config bar at the top of the dialog). Vertical creep compensates for paper thickness in nested signatures; horizontal creep corrects for spine shift. The emerald hatched overlay shows the direction and magnitude of the applied creep.
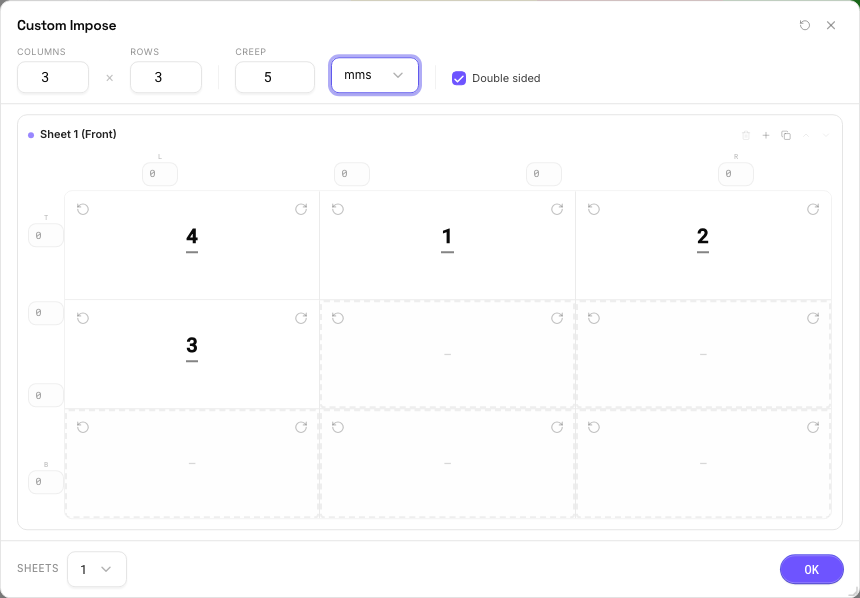
Settings to change
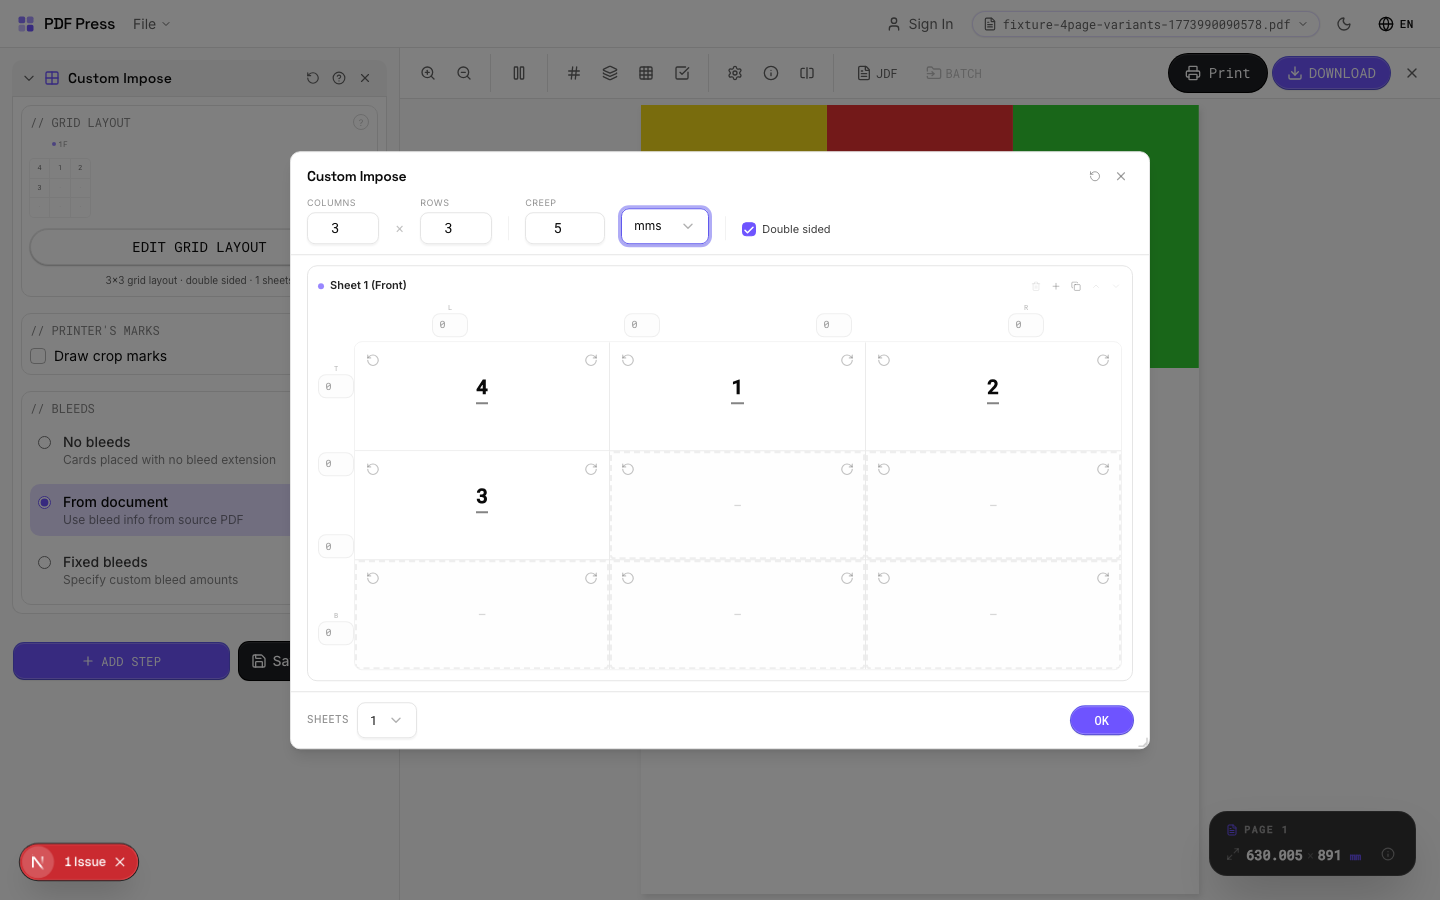
Full app view

Output result
Double-Sided Sheets
Tick the Double-sided checkbox in the dialog config bar. Each physical sheet now has a front and back surface, and the sheet stack shows paired entries (Sheet 1 Front, Sheet 1 Back). Page assignments, rotations, and gutter widths are independent per side. The backing array sizes double automatically. Use the Copy button on any sheet to duplicate the entire layout (both sides, all rotations, gutters, and creep) for fast multi-sheet setup.
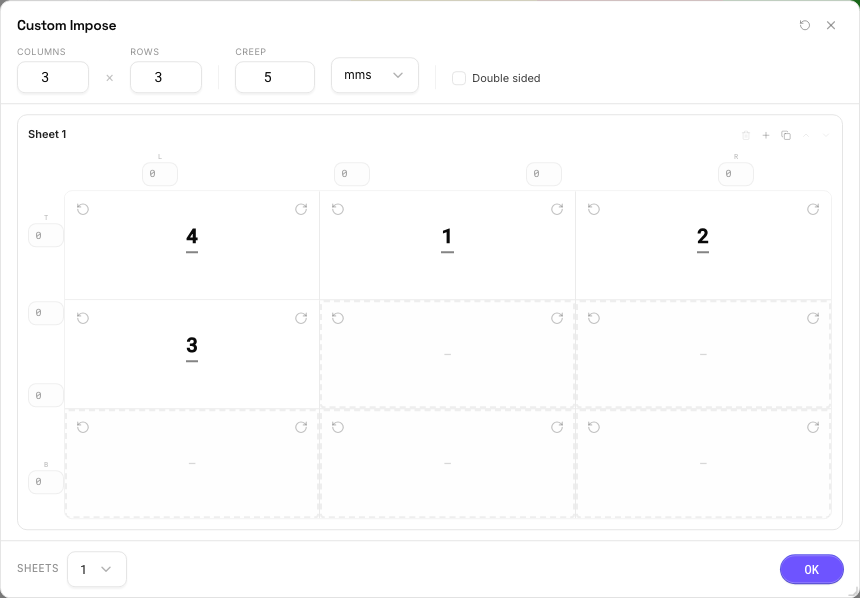
Settings to change
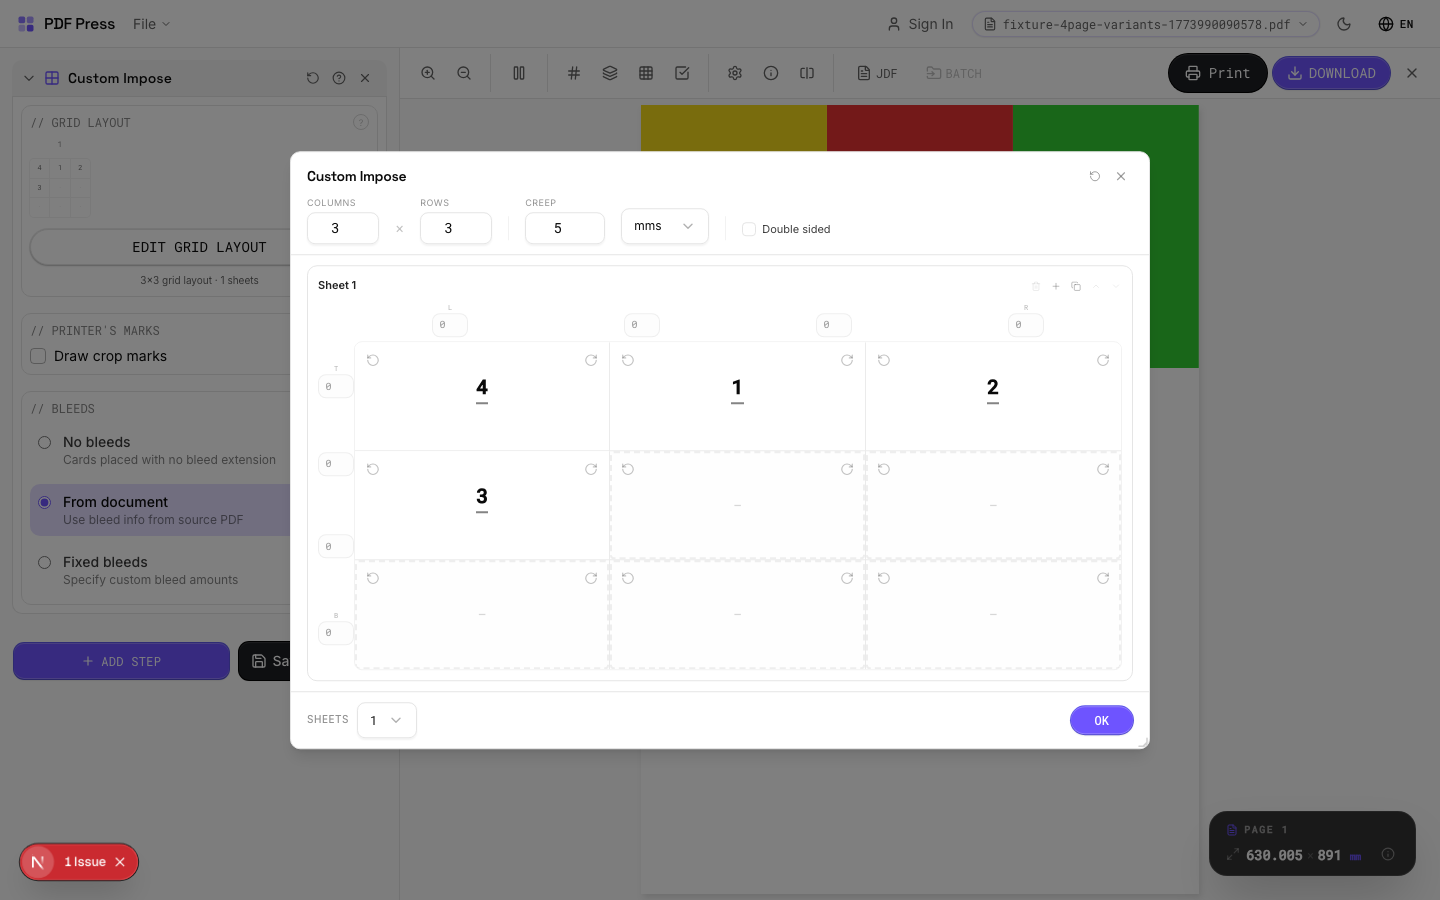
Full app view

Output result
Expert Tip
Expert Grid is the escape hatch for impositions that do not fit any standard template: variable gutter widths, mixed page sizes per cell, per-cell rotation, and independent creep on each slot. Open the Edit Grid Layout dialog for the full grid surface with per-cell controls, sheet duplication, and double-sided mode.
The gutter array size must equal (columns + 1) x (rows) x effectiveSheets. An incorrect array length will cause a processing error. Double-check the maths before running.
Used in Recipes
Expert Custom Imposition
Fully custom imposition using Expert Grid for non-standard layouts.
Expert Grid with Finishing
Custom Expert Grid imposition with full finishing marks.
PDF Tools
2 recipesPDF processing toolkit: optimize file size, linearize for web, encrypt/decrypt, and repair structure.
PDF Optimizer is a Swiss-army-knife powered by qpdf-wasm. It handles five common PDF operations: file size optimization (recompress streams, remove unused objects), linearization (fast web view), encryption (password protection with granular permissions), decryption (remove password protection), and structural repair (fix corrupted xref tables and streams). All processing happens client-side in a Web Worker: your files never leave the browser.
How It Works
PDF Optimizer is a Swiss-army-knife powered by qpdf-wasm. It handles five common PDF operations: file size optimization (recompress streams, remove unused objects), linearization (fast web view), encryption (password protection with granular permissions), decryption (remove password protection), and structural repair (fix corrupted xref tables and streams). All processing happens client-side in a Web Worker: your files never leave the browser.

PDF Tools tool applied. Options panel on the left, imposed result on the right. Click to zoom.
Options Guide
Operation
Choose which PDF processing operation to perform.
Optimize: reduce file size by recompressing streams and removing unused objects. Linearize: restructure for "fast web view": the first page loads before the full file downloads. Encrypt: add password protection and restrict permissions (print, copy, modify, annotate). Decrypt: remove password protection from an encrypted PDF. Repair: fix corrupted PDF structure (broken xref tables, invalid stream lengths).
Optimize
Reduce PDF file size by recompressing and cleaning up internal structure.
Recompress streams: re-encodes content streams with optimal Flate (zlib) compression: can significantly reduce files saved with poor compression. Remove unreferenced objects: purges orphaned objects not linked from the page tree: common in PDFs that have been repeatedly edited. Normalize content streams: standardizes the internal drawing commands for consistency. Typical savings: 10–40% on unoptimized files, less on already-lean PDFs.
Linearize
Restructure the PDF for fast web viewing: the first page renders before the entire file downloads.
Linearization (also called "fast web view" or "optimized for web") reorganizes the PDF so page 1's data comes first in the byte stream. Web browsers and PDF viewers can display the first page immediately while the rest downloads. Essential for large PDFs served from websites. Note: linearization may slightly increase file size due to cross-reference restructuring.
Encrypt
Add password protection and control what recipients can do with the PDF.
User password: required to open the PDF: leave empty if the document should be viewable by anyone. Owner password: required to change security settings or remove restrictions: always required for encryption. Key length: 128-bit AES is broadly compatible; 256-bit AES is more secure but requires Acrobat X+. Permissions: granularly control Print (allow/deny printing), Copy (allow/deny text/image extraction), Modify (allow/deny page editing), and Annotate (allow/deny comments and form filling).
Decrypt
Remove password protection from an encrypted PDF.
Enter the owner or user password to decrypt. Once decrypted, all restrictions are removed and the output PDF has no password protection. You must know at least one valid password: this tool cannot crack unknown passwords.
Repair
Fix corrupted PDF structure by re-processing the file through qpdf.
Repair re-reads and re-writes the entire PDF structure: fixing broken cross-reference tables, invalid stream lengths, mismatched object numbers, and other structural corruption. Also includes a Check function that validates PDF structure without modifying the file. Use Repair when PDFs fail to open in other software, show "file damaged" warnings, or crash RIPs.
Result
Shows the operation status, file size comparison, and download button for the processed PDF.
Expert Tip
Optimise the final imposed PDF to cut file size before sending to the RIP. Downsample images to 300 DPI for offset or 150 DPI for large-format. Anything higher just wastes RIP memory and slows processing.
JPEG compression below quality 60 causes visible banding in gradients and skin tones. Stay at 80 or above for production quality.
Learn More
Used in Recipes
Print-Ready Preparation
Standard pre-flight and preparation workflow for incoming files.
Preflight and Fix
Identify and repair common PDF issues before production.
PDF Preflight
12 recipesPre-press PDF validation and cleanup: remove problem elements, flatten layers, and fix compliance issues.
PDF Preflight runs your file through a Ghostscript-based analysis and cleanup pipeline. It identifies and fixes common prepress issues: embedded files that bloat file size, PostScript fragments that cause RIP errors, problematic font embedding, overprint settings that produce unexpected output, OPI references to missing images, and non-compliant color spaces. Think of it as a pre-flight check before sending files to the printer: catching problems before they become expensive reprints.
How It Works
PDF Preflight runs your file through a Ghostscript-based analysis and cleanup pipeline. It identifies and fixes common prepress issues: embedded files that bloat file size, PostScript fragments that cause RIP errors, problematic font embedding, overprint settings that produce unexpected output, OPI references to missing images, and non-compliant color spaces. Think of it as a pre-flight check before sending files to the printer: catching problems before they become expensive reprints.
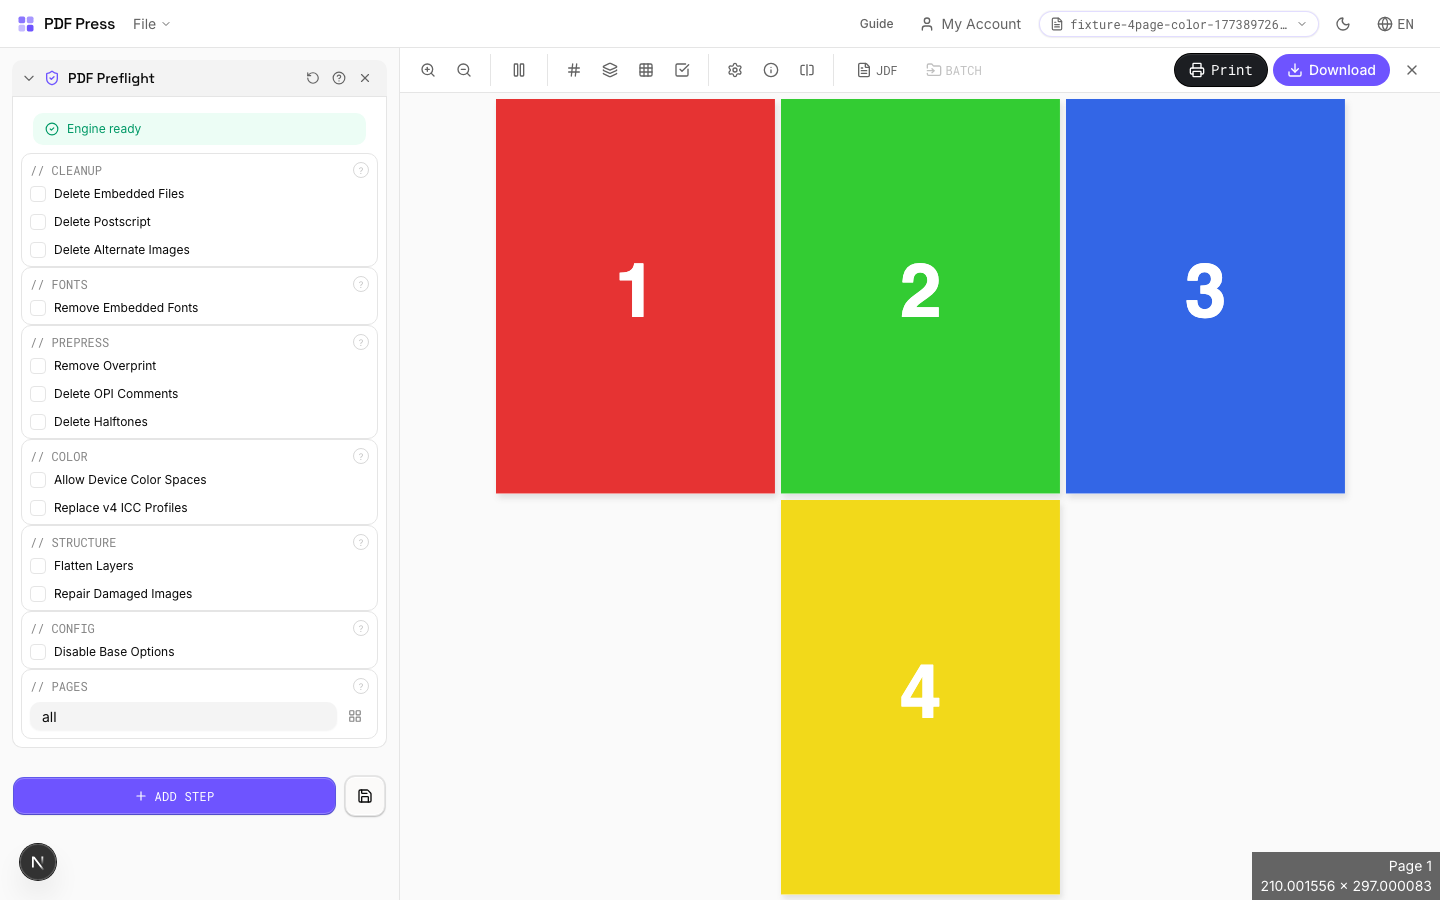
PDF Preflight tool applied. Options panel on the left, imposed result on the right. Click to zoom.
Options Guide
Cleanup
Remove embedded files, PostScript code, and alternate image representations.
Delete Embedded Files: removes file attachments (Excel spreadsheets, Word docs, etc.) that bloat PDF size and aren't needed for print. Delete PostScript: strips legacy PostScript code fragments that can cause errors on modern RIPs. Delete Alternate Images: removes OPI-style alternate image representations (low-res placeholders): the high-res images remain. These are all safe, non-destructive cleanup operations for print-bound PDFs.
Fonts
Control font embedding in the output PDF.
Remove Embedded Fonts: strips all font data from the PDF. The output relies on system fonts for rendering: use only when you intentionally want to reduce file size and know the target system has the required fonts installed. Warning: missing fonts cause text reflow and substitution. For print workflows, keep fonts embedded.
Prepress
Clean up overprint, OPI, and halftone settings that can cause unexpected output.
Remove Overprint: clears overprint flags on objects. Overprint causes objects to mix with underlying colors instead of knocking out: this is intentional for black text but can cause color shifts on colored objects if set incorrectly. Delete OPI Comments: removes Open Prepress Interface references to external high-res images. OPI is a legacy workflow; modern PDFs should have images embedded directly. Delete Halftones: removes custom halftone screen definitions, letting the RIP use its default screens. Use this when the PDF contains wrong screen frequencies (e.g., 133 lpi settings on a 175 lpi press).
Color
Handle device color spaces and ICC profile version compliance.
Allow Device Color Spaces: permits DeviceRGB, DeviceCMYK, and DeviceGray: the "unmanaged" color spaces. Disable this for strict PDF/X compliance that requires ICC-based color management. Replace v4 ICC Profiles: downgrades ICC v4 profiles to v2 equivalents. Some older RIPs and software can't read v4 profiles: this ensures broader compatibility while maintaining color accuracy.
Structure
Flatten optional content layers and repair damaged image data.
Flatten Layers: merges all optional content groups (OCGs/layers) into a single flat page. Essential when sending to RIPs or workflows that don't support PDF layers: ensures all content prints regardless of layer visibility state. Repair Damaged Images: attempts to reconstruct corrupt image streams. Use when images show as gray boxes or cause "invalid image" errors during RIP processing.
Config
Advanced engine configuration.
Disable Base Options: turns off the default cleanup operations that the Ghostscript engine applies automatically. Use this only if you want to selectively enable specific operations without the engine's default processing. For most workflows, leave this unchecked.
Pages
Specify which pages to process using a range expression.
Examples: 'all' = every page. '1-5' = pages 1 through 5. '1,3,5' = specific pages. '1-10 odd' = odd pages 1-9. '2-20 even' = even pages 2-20. 'last' = last page. 'last-2' = third from last. Ranges are 1-based. Combine with commas: '1-5, 8, 12-15'.
Expert Tip
Run preflight as the first step on every incoming file. Check for RGB images, missing fonts, low-resolution images, and transparency that needs flattening for older RIPs.
A passing preflight only means the file is technically compliant. It does not guarantee a good print. Always do a visual soft-proof after preflight.
Learn More
Used in Recipes
Saddle-Stitch Booklet
Standard saddle-stitched booklet. The most common short-run binding method.
Saddle-Stitch with Bleeds
Saddle-stitch booklet with synthetic bleed generation for artwork delivered without bleeds.
Perfect-Bound Book
PUR/hot-melt perfect binding for books with 48+ pages.
Case-Bound (Hardcover) Book
Smyth-sewn case-bound book with proper signature imposition and spine marks.
Comic Book Signatures
Comic book or graphic novel imposed in saddle-stitch or perfect-bound signatures.
Children's Book
Full-color children's picture book with heavy stock and case binding.
Photo Book
Lay-flat photo book with flush-mount or perfect binding.
Magazine Production
Full commercial magazine with saddle-stitch or perfect binding and press marks.
Annual Report
Corporate annual report with mixed content (text, charts, photos) and premium finishing.
Planner / Diary
Wire-o or perfect-bound planner with weekly/daily layouts.
Print-Ready Preparation
Standard pre-flight and preparation workflow for incoming files.
Preflight and Fix
Identify and repair common PDF issues before production.
Production Recipes
68 step-by-step workflows for common print products, authored from a professional prepress perspective.
Booklets & Books
Saddle-stitch, perfect-bound, and case-bound book impositions with finishing marks.
Saddle-Stitch Booklet
Standard saddle-stitched booklet. The most common short-run binding method.
Keep page count at or below 64 for saddle-stitch. Beyond that, the spine becomes too thick for reliable wire-stitch penetration. Enable creep compensation on stock heavier than 100gsm.
Input: Single PDF with sequential pages, page count a multiple of 4. Include 3mm bleed on all sides.
Saddle-Stitch with Bleeds
Saddle-stitch booklet with synthetic bleed generation for artwork delivered without bleeds.
Synthetic bleeds are a rescue technique, not a replacement for properly designed bleeds. Inform the client and flag it on the job ticket.
Input: PDF with pages at trim size (no bleed). Page count must be a multiple of 4.
Perfect-Bound Book
PUR/hot-melt perfect binding for books with 48+ pages.
Leave 5mm extra at the spine edge for PUR milling. Confirm signature count and sheet size with your bindery before imposing.
Input: Single PDF, sequential pages, 3mm bleed, CMYK. Page count divisible by signature size (8, 16, or 32).
Perfect-Bound with Color Bar
Perfect-bound book signatures with inline color bars for press density control.
Color bars require at least 8mm of non-image area along the gripper edge. Verify your plate size can accommodate them.
Input: CMYK PDF, 3mm bleed, page count divisible by 16 for optimal efficiency.
Case-Bound (Hardcover) Book
Smyth-sewn case-bound book with proper signature imposition and spine marks.
Case-bound books need a separate cover imposition. The text block signatures are imposed independently. Add 3mm to the spine-side bleed for Smyth-sewing thread clearance.
Input: Text block PDF, sequential pages, 3mm bleed, CMYK. Cover supplied as a separate file.
Zine / Mini Booklet
Small-format DIY zine from a single sheet of paper (8-page or 16-page fold).
For a single-sheet 8-page zine, print duplex on one sheet, cut a slit in the center, and fold. The page sequence is non-obvious. Verify with a paper dummy first.
Input: 8-page or 16-page PDF at final reading size.
Comic Book Signatures
Comic book or graphic novel imposed in saddle-stitch or perfect-bound signatures.
Standard US comic trim is 6.625 x 10.25 inches. Manga trim is typically B6 (128 x 182mm). Always confirm trim size with the publisher spec.
Input: Sequential pages at comic trim size + 3mm bleed. RGB or CMYK.
Children's Book
Full-color children's picture book with heavy stock and case binding.
Board books need special imposition. Each 'page' is two sheets laminated together. Confirm with the bindery whether they need individual pages or pre-paired spreads.
Input: Full-color CMYK PDF, minimum 300 DPI images, 5mm bleed for board books.
Photo Book
Lay-flat photo book with flush-mount or perfect binding.
Lay-flat binding requires page pairs to be printed as spreads. Verify the imposition handles the center spread correctly. A gutter gap will ruin panoramic photos.
Input: High-resolution CMYK or sRGB PDF with 3mm bleed. Even page count.
Magazine Production
Full commercial magazine with saddle-stitch or perfect binding and press marks.
Magazines with ads from multiple sources will have inconsistent color. Apply a normalization profile or at least verify TIC (Total Ink Coverage) does not exceed 340% for heatset web.
Input: Complete magazine PDF, sequential pages, CMYK, 3mm bleed, all fonts embedded.
Catalog Signatures
Multi-signature catalog for perfect binding on commercial presses.
Large catalogs (200+ pages) benefit from 32-up imposition if your press can handle the sheet size. Fewer signatures = fewer gathering errors.
Input: CMYK PDF, page count divisible by signature size, 3mm bleed, production-ready.
Annual Report
Corporate annual report with mixed content (text, charts, photos) and premium finishing.
Annual reports often mix coated and uncoated stocks. If so, impose each stock type separately and coordinate signature order with the bindery.
Input: CMYK + spot color PDF, 3mm bleed, all fonts embedded, transparency flattened if targeting older RIPs.
Cards & Flat
Business cards, postcards, greeting cards, tickets, and other flat-sheet products.
Business Cards
Standard multi-up business card layout on a press sheet.
Standard business card sizes: 3.5x2 inches (US), 85x55mm (EU), 91x55mm (AU/NZ). Pull bleeds from the document for cleanest results.
Input: Business card PDF at trim size with 3mm bleed on all sides. Duplex: supply front and back as page 1 and 2.
Business Cards (No-Bleed Rescue)
Business cards from artwork delivered without bleeds.
Synthetic bleeds on cards with edge-to-edge photos will show mirrored artifacts. Always request proper bleeds from the designer when possible.
Input: Business card PDF at exact trim size, no bleed included.
Postcards
Multi-up postcards (4x6 or A6) on press sheets.
USPS requires minimum 3.5x5 inches and specific barcode clear zones. For mailable postcards, verify your layout leaves room for the address panel and indicia.
Input: Postcard PDF at trim size, front and back pages, 3mm bleed.
Greeting Cards
Folded greeting cards imposed for duplex printing and fold finishing.
Greeting cards are typically 4 pages (front, inside-left, inside-right, back). Supply as a 4-page PDF in reading order; the booklet tool handles the spread reordering.
Input: 4-page PDF in reading order at final folded size with 3mm bleed.
Playing Cards
Full deck of playing cards imposed for sheet-fed printing.
Playing cards require exact front-to-back registration or the card back pattern reveals the card face at the edges. Use registration marks and do a press check.
Input: 54 cards (52 + 2 jokers) as individual pages, standard poker size (63x88mm) with 3mm bleed.
Door Hangers
Multi-up door hangers with die-cut hook hole.
Standard door hanger is 4.25x11 inches. The hook die must be positioned consistently across all items. Use the cut contour tool to define it precisely.
Input: Door hanger PDF at trim size with die-cut hook area marked. 3mm bleed.
Rack Cards
4x9 inch rack cards imposed for multi-up printing.
Rack cards have a narrow aspect ratio. Ensure the grain direction runs parallel to the long edge for stiffness in the display rack.
Input: Rack card PDF at 4x9 inches trim size with 3mm bleed.
Numbered Tickets
Sequential numbered tickets with cut-and-stack imposition.
Cut-and-stack numbering requires the shuffle order to match your guillotine cut sequence (typically top-to-bottom, left-to-right). Always verify with a test sheet.
Input: PDF with one page per ticket, sequentially numbered. Total count should be divisible by grid cells.
Variable Data Tickets
Tickets with variable data (barcodes, names, seat numbers) imposed efficiently.
Variable data tickets need each barcode to be unique and scannable. Verify barcode readability at the final printed size. QR codes below 15mm may not scan reliably.
Input: PDF with one ticket per page, each containing unique variable data.
Wedding Invitations
Premium wedding invitations with RSVP cards and envelopes imposed together.
Wedding suites often include multiple card sizes. Gang them on a single sheet so all pieces print in the same pass with identical color. Use a premium uncoated stock profile.
Input: Separate PDFs for each suite component (invite, RSVP, details), each at trim size with bleed.
Labels & Stickers
Sticker sheets, die-cut labels, product labels, and vinyl stickers with nesting.
Sticker Sheets
Full sticker sheets with kiss-cut contours for peel-and-stick application.
Kiss-cut depth should penetrate the vinyl/paper but NOT the backing liner. Set padding between stickers to at least 3mm for reliable plotter tracking.
Input: Individual sticker artwork as separate pages or a single page per design. Include 1mm bleed around each sticker.
Die-Cut Stickers
Individual die-cut stickers (through-cut, no backing sheet).
Thru-cut stickers on vinyl need a slightly oversized cut path (0.5mm offset from artwork edge) to avoid white borders caused by cutting misregistration.
Input: Individual sticker designs, each on its own page, artwork at final sticker size with 1mm bleed.
Product Labels
Multi-up product labels for bottles, jars, and boxes.
Product labels for curved surfaces (bottles) need distortion compensation. Artwork will stretch when applied. Confirm with the label applicator vendor for exact distortion values.
Input: Label PDF at flat die size with 2mm bleed. CMYK + spot colors if brand-critical.
Shipping Labels
Shipping labels (4x6 inch) on self-adhesive A4/Letter sheets.
Shipping labels are typically thermal-printed. If offset/digital, use a label stock template and align your grid to the die-cut positions exactly.
Input: 4x6 inch label PDF per shipment, one page per label.
Address Labels
Avery-style address labels on standard label sheets.
Pre-die-cut label stock requires exact registration. Test-print on plain paper first and hold it up against a label sheet to verify alignment before committing to label stock.
Input: Individual label content, one per page, at the Avery label cell size.
Vinyl Stickers
Outdoor-rated vinyl stickers with laminate overprint and contour cut.
For outdoor vinyl, add 2mm white border around the artwork to prevent edge peel. Use solvent or UV-cure inks only. Aqueous inks will fade in weeks.
Input: Sticker artwork on transparent background (PNG or PDF with transparency) at final sticker size.
QR Code Labels
Unique QR code labels for product tracking or authentication.
QR codes need minimum 15mm at print resolution for reliable scanning. Add error correction level H (30%) for labels that may get scratched or partially obscured.
Input: One QR code per page, or a data file for batch generation. Label size specified.
Coasters
Printed coasters (round or square) imposed for die cutting.
Coaster board (1.4mm pulpboard) absorbs ink differently than paper. Reduce TIC to 280% and expect color shift. Always do a press proof on the actual substrate.
Input: Coaster artwork at the die size (typically 95mm round or 95mm square) with 3mm bleed.
Packaging
Box layouts, label wraps, corrugated packaging, bags, sleeves, and envelopes.
Box Layout
Folding carton box flat (die-line) with artwork positioned for die cutting.
Always work from the die-maker's approved CAD file. Never create your own die lines. Even 0.5mm off can cause misalignment in the gluing machine.
Input: Flat artwork PDF matching the die-line dimensions exactly. Die-line supplied as a separate overlay PDF.
Label Wrap
Wraparound labels for bottles, cans, or tubes with distortion compensation.
Calculate distortion from the cylinder diameter and label thickness: distortion% = (thickness / (diameter/2 + thickness)) x 100. Round containers need only circumferential distortion.
Input: Flat label artwork at unwrapped dimensions with 2mm bleed. Specify container diameter.
Corrugated Packaging
Large-format corrugated box or display printed on flatbed or flexo.
Corrugated print has very low resolution (65-100 LPI). Simplify halftone details, increase minimum type size to 8pt, and avoid reverses smaller than 10pt.
Input: Artwork on the corrugated die flat layout. Spot colors preferred. Verify flute direction with the converter.
Bag Layout
Paper or poly bag printed flat and imposed for production.
Bag printing requires artwork to wrap around fold edges. The side gusset panels are often printed in mirror on the same form. Verify orientation with a folding dummy.
Input: Flat bag artwork with fold lines marked. Gusset panels if applicable.
Sleeve / Band
Shrink sleeves or belly bands for product packaging.
Shrink sleeves distort differently in the circumferential and height directions. Get the exact shrink ratios from your sleeve converter. Generic values will cause artwork misalignment.
Input: Flat sleeve artwork at pre-shrink dimensions. Specify shrink material and container dimensions.
Envelope Layout
Printed envelopes imposed for flatbed or rotary die cutting.
Envelope flaps require artwork to be oriented correctly for the fold direction. Print on the inside of the flap if the design wraps over the seal edge.
Input: Envelope artwork on the flat die layout with fold flaps. Die template as overlay.
Large Format
Posters, banners, signage, trade-show panels, floor graphics, and vehicle wraps.
Poster Tiling
Large poster split into printable tiles with overlap for assembly.
Use 10-15mm overlap between tiles. Align the tile grid to avoid splitting critical design elements (faces, text) across a seam wherever possible.
Input: Single-page PDF at the full poster size (e.g., 24x36 inches or A0). 300 DPI for close-viewing, 150 DPI acceptable for distance viewing.
Signage Repeat
Repeated signage (e.g., shelf talkers, aisle signs) ganged on large-format sheets.
For rigid substrates (foam board, PVC), add 3mm bleed beyond the cut line. The CNC router bit kerf is typically 2-3mm. Account for this in your gutter spacing.
Input: Single sign PDF at trim size with 3mm bleed. Specify substrate sheet dimensions.
Trade Show Panels
Multi-panel trade show displays split for separate printing and assembly.
Trade show panel systems have specific frame pockets that add 25-50mm per side. Get the exact frame specs from the display vendor before sizing your panels.
Input: Full continuous artwork at the assembled display size. Specify frame system and panel count.
Floor Graphics
Floor decals and wayfinding graphics with contour cutting.
Floor graphics must be laminated with anti-slip overlaminate (certified to ASTM D2047). Always specify the laminate in the job ticket. Unlaminated floor graphics are a liability.
Input: Floor graphic artwork at final size. Include 10mm bleed for contour-cut shapes.
Vehicle Wrap
Vehicle wrap panels split for contour-cut application.
Vehicle wraps need 50-75mm extra per panel for wrapping around edges. Use a professional vehicle template (from the template vendor, not hand-measured) to avoid costly reprints.
Input: Full vehicle artwork on a professional template file. Panels pre-separated or as a single flat.
Production Marks
Full press mark sets, digital/offset-ready finishing, proofs with watermarks.
Full Press Marks
Complete press mark set for commercial offset production.
This is the standard mark set for any commercial offset job. Place marks at least 3mm from the trim edge and ensure they do not overlap each other.
Input: Already-imposed press sheet PDF ready for mark application.
Digital Press Ready
Mark set optimized for digital presses (HP Indigo, Xerox iGen, etc.).
Digital presses have built-in registration. You rarely need separate registration targets. Focus on color bars and trim marks only to keep the file simple for the DFE.
Input: Imposed PDF, any tool. CMYK with transparency flattened.
Offset Press Ready
Full offset press preparation with all required finishing marks.
Verify the plate size accommodates all marks. On modern CTP workflows, marks are often added by the CTP software. Check with your prepress department to avoid duplication.
Input: Imposed press-sheet PDF, CMYK, all transparency flattened, fonts embedded.
Saddle-Stitch Finishing Marks
Finishing marks specifically for saddle-stitch bindery operations.
The saddle-stitch line reads collating marks optically. Ensure marks have high contrast (black on white) and are positioned consistently across all signatures.
Input: Imposed saddle-stitch signatures, ready for finishing marks.
Perfect Bind Finishing Marks
Finishing marks for perfect binding operations with gathering verification.
OMR and gathering marks serve different purposes. Gathering marks are for visual verification, OMR is for machine verification. Use both on high-volume runs.
Input: Imposed perfect-bind signatures with known signature thickness.
Die-Cut Production Marks
Complete die-cutting mark set for labels, stickers, and packaging.
Use industry-standard layer naming: CutContour (thru-cut), KissCut, Crease, Perforation. Most automated cutting systems recognize these names from the PDF layer metadata.
Input: Artwork with die-line paths on separate spot-color layers, imposed on the press sheet.
Watermarked Proof
Draft proof with watermark and job information for client approval.
Always watermark proofs before sending to clients. An unwatermarked proof has been mistakenly sent to press more than once in every shop's history.
Input: Any PDF at any stage. This is a proofing overlay, not production output.
Branded Proof
Client proof with your shop's branding, job info, and color patches.
Include your shop's ICC profile name in the footer so the client (or another shop) can identify the proofing condition. This prevents disputes about color accuracy.
Input: PDF to be proofed, at any stage of production.
Calendars & Specialty
Wall/desk calendars, planners, menus, newsletters, and envelope production.
Wall Calendar
12-month wall calendar with saddle-stitch or wire-o binding.
Wall calendars need a hanging hole. Add a drill mark at top-center. Wire-o binding is preferred over saddle-stitch for calendars because pages lay flat.
Input: 13-page PDF (cover + 12 months) in landscape orientation with 3mm bleed.
Desk Calendar
Desk tent calendar with fold-and-stand construction.
Desk calendars fold in half to stand up. The bottom half (base) is usually blank or has a different print. Ensure front and back are aligned correctly for the fold.
Input: 13-page PDF (cover + 12 months) at the flat (unfolded) desk calendar size with 3mm bleed.
Planner / Diary
Wire-o or perfect-bound planner with weekly/daily layouts.
Wire-o planners need a 12mm margin on the bind side for the wire holes. Perfect-bound planners need the standard 5mm spine milling allowance.
Input: Complete planner PDF, sequential pages, 3mm bleed. Page count must be divisible by the chosen signature size.
Envelope Production
Printed envelopes imposed and prepared for envelope-making machinery.
Window envelopes need the window position to be precisely registered to the letter fold. Always test the finished envelope with the actual letter insert.
Input: Flat envelope artwork on the die-maker's template with fold flaps. Die template as overlay.
Ganging & Optimization
Multi-job gang runs, expert custom impositions, and cut-and-stack workflows.
Mixed Gang Run
Multiple different jobs ganged on a single press sheet for cost efficiency.
Gang runs save money but complicate color management. All ganged items share the same ink density. Group items with similar color requirements (e.g., all warm tones together).
Input: Multiple job PDFs at their individual trim sizes with bleed. Same stock and coating for all items.
Gang Run with Full Marks
Ganged production sheet with complete finishing marks for commercial press.
Number each ganged item in the slug so the cutter operator can verify all pieces are accounted for after cutting. Missing one item in a gang run is an expensive reprint.
Input: Multiple production-ready PDFs, trimmed to final size with 3mm bleed. Same substrate.
Expert Custom Imposition
Fully custom imposition using Expert Grid for non-standard layouts.
Expert Grid is the escape hatch for layouts that no standard tool handles. Mixed page sizes, rotated cells, asymmetric gutters. Plan your grid on paper first to avoid costly trial-and-error.
Input: Source pages ready for custom positioning. Know your press sheet size and grid requirements.
Expert Grid with Finishing
Custom Expert Grid imposition with full finishing marks.
When using Expert Grid with finishing marks, verify that the marks do not overlap the grid cells. Custom gutters may be narrower than the mark footprint.
Input: Source pages and a detailed imposition plan (grid spec, gutter widths, rotations).
Cut-and-Stack Numbering
Sequential numbering with cut-and-stack page ordering for tickets, NCR forms, or raffle books.
The shuffle order MUST match your cutting sequence (top-to-bottom then left-to-right, or vice versa). A mismatch means the entire run is numbered out of order. Always cut and verify a test sheet first.
Input: PDF with one page per numbered item, sequentially numbered. Count must equal grid cells times sheet count.
Transform & Prep
Print-ready preparation, preflight fixes, merging, duplex interleaving, and distortion.
Print-Ready Preparation
Standard pre-flight and preparation workflow for incoming files.
This is your first-pass workflow for every incoming file. Run preflight first, fix issues, then convert and optimize. Never skip preflight. Hidden issues caught late cost 10x more to fix.
Input: Any incoming PDF from a client or designer. No specific format required.
Preflight and Fix
Identify and repair common PDF issues before production.
If repair fails, the file may be too damaged. Try opening in Acrobat and re-saving as PDF/X before repair. As a last resort, distill from PostScript.
Input: Problematic PDF that crashes, shows errors, or renders incorrectly.
Multi-File Merge
Merge multiple source files into a single document for unified processing.
Merge order becomes page order. Double-check the sequence before proceeding. If files have different color profiles, convert to a common profile before merging.
Input: Multiple PDFs to be combined. Specify the desired page order.
Duplex Interleave
Interleave separate front and back files for duplex printing.
If the back file is in reverse order (common from scanning), reverse it first before interleaving. One page off will cascade the mismatch through the entire job.
Input: Two PDFs: one with all fronts, one with all backs. Both must have the same page count.
Work and Tumble
Flip backup for work-and-tumble duplex printing method.
Work-and-tumble flips the sheet along the short edge; work-and-turn flips along the long edge. Using the wrong flip direction will produce mirrored backs.
Input: Imposed front-side sheet ready for tumble backup creation.
Landscape Rotation
Rotate pages from portrait to landscape (or vice versa) for press feed direction.
Always confirm the rotation direction (CW vs CCW) with a test page. The wrong rotation puts the gripper edge on the wrong side, which can cause feeding issues.
Input: PDF with pages in the wrong orientation for the target press.
Flexo Distortion
Pre-distort artwork for flexographic plate mounting on cylinders.
Distortion percentage is calculated from plate thickness and repeat length: D% = (plate thickness x PI / repeat length) x 100. Always get these values from the plate maker.
Input: Artwork at 1:1 undistorted size. Specify plate thickness and cylinder repeat length.
Template Index
181 ready-made templates across 6 categories. Load any template to jump-start your imposition workflow.
Commercial Print
Offset & digital press workflows
10-Up Business Cards
singleStandard US business cards (3.5×2") ganged 10-up on Letter with bleeds and crop marks.
14-Up Business Cards (Tabloid)
singleProduction-run business cards ganged 14-up on 11×17" tabloid for commercial offset.
2-Up Postcards (4×6")
singleUSPS-standard 4×6" postcards, 2-up on Letter for desktop or short-run digital.
2-Up Rack Cards (4×9")
multiStandard rack cards for brochure holders, 2-up on tabloid stock.
Tri-Fold Brochure 2-Up
multiImposes two finished tri-fold brochure flats (8.5×11" or A4) on tabloid for offset printing.
Saddle-Stitch A5 Booklet
multiCreates print-ready A5 saddle-stitched booklets from A5 source pages on A4 landscape sheets.
Saddle-Stitch A4 Magazine
multi32-page A4 magazine signatures on A3 landscape sheets for commercial offset.
Perfect Bound A5 Signatures
multi4-up perfect-bound book signatures for A5 trade paperbacks on A4 landscape.
Step-and-Repeat Flyer
singleFill a sheet with sequential flyer pages, auto-scaled to fit. Ideal for different-content handouts.
3-Up Numbered Tickets
productionSequentially numbered event tickets in cut-and-stack (shingled) order for guillotine cutting and collating.
2-Up Door Hangers
multiStandard door hangers (3.875×8.75") ganged 2-up on Letter with trim marks.
Tent Card 2-Up
multiFold-in-half table tent cards (4.25×5.5" finished), 2-up on Letter for double-sided printing.
Letterhead Gang Run
productionGang multiple client letterheads on one tabloid press sheet with color bar and individual cut marks.
Playing Cards 16-Up
productionStandard poker-size playing cards (2.5×3.5") ganged 16-up on 12×18" stock.
Round Coasters (Nested)
production3.5" round drink coasters nested on Letter for contour die-cutting.
EDDM Postcard (6.25×9")
multiUSPS Every Door Direct Mail oversized postcard on 13×19" stock.
Certificate 2-Up
multiAward or training certificates 2-up on tabloid for desktop proofing or short-run printing.
Wall Calendar Signatures
multiCoil-bound wall calendar with back cover rotation on tabloid landscape.
Work-and-Turn Gang Sheet
productionGang sheet with work-and-turn imposition — print one side, flip sheet on short edge, print again. Saves plates.
Work-and-Tumble Gang Sheet
productionGang sheet with work-and-tumble — flip on the long edge. Ideal for landscape items.
CD Tray Card 2-Up
multiStandard CD jewel case tray cards (4.75×4.75") ganged 2-up on Letter.
Shingled 3-Up (Cut & Stack)
singleClassic cut-and-stack imposition for sequentially ordered pieces. Cut the stack into 3 strips and they're pre-collated.
Tri-Fold Brochure (Letter)
singleStandard tri-fold brochure on Letter stock. 6 panels (3 front, 3 back) with fold marks.
4-Up Rack Cards (3.5×7")
singleVertical rack cards ganged 4-up on Letter. Standard tourism and retail display size.
3-Up Door Hangers
single3.5×8.5" door hangers ganged 3-up across on Tabloid for die-cutting.
4-Up Ticket Strips
singleEvent/raffle tickets (8×2.5") stacked 4-up on Letter with perforation marks.
NCR Form (3-Part Carbon)
single3-part carbonless form on Letter. Each part prints on separate sheet for collating.
Coupon Sheets (10-Up)
single3.5×2" coupons ganged 10-up on Letter with perforation-ready marks.
2-Up Gift Certificates (5×7")
single5×7" gift certificates, 2-up on Letter stock with crop marks.
2-Up Notepad Sheets
singleHalf-letter notepads (5.5×8.5") printed 2-up on Letter for padding.
Loyalty/Punch Cards (10-Up)
singleStandard business-card-size loyalty/punch cards, 10-up on Letter with crop marks.
2-Up Invitation Cards (5×7")
singleWedding/event invitations (5×7") printed 2-up on Letter with premium bleeds.
Photo Contact Sheet (8-Up)
singlePhotographer's proof sheet with 8 images (2×4) on Letter. Quick client review layout.
Bi-Fold Restaurant Menu
singleStandard bi-fold menu on Tabloid. Print both sides, fold in half for 4-panel menu.
Tri-Fold Event Program
multiTri-fold event or church program on Letter landscape. 6 panels with fold marks.
RSVP Cards (4-Up A7)
singleA7 response/RSVP cards (5×3.5") printed 4-up on Letter with crop marks.
Square Coasters (4-Up)
multi4" square drink coasters printed 4-up on Tabloid stock with crop marks for die cutting.
Tear-Off Flyer with Tabs
singleCommunity bulletin flyer with tear-off contact tabs at bottom. Cut-and-stack layout stacks 3 on Letter.
Folder Insert (Tabloid)
singlePresentation folder insert (9×12") centered on tabloid with trim marks.
Business Checks (3-Up)
multiStandard 3-up business checks on Letter stock. MICR-safe layout with perforation marks.
Full-Bleed Postcards (4-Up + Bleed)
multiAdd 1/8″ bleed to postcard artwork missing bleeds, then gang 4-up on Letter with crop marks.
Proof Sheet with PROOF Watermark
multi2-up proofing layout on Tabloid with a diagonal PROOF watermark — prevents client from using proofs as finals.
Full-Bleed Brochure Booklet
multiAdd 3mm bleed to brochure pages, then impose as saddle-stitch booklet on Tabloid.
Business Cards with QR Code
multi10-up business cards on Letter with a QR code on the back — links to website or vCard.
Business Card 8-Up (Step & Repeat)
single8-up step-and-repeat business cards using Expert Grid. All slots print the same card for maximum throughput on a single design.
Postcard 2-Up (Work & Turn)
multi2-up work-and-turn postcard imposition. Front and back print on the same sheet – flip along the short edge to back up.
Label 4-Up (Cut & Stack)
production4-up label imposition in cut-and-stack order across 4 sheets. After guillotine cutting and stacking, labels are in sequential order.
Packaging
Boxes, labels, bags & dielines
Folding Carton Dieline
productionRetail box flat on 13×19" sheet using Expert Grid for precise panel placement with die-cut paths.
Sticker Sheet A4 (Die-Cut)
productionKiss-cut sticker sheet on A4 with shape-based nesting for maximum yield.
Label Roll (Continuous)
productionProduct labels on a 4" continuous roll for roll-to-roll label printers.
Hang Tags 8-Up (2.5×4")
multiRetail garment hang tags ganged 8-up on Tabloid with die-cut contour paths.
Wine Bottle Label 6-Up
multiStandard wine bottle labels (3.5×4") ganged 6-up on Tabloid with trim marks.
Blister Card 4-Up
multiRetail blister packaging cards (3.5×5") ganged 4-up on Tabloid with dieline paths.
Soap Bar Wrap 4-Up
multiBody care product wraps (3×4") ganged 4-up on Letter.
Envelope Flats 4-Up (#10)
multiStandard #10 envelope flats (9.5×4.125") ganged 4-up on Tabloid with dieline paths.
Retail Box Flat 2-Up
productionProduct box flats arranged 2-up using Expert Grid for precise panel positioning.
Print & Cut Vinyl Decals
productionVinyl decals on 24" roll for Roland/Graphtec/Mimaki print-and-cut plotters.
LP Record Sleeve Insert
multi12×12" vinyl record sleeve inserts, 2-up on 13×19" stock.
Pill Box Flat Pattern
productionPharmaceutical packaging dieline with rotated panels for optimal sheet usage.
Shopping Bag Flat 2-Up
multiRetail shopping bag flats 2-up on Tabloid with fold and die-cut paths.
Pizza Box Lid (13×19")
multi10×10" pizza box lid flats on 13×19" stock with trim marks.
Cereal Box Flat
productionConsumer goods box dieline using Expert Grid for precise multi-panel positioning.
CD/DVD Jewel Case Wrap
multiOptical disc jewel case wrap (9.5×4.72") on Tabloid with trim marks.
Tea Box Wrap
productionSmall product box flat (3×5") positioned 4-up on Letter with dieline marks.
Cosmetic Box Flats
productionPremium cosmetic box flat on 13×19" sheet with Expert Grid for precise panel layout.
Seed Packets (6-Up)
singleSmall seed packets (3×4.5") ganged 6-up on Letter with crop marks.
Candy Bar Wrappers (3-Up)
singleCandy bar wraps (7.5×5.5") placed 3-up on Tabloid for wrapping and gluing.
Bottle Neck Hangers (6-Up)
productionNeck tags (2.5×3.5") for wine/spirit bottles, 6-up on Letter with die-cut marks.
Candle Wraps (4-Up)
singleCandle label wraps (3×8") printed 4-up on Tabloid for wrapping round candles.
Soap Band Wraps (8-Up)
singleNarrow soap bands (1.5×6") ganged 8-up on Letter for bar soap wrapping.
Gift Box Flat (Tabloid)
productionMedium gift box flat printed 1-up on Tabloid with fold lines and die-cut marks.
Pouch Flats (2-Up Tabloid)
singleStand-up pouch flats (6×9") printed 2-up on Tabloid for heat-seal pouches.
Spice Labels (Nested)
productionSmall spice jar labels (2×3") auto-nested on Letter for maximum yield with kiss-cut.
Shrink Sleeve (Roll)
productionBottle shrink sleeves auto-nested on continuous roll stock for maximum yield.
Bakery Tray Liner (2-Up)
singleBakery/deli tray liners printed 2-up on Tabloid with food-safe inks area.
Corrugated Shipper Flat
productionE-commerce shipper box die-cut flat laid out with Expert Grid for flexo/litho lamination.
Poly Bag Headers (6-Up)
multiRetail poly bag header cards (4×2.5") printed 6-up on Letter with hang-hole marks.
Bottle Cap Labels (Nested)
productionTiny bottle cap labels (1.5" circles) auto-nested for maximum yield on Letter.
Tube Label Wrap (4-Up)
multiCosmetic tube label wraps (6×2.5") printed 4-up on Letter for roll-on application.
Product Labels with Bleed & Barcode
productionAdd bleeds to product label artwork, add a Code 128 barcode, then gang 6-up on Letter with kiss-cut marks.
Box Flat with Bleed Prep
multiAdd 5mm bleed to a box dieline flat, then resize to fit press sheet — ready for die-cutting.
Publishing
Books, magazines & calendars
Perfect Bound Trade Paperback (4-Up)
multi4-up signatures for A5 perfect-bound trade paperbacks. Standard for novels, manuals, and catalogs.
Saddle-Stitch A6 Mini Booklet (8-Up)
multi8-up mini booklet for A6 saddle-stitched inserts and leaflets on A4.
16-Page Church Bulletin (A4)
multiSaddle-stitched A4 bulletin on A3 landscape. Standard for weekly church programs.
Manga / RTL Comic Booklet
multiRight-to-left saddle-stitched booklet for manga, Arabic, and Hebrew comics on B5 landscape.
Landscape Wall Calendar
multiCoil-bound wall calendar with back cover rotation on Tabloid landscape.
Desk Calendar (Tent Style)
singleDesk tent calendar on Letter landscape with half-sheet layout.
32-Page Book Signature (8-Up)
productionStandard 32-page book signature using 8-up perfect binding on Tabloid. The workhorse of trade printing.
Digest Magazine (5.5×8.5")
multiReader's Digest-size magazine signatures. 4-up saddle-stitch on Tabloid.
Children's Book (8.5" Square)
multiSquare-format picture book on Tabloid landscape with saddle-stitch binding.
Lay-Flat Photo Book (12×12")
multiSquare photo album with zero creep for lay-flat binding on 24×12" stock.
Academic Journal (4-Up)
production4-up perfect-bound journal signatures with color bar for press proofing.
Newsletter 4-Page (Single Fold)
singleSimple 4-page newsletter — one sheet folded in half on Letter landscape.
Pocket Book (A6 from A5)
multiSmall-format pocket book in A6 with 2-up perfect binding.
US Comic Book (6.625×10.25")
multiStandard US comic book format on Tabloid with saddle-stitch binding.
Instruction Booklet (A6 4-Up)
multiSmall product instruction booklet. 4-up nested on A4 for cost-effective production.
Newspaper Tabloid Signature
production4-page newspaper folded tabloid signature using Expert Grid for broadsheet-style page ordering.
Quarter-Letter Zine
multiMicro-zine at 4.25×5.5" using 4-up saddle-stitch on Letter. Cut, fold, staple.
A5 Pocket Book
multiA5 (148×210mm) pocket paperback using saddle-stitch binding on A4 landscape.
Playbill / Theater Program
multiA5 saddle-stitched theater program booklet on A4 stock.
Recipe Book (Letter)
multiUS Letter recipe book with perfect binding. Ideal for cookbooks and recipe collections.
Wedding Program
multiHalf-letter (5.5×8.5") wedding program booklet, saddle-stitched on Letter landscape.
Memorial / Funeral Program
singleHalf-letter memorial program, saddle-stitched on Letter landscape. Single fold, 4-8 pages.
Yearbook Signatures (16-Up)
production16-up book signatures for yearbook production on Tabloid. Professional offset workflow.
Hymnal / Songbook (A5)
multiA5 hymnal or songbook with perfect binding on A4 stock. For churches and choirs.
Instruction Manual (A5)
multiA5 product instruction booklet, saddle-stitched on A4. Compact format for product packaging.
Pocket Digest (5×8")
multi5×8" digest-size booklet using perfect binding. Common for literary journals and anthologies.
Concert Program (A5)
multiA5 saddle-stitched concert or theater program. 12-16 pages typical, fits in pocket.
Memorial Service Program
singleHalf-letter bi-fold memorial program. 4 pages — cover, obituary spread, back.
Student Planner (4-Up)
multiA6 student planner pages imposed 4-up on A4 for perfect binding. 52+ weeks.
Coloring Book (Letter)
multiUS Letter coloring book with saddle-stitch binding. Single-sided interior (back pages blank).
Photo Book (Landscape A4)
multiLandscape A4 photo book with perfect binding. Full-bleed photo spreads.
Square Catalog (8×8")
multi8×8" square product catalog with saddle-stitch binding. Popular for retail and portfolio.
8-Page Saddle-Stitch Booklet
productionClassic 8-page saddle-stitched booklet using Expert Grid. Two physical sheets, each printed double-sided, folded and nested.
16-Page Signature (Perfect Bind)
production16-page book signature using Expert Grid with 2×2 layout on 2 double-sided sheets. Sequential page order for perfect (adhesive) binding.
Large Format
Banners, posters & signage
Banner Tiles 4-Up (24×36" panels)
singleFour 24×36" banner panels on a single 96×36" wide-format sheet for trade show displays.
Tiled Poster (A4 tiles to A0)
singleTiles a large poster across multiple sheets. Each source page fills one cell in an 4×2 grid.
Roll Vinyl Sticker Sheet (24")
productionVinyl stickers nested on 24" roll for wide-format print-and-cut plotters.
4-Up 18×24" Posters
singleFour 18×24" posters ganged on a 36×48" sheet for screen printing or large-format digital.
Step-and-Repeat Photo Print
singleFill a sheet with identical photos. Perfect for passport photos, photo booth strips, and proofing.
Wallpaper Panel Repeat (27")
productionWallpaper and mural panels on 27" roll with seamless repeat pattern.
2-Up Movie Posters (27×40")
singleStandard one-sheet cinema posters ganged 2-up on 54×40" wide-format stock.
Label Roll 4" (Continuous)
productionProduct labels on a 4" continuous roll with kiss-cut dielines for label applicators.
Vehicle Wrap Panel Layout
productionVehicle wrap panels arranged in 3×1 Expert Grid for wide-format printing.
Canvas Wrap Print Tiling
multiGallery-wrap canvas tiles auto-scaled in a 2×2 grid for large art prints.
Trade Show Display Graphics
multiExhibition pop-up display panels on 48×96" wide-format with color bar for proofing.
Billboard Tiles (4-Panel)
productionOutdoor billboard composed of 4 tiled panels using Expert Grid for precise placement.
Yard Signs (18×24")
singleCorrugated yard signs at 18×24" for real estate, political campaigns, and event signage.
Real Estate Signs (24×36")
singleLarge real estate signs at 24×36" for property listings and open house signage.
Menu Board (Tabloid)
singleRestaurant menu board at 11×17" Tabloid with color bar for print verification.
Window Clings (A3)
singleA3 (297×420mm) window cling graphics for storefront and vehicle windows.
Floor Graphics (24×24")
singleSquare floor decals at 24×24" for retail wayfinding and promotional graphics.
A-Frame Sign Inserts
singleSidewalk A-frame sign inserts at 24×36" with double-sided printing.
Retractable Banner (33×80")
singleStandard retractable/roll-up banner at 33×80" for trade shows and events.
Exhibition Panel (4×8 ft)
productionLarge exhibition panel at 4×8 feet, tiled into 4 printable sections.
Photo Backdrop (8×10 ft)
productionPhotography backdrop at 8×10 feet, tiled into printable sections for assembly.
Table Runner (30×72")
singleConference table runner at 30×72" for 6ft tables. Resized for large-format output.
Fabric Banner (24×72")
singleVertical fabric banner at 24×72" for dye-sublimation printing.
Street Pole Banner (24×60")
singleStandard street/light pole banner at 24×60" with bleed for pole pocket.
Bus Shelter Poster (46×67")
singleStandard bus shelter/transit advertising poster at 46×67" for backlit display.
Yard Sign (24×18")
singleStandard coroplast yard sign at 24×18" landscape for real estate, political, and event signage.
Office
Desktop & home printing
2-Sided A5 Flyer
singleQuick double-sided A5 flyer from your desktop printer. No marks, no bleeds — just fold or cut.
Mini Booklet (A7 Zine)
multiDIY mini zine using 4-up saddle-stitch on A4. Cut, fold, staple — instant pocket booklet.
Greeting Card (A5 Fold)
singleSingle-fold greeting card on Letter landscape. Print, fold in half, done.
4-Up Index Cards (3×5")
multiStudy flashcards or index cards, 4-up on Letter for cutting.
Half-Sheet Handout 2-Up
singleTwo half-letter handouts per sheet. Perfect for meeting agendas, sign-up sheets, and flyers.
Mailing Labels (Avery 5160 Style)
singleAddress labels nested on Letter. Compatible with Avery 5160 and similar 30-up label sheets.
Add Page Numbers
singleAdds "Page X of Y" to every page. Simple and universal — works with any PDF.
2-Up Proofing on Tabloid
multiProof Letter-size artwork 2-up on Tabloid with crop marks to verify bleed and trim.
Rotate All Pages Landscape
singleRotates all pages 90° clockwise. Useful for converting portrait scans to landscape.
Interleave Two Documents
singleMerges pages from two PDFs in alternating order (A1, B1, A2, B2...). Great for double-sided printing from single-sided scans.
Tent Cards (4-Up)
singleTable tent cards (5×5" flat, folds to 5×2.5") printed 4-up on Letter.
Name Badges (8-Up)
singleConference name badges (3.5×2.25") printed 8-up on Letter for badge holders.
Raffle Tickets (8-Up)
singleNumbered raffle tickets (2×5.5") printed 8-up on Letter with perforation marks.
Bookmarks (6-Up)
singleStandard bookmarks (2×6") printed 6-up on Letter stock.
Door Signs (2-Up)
singleDo Not Disturb / office door signs (4×10") printed 2-up on Letter.
Desk Name Plates (4-Up)
singleFolding desk name plates (8×2" flat) printed 4-up on Letter.
Parking Permits (4-Up)
singleParking permits / hang tags (3.5×5") printed 4-up on Letter stock.
Visitor Passes (10-Up)
singleBusiness-card-size visitor passes (3.5×2") printed 10-up on Letter stock.
Flash Cards (12-Up)
singleStudy flash cards (3.5×2") printed 12-up on Letter. Perfect for students and educators.
Recipe Cards (4×6", 4-Up)
singleStandard recipe cards (4×6") printed 4-up on Tabloid. Double-sided for ingredients + instructions.
Shipping Labels (6-Up)
singleShipping/mailing labels (4×3.33") printed 6-up on Letter. Fits standard label sheets.
Place Cards (8-Up)
singleEvent place cards (3.5×2") printed 8-up on Letter. Fold in half for tent-style seating cards.
Luggage Tags (6-Up)
singleLuggage tags (2.5×4.25") printed 6-up on Letter with crop marks for die cutting.
Emergency Contact Cards (10-Up)
singleWallet-size emergency contact cards (3.5×2") printed 10-up on Letter.
Binder Spine Labels (10-Up)
single1" binder spine labels printed 10-up on Letter. Standard 3-ring binder spine width.
Certificates (2-Up)
singleHalf-letter classroom certificates printed 2-up on Letter for quick teacher printing.
Draft Watermark
singleStamp a diagonal DRAFT watermark on every page — prevents accidental use of unfinished documents.
Confidential Watermark
singleRed CONFIDENTIAL watermark for sensitive documents — visible but non-destructive.
Full-Bleed Photo Cards (4×6)
multiAdd bleed to borderless photo cards, then print 2-up on Letter — perfect for holiday cards or invitations.
Proof Booklet with Watermark
multiSaddle-stitch booklet on Letter with a PROOF watermark — for client review copies.
Variable Data
CSV-driven tickets, labels & badges
Event Tickets (QR Code)
multiQR code tickets from CSV data, 2-up on Letter sheets for easy cutting.
Raffle Tickets (Numbered)
multiCode 128 barcode raffle tickets from CSV, 4-up on Letter.
Conference Badges (QR)
multiName badges with unique QR codes from CSV, 4-up on A4.
Shipping Labels (Code 128)
multiShipping labels with unique Code 128 barcodes, 10-up on Letter.
Asset Tags (DataMatrix)
multiCompact DataMatrix asset tags, 10-up on Letter for inventory tracking.
Product Labels (EAN-13)
multiEAN-13 retail barcodes from CSV, 12-up on A4 for product labelling.
Gift Vouchers (QR Code)
multiGift vouchers with unique QR redemption codes, 2-up on A4.
Parking Permits (QR Code)
multiParking permits with unique QR validation codes, 4-up on Letter.
Loyalty Cards (Code 128)
multiLoyalty/membership cards with unique Code 128 barcodes, 10-up on Letter.
Wristbands (QR Code)
multiEvent wristbands with unique QR codes, 8-up on Letter.
Glossary
Ready to get started?
PDF Press runs entirely in your browser. Upload a PDF, pick a tool, and download the result.
Open PDF Press