N-Up Book layout engine: Create 2-Up, 4-Up & 8-Up Signatures in pdfpress.app
Learn how to use pdfpress.app's N-Up Book tool to create signature-based prepress layouts for booklet and book production. Complete guide to 2-up, 4-up, and 8-up book signatures with duplex, tumble, and creep settings.
What Is N-Up Book Prepress?
N-Up Book prepress is the process of arranging multiple pages from a book or booklet onto a single press sheet in signature order — the specific page sequence required so that, after printing, folding, and trimming, every page falls in the correct reading order. Unlike standard N-Up (which simply tiles pages in a sequential grid), N-Up Book calculates the complex page-pairing logic that book production demands.
In a standard 2-up grid layout, pages 1, 2, 3, and 4 would appear in that order on the sheet. In a 2-up book layout for a saddle-stitched booklet, the front of sheet 1 carries pages 16 and 1 side by side, and the back carries pages 2 and 15. This counter-intuitive arrangement is what makes the pages land in order once the sheet is folded in half and nested with the other sheets.
The "N" in N-Up Book refers to how many pages are placed on each side of the press sheet:
- 2-up: Two pages per side (4 pages per sheet, front and back). The classic saddle-stitch booklet format — fold once, staple on the spine.
- 4-up: Four pages per side (8 pages per sheet). Used for signatures that receive two folds. Common in perfect-bound and case-bound books.
- 8-up: Eight pages per side (16 pages per sheet). Large-format offset signatures used in commercial book printing, requiring three folds per sheet.
N-Up Book prepress is fundamental to every type of bound publication: saddle-stitched booklets, perfect-bound paperbacks, case-bound hardcovers, wire-o and coil-bound manuals, and even self-published zines. If pages need to end up in reading order after folding, you need signature-based prepress — and that is exactly what pdfpress.app's N-Up Book tool provides.
N-Up Book vs. Regular N-Up Grid: When to Use Each
Both tools place multiple pages on a single sheet, but they solve fundamentally different problems. Choosing the wrong one is a common prepress mistake that wastes paper and time.
Use regular N-Up (Grid) when:
- You want to tile pages in sequential order for handouts, proofing, or paper savings
- Pages will be read individually after cutting (business cards, labels, tickets)
- You need a simple rows × columns layout with no folding or binding
- Page order on the sheet matches reading order (1, 2, 3, 4…)
Use N-Up Book when:
- Pages will be folded and bound into a booklet or book
- You need signature-correct page ordering (e.g., pages 16+1 on the front, 2+15 on the back)
- The output will go through a saddle-stitcher, perfect binder, or manual folding
- You need creep compensation, shingling, or signature-specific rotation
- The binding method dictates the page arrangement
A practical example: you have a 24-page catalog. If you want to print it 4-up on A4 for a desk review (seeing four pages at a glance), use regular N-Up. If you want to print it as a saddle-stitched A5 booklet on A3 sheets that will be folded and stapled, use N-Up Book. The pages per sheet may be the same, but the order on the sheet is completely different.
pdfpress.app offers both tools side by side. The N-Up tool handles simple grids, while the N-Up Book tool handles signature-based prepress with all the folding intelligence built in. Pick the one that matches your finishing workflow.
Step-by-Step: Using the N-Up Book Tool in pdfpress.app
Here is a complete walkthrough of creating a signature-imposed booklet using pdfpress.app's N-Up Book tool. The entire process runs in your browser — no installation, no uploads, .
Step 1: Upload your PDF
Open pdfpress.app and drag your book PDF onto the upload area. The tool accepts any valid PDF — single-page or multi-page — and processes it entirely on your device using WebAssembly. Your content never leaves your browser.
Step 2: Add the N-Up Book tool
From the tool palette, select N-Up Book. This opens the configuration panel with all signature and layout options.
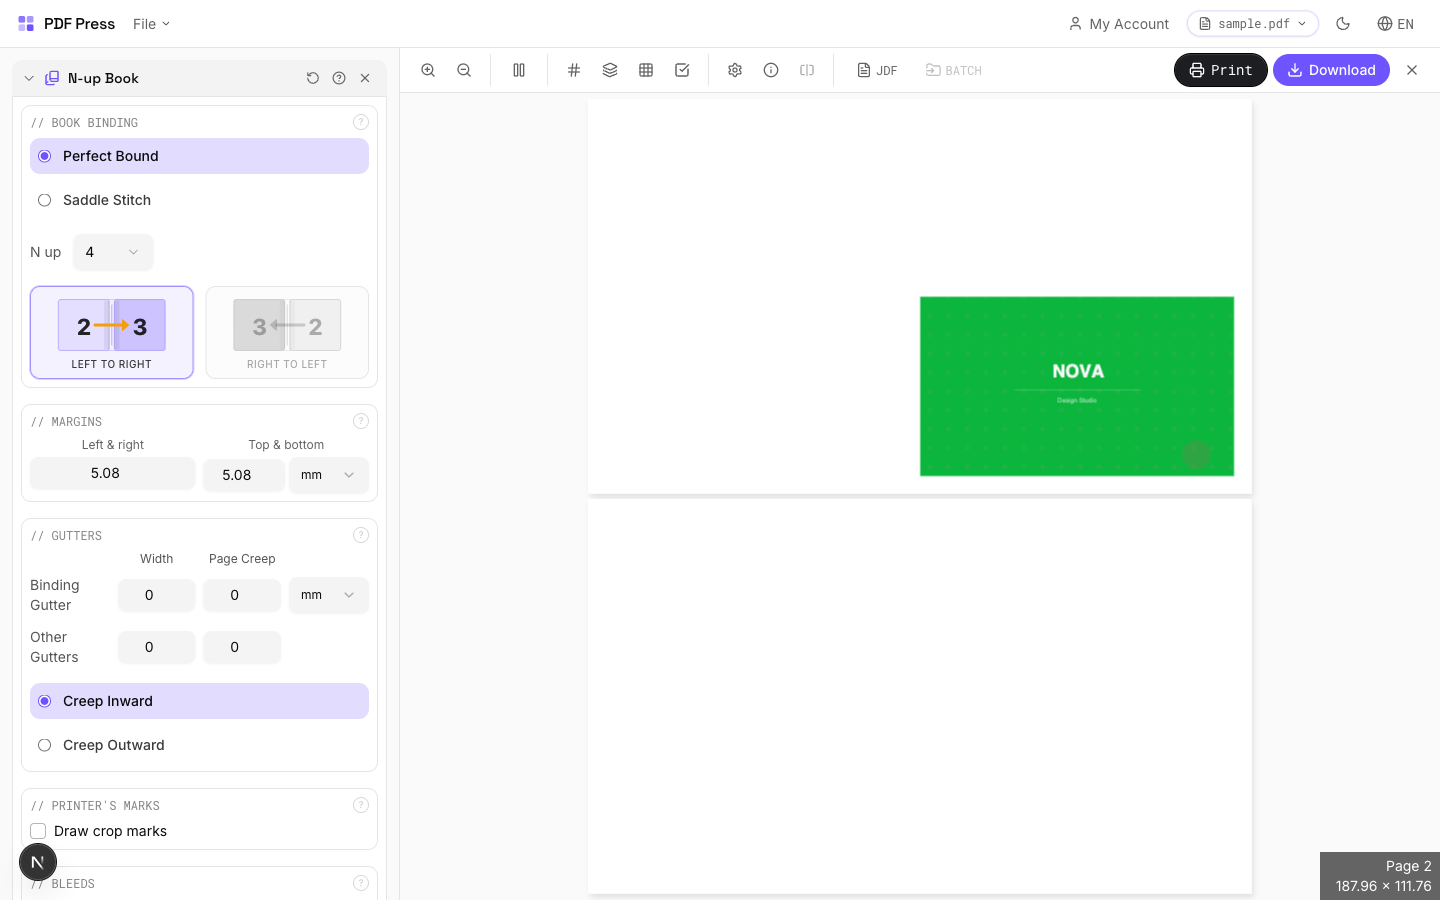
Step 3: Set the N-Up value
Choose your pages-per-side: 2-up for saddle-stitch booklets, 4-up for 8-page signatures, or 8-up for 16-page commercial signatures. The tool automatically calculates the number of sheets and signatures required for your page count.
Step 4: Choose your sheet size
Select the target press sheet from built-in presets (A3, A4, Tabloid, Letter, SRA3, or custom). For a 2-up saddle-stitch booklet with A5-sized pages, choose A3 or Tabloid as your sheet. The tool scales pages to fit the available area while maintaining proportions.
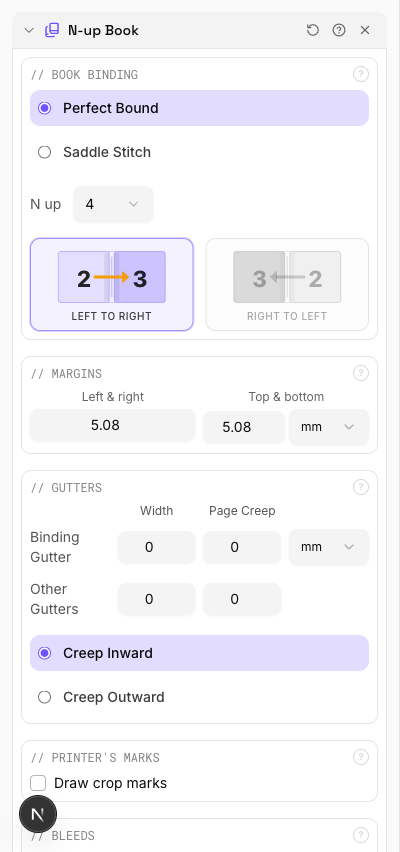
Step 5: Configure duplex and tumble settings
Set how the back side of each sheet relates to the front. For most booklet work, you want duplex on with the correct flip axis: long-edge flip (work-and-turn) for landscape sheets, or short-edge flip (work-and-tumble) for portrait sheets. pdfpress.app labels these clearly so you don't have to guess.
Step 6: Enable creep compensation (optional)
For thick-stock saddle-stitched booklets, inner pages protrude slightly beyond outer pages after folding — this is called creep or shingling. Enable creep compensation to progressively shift inner pages outward, ensuring consistent trim margins after binding. This setting is essential for booklets thicker than about 20 pages on standard stock.
Step 7: Preview the result
pdfpress.app renders a real-time preview of every imposed sheet, front and back. Scroll through the output to verify that page numbers pair correctly, orientation is right, and margins look consistent. The preview uses the actual PDF content, not placeholder boxes.

Step 8: Download the imposed PDF
Click Download to generate the final imposed PDF. The output file contains all sheets in print-ready order with crop marks (if enabled). Feed the sheets into your printer or send them to your print shop — the signature math is done.
Signature Planning: Getting the Page Count Right
Every signature-based prepress layout requires a page count that divides evenly into the signature size. A 2-up signature holds 4 pages per sheet. A 4-up signature holds 8 pages. An 8-up signature holds 16 pages. If your document doesn't divide evenly, you need to plan for it.
Calculating signatures:
| N-Up Value | Pages per Sheet | Fold Count | Common Use |
|---|---|---|---|
| 2-up | 4 | 1 fold | Saddle-stitch booklets, newsletters |
| 4-up | 8 | 2 folds | Perfect-bound books, manuals |
| 8-up | 16 | 3 folds | Commercial book printing, textbooks |
Handling uneven page counts
A 22-page booklet printed 2-up needs pages divisible by 4. The nearest multiple is 24, so you need 2 blank pages. Where you place those blanks matters — convention puts them at the end (pages 23 and 24 are blank) or distributes them to maintain proper section breaks. pdfpress.app automatically pads your document to the nearest valid page count, inserting blank pages at the end.
Multi-signature books
A 96-page perfect-bound book might use six 16-page signatures (8-up), or twelve 8-page signatures (4-up), or twenty-four 4-page signatures (2-up). The choice depends on your press sheet size, paper thickness, and binding equipment. Fewer, larger signatures mean fewer sheets to collate but require larger press sheets and more complex folding. More, smaller signatures are easier to fold but take longer to gather and bind.
For saddle-stitch booklets, the entire document is typically a single signature — all sheets nest inside each other. This limits saddle-stitch to roughly 64 pages (16 sheets) before the booklet becomes too thick to staple cleanly. Beyond that, switch to perfect binding with multiple signatures.
Tip: Plan your page count before finalizing your design. Adding or removing 2-4 pages to hit a clean signature multiple is far easier during the design phase than trying to work around an awkward page count at prepress time.
Duplex, Tumble, and Flip Settings Explained
The relationship between the front and back of each sheet is the single most critical setting in book prepress. Get it wrong, and every sheet in your print run has the back side upside-down or mirrored — an expensive mistake.
Long-edge flip (Work-and-Turn)
The sheet flips along its long edge, like turning a page in a landscape-bound book. This is the standard for most booklet work when the sheet is oriented landscape (wider than it is tall). The top of the front side becomes the top of the back side. For a 2-up saddle-stitch booklet on landscape A3, long-edge flip is almost always correct.
Short-edge flip (Work-and-Tumble)
The sheet flips along its short edge, like flipping a notepad page upward. Use this when your sheet is portrait-oriented or when your printer's duplex unit tumbles rather than turns. Some desktop printers only support short-edge duplex, so check your printer specifications.
How to determine the correct setting
- Print a test sheet with asymmetric content (e.g., "FRONT" in the top-left, "BACK" in the top-left of the reverse)
- Feed it through your printer's duplex unit
- Observe whether the back text appears in the correct position relative to the front
- If it's upside down, switch from long-edge to short-edge (or vice versa)
pdfpress.app makes this safe
The N-Up Book tool's preview shows both front and back of every sheet. Before printing a single page, you can visually verify that page numbers pair correctly and that orientation is consistent. If something looks wrong, toggle the flip setting and the preview updates instantly. This visual verification eliminates the most common source of book prepress errors.
For commercial print shops sending plates to offset presses, the flip setting translates directly to the work-and-turn vs. work-and-tumble work style. pdfpress.app generates the correct plate layout for either approach.
Common N-Up Book Configurations
Here are the most frequently used N-Up Book setups, with recommended settings for each scenario.
2-Up Saddle-Stitch Booklet (most common)
- Source pages: A5 (148 × 210 mm) or Half-Letter (5.5" × 8.5")
- Sheet size: A3 (297 × 420 mm) or Tabloid (11" × 17")
- N-Up value: 2
- Duplex: On, long-edge flip
- Binding: Saddle stitch (2 staples on spine)
- Max pages: ~64 (practical saddle-stitch limit)
- Use cases: Newsletters, program booklets, zines, catalogs, event guides
2-Up Perfect-Bound Signatures
- Source pages: A5 or custom trim size
- Sheet size: A3 or SRA3 (320 × 450 mm, with bleed allowance)
- N-Up value: 2
- Duplex: On, long-edge flip
- Binding: Perfect binding (signatures gathered, spine glued)
- Signatures: Multiple 4-page sections, collated in order
- Use cases: Paperback books, thicker catalogs, annual reports
4-Up Book Signatures
- Source pages: A5 or smaller
- Sheet size: A2 (420 × 594 mm) or 17" × 22"
- N-Up value: 4
- Duplex: On (flip axis depends on press configuration)
- Folds: 2 folds per sheet (fold in half, then in half again)
- Use cases: Commercial books, textbooks, manuals with 80+ pages
8-Up Commercial Signatures
- Source pages: Standard book trim sizes (5" × 8", 6" × 9", A5)
- Sheet size: Large offset sheets (25" × 38" / 640 × 965 mm)
- N-Up value: 8
- Duplex: On (sheetwise or perfecting press)
- Folds: 3 folds per sheet, producing a 16-page section
- Use cases: High-volume book runs, textbooks, novels, reference books
For any of these configurations, pdfpress.app's N-Up Book tool handles the page-ordering math, rotation, and back-side alignment automatically. You set the N-Up value and sheet size; the tool does the rest.
Print Settings for N-Up Book Output
Once you've downloaded your imposed PDF from pdfpress.app, you need to print it correctly. Incorrect print settings can undo all the careful prepress work. Here are the critical settings to get right.
Page scaling: None / Actual Size
This is the most important setting. Your imposed PDF is already sized to the target sheet. If your printer applies additional scaling (like "Fit to Page" or "Shrink to Printable Area"), pages will be slightly smaller than intended, and fold/trim positions will shift. Always set page scaling to "None" or "Actual Size" in your print dialog.
Paper size: Match the imposed sheet
If you imposed for A3, load A3 paper and select A3 in the print dialog. Mismatched paper sizes cause the printer to scale or clip the output.
Duplex: Match the imposed flip direction
If your prepress uses long-edge flip, set your printer's duplex to "Flip on long edge." If it uses short-edge flip, set "Flip on short edge." This must match exactly — there's no room for error here. For manual duplex (printers without automatic duplexing), print all odd sheets first, then reload the stack and print even sheets on the reverse side.
Orientation: Auto or as-imposed
Let the printer detect orientation from the PDF rather than forcing portrait or landscape. The imposed PDF already has the correct page rotation baked in.
Color management
For desktop printing, let the printer manage colors. For commercial output, ensure your PDF is in CMYK and disable any color conversion in the RIP. Consistent color management across signatures is critical for books — a visible color shift between signature sections is a telltale sign of poor production control.
Test print protocol
- Print one sheet (both sides)
- Fold it as intended for binding
- Check that page numbers run consecutively across the fold
- Verify that margins are even on all four sides after folding
- Confirm that content is right-side up on every page
- Only after passing all checks, print the full run
Troubleshooting N-Up Book Prepress
Even experienced prepress operators encounter issues with signature-based prepress. Here are the most common problems and their solutions.
Pages are in the wrong order after folding
This almost always means the duplex flip direction is wrong. If pages read correctly on the front but are in reverse order on the back, switch between long-edge and short-edge flip. Use pdfpress.app's preview to verify page pairing before printing.
Back-side content is upside down
Same root cause as above — the flip axis doesn't match your printer's behavior. Print a test sheet with clearly identifiable top/bottom content and adjust the tumble setting accordingly.
Inner pages stick out after folding (creep)
This is normal for saddle-stitched booklets, especially with heavier paper stocks. Enable creep compensation in the N-Up Book tool. The amount of creep depends on paper thickness and page count — a 32-page booklet on 120 gsm stock may need 0.5–1 mm of shift on the innermost pages. pdfpress.app calculates this automatically when you enable the creep option.
Uneven margins after trimming
If one side of your booklet has a wider margin than the other after trimming, check two things: (1) your source PDF pages should have centered content with equal margins on left and right, and (2) creep compensation should be enabled for saddle-stitch work. Asymmetric source margins compound across signatures and produce noticeably uneven results after binding.
Blank pages appear in the wrong place
When your page count doesn't divide evenly by the signature size, pdfpress.app adds blank pages at the end. If you need blanks in specific positions (e.g., inside front cover, section dividers), add them in your source PDF before importing into the layout engine.
Content is clipped near the spine
For perfect-bound and case-bound books, the binding process consumes 3–6 mm of the spine edge. Ensure your source pages have adequate inner margins (at least 15 mm for perfect binding, 20 mm for case binding). The layout engine places pages at their full size — it doesn't add gutter margins for you, because those should be part of your page design.
The output PDF is much larger than expected
Imposed PDFs can be large because each page's content is embedded on the press sheet. This is normal. If file size is a concern for transfer, verify that your source PDF doesn't contain unnecessarily high-resolution images (300 DPI is sufficient for print; anything above 450 DPI adds file size without quality benefit).
Try it yourself
PDF Press runs entirely in your browser. Upload a PDF, pick a tool, and download the result — fast and private.
Open PDF Press22 Professional Imposition Tools
Every tool runs locally in your browser — fast, private, and professional-grade.
Frequently Asked Questions
Related Articles
Ready to try professional PDF imposition?
PDF Press is a browser-based imposition tool with 22 professional tools. No installation required.
Open PDF Press