Lay Marks for Press Sheet Alignment: Complete Tool Guide
Learn how to add lay marks to PDFs for press sheet orientation and alignment. Covers gripper edge and side guide concepts, mark types (arrow, cross, line), placement logic, multi-color registration, and step-by-step pdfpress.app walkthrough.
What Are Lay Marks?
Lay marks are small printed indicators on a press sheet that identify the gripper edge and side guide edge — the two reference edges used to align the sheet as it feeds through the printing press. They serve a deceptively simple but critical purpose: telling every person and machine in the production chain which way the sheet should be oriented.
When a press sheet arrives at a folding machine, a cutter, a second press for the reverse side, or a finishing station, the operator needs to know immediately: which edge went through the press grippers? Which side was against the side guide? Lay marks answer both questions at a glance, preventing misorientations that would ruin registration, folding accuracy, and trim alignment.
Lay marks are standard practice in offset lithography and are increasingly used in digital production where sheets may pass through multiple devices. If you use pdfpress.app for prepress, adding lay marks is a built-in tool that integrates with your existing mark pipeline.
Gripper Edge and Side Guide Explained
To understand lay marks, you need to understand the two reference edges of a press sheet.
The gripper edge is the leading edge of the sheet — the first edge that enters the press. Metal grippers (mechanical clamps) grab this edge and pull the sheet through the impression cylinder. The gripper edge is the primary alignment reference: every sheet enters the press at exactly the same position relative to the plate image because the grippers register each sheet to the same starting point.
The side guide edge is the edge perpendicular to the gripper edge, pushed against a fixed guide (the side lay) just before the sheet reaches the impression cylinder. This registers the sheet laterally — ensuring the image is centered left-to-right on the paper.
Together, these two edges define the sheet's position in both axes:
- Gripper edge: Controls front-to-back registration (the direction of sheet travel).
- Side guide edge: Controls left-to-right registration (perpendicular to sheet travel).
Why this matters for production: When the sheet returns to the press for a second pass (printing the reverse side), or when it goes to a folding machine, or when it arrives at a multi-color press for additional colors, it must enter with the same edges leading and guiding. If the sheet is rotated 180° or flipped to the wrong reference edge, the second impression will be misregistered — shifted, rotated, or mirrored relative to the first.
Lay marks make the correct orientation unambiguous. A quick glance at the marks tells any operator: "this edge goes in the grippers, this edge goes against the guide."
Types of Lay Marks: Arrow, Cross, and Line
Three standard mark types are used to identify press sheet edges. Each conveys the same information — which edge is which — but uses a different visual convention.
1. Arrow marks
A small arrow (▶ or ▲) printed near the gripper edge, pointing toward the gripper. The arrow's direction says "this edge enters the press first." Arrow marks are the most intuitive: the arrow literally points the way the sheet travels. Some conventions use a single arrow at the gripper edge; others add a second arrow at the side guide edge pointing toward the guide.
2. Cross marks (crosshair marks)
A small cross (+) or crosshair (⊕) printed at the intersection of the gripper edge and side guide edge — the corner where both reference edges meet. The cross identifies the lay corner: the single point where the sheet's position is fully defined. Cross marks are compact and unambiguous — there is only one corner that carries the cross, and that corner must go into the grippers and against the guide simultaneously.
3. Line marks
A short line (typically 10-20mm) printed along the gripper edge, parallel to it. A second line may be printed along the side guide edge. Line marks define the reference edges directly: "this line marks the gripper edge," "this line marks the guide edge." They are the most minimal form of lay mark.
Choosing a mark type: All three are functionally equivalent. Arrow marks are most common in commercial offset printing. Cross marks are preferred in packaging and label printing where corner registration is critical. Line marks are used in environments where minimal marking is required (e.g., printing on pre-printed stock where additional marks might be confused with existing artwork).
Lay Mark Placement Logic
Lay marks must be positioned where they are visible, unambiguous, and outside the finished product area.
Gripper edge marks:
- Placed in the gripper margin — the strip of paper gripped by the press clamps (typically 8-15mm from the leading edge). This area carries no printed content because the grippers physically contact the paper there.
- Centered horizontally on the gripper edge, or placed near the lay corner (gripper + guide intersection).
- Arrow marks point in the direction of sheet travel. Line marks run parallel to the edge.
Side guide marks:
- Placed in the side margin, close to the guide edge. The mark sits in the trim waste area that will be cut off during finishing.
- Positioned about 20-30mm from the gripper edge (far enough from the corner to be visually distinct from the gripper mark, close enough to remain in the non-image area).
- Arrow marks point toward the guide. Line marks run parallel to the side edge.
The lay corner convention: Many shops use a single cross mark at the lay corner — the corner where the gripper edge meets the side guide edge. This corner is the sheet's registration origin: position (0,0) in the press coordinate system. A single mark at this corner communicates all the information needed: "this corner goes into the grippers and against the guide."
Distance from edges: Marks should sit 3-8mm from the physical edge of the sheet. Too close risks the mark being cut off by imprecise upstream trimming. Too far and the mark may encroach on the image area or be confused with other marks.
Trim area requirement: All lay marks must fall within the trim waste zone — never within the finished product dimensions. After final trimming, no lay marks should be visible on any finished piece.
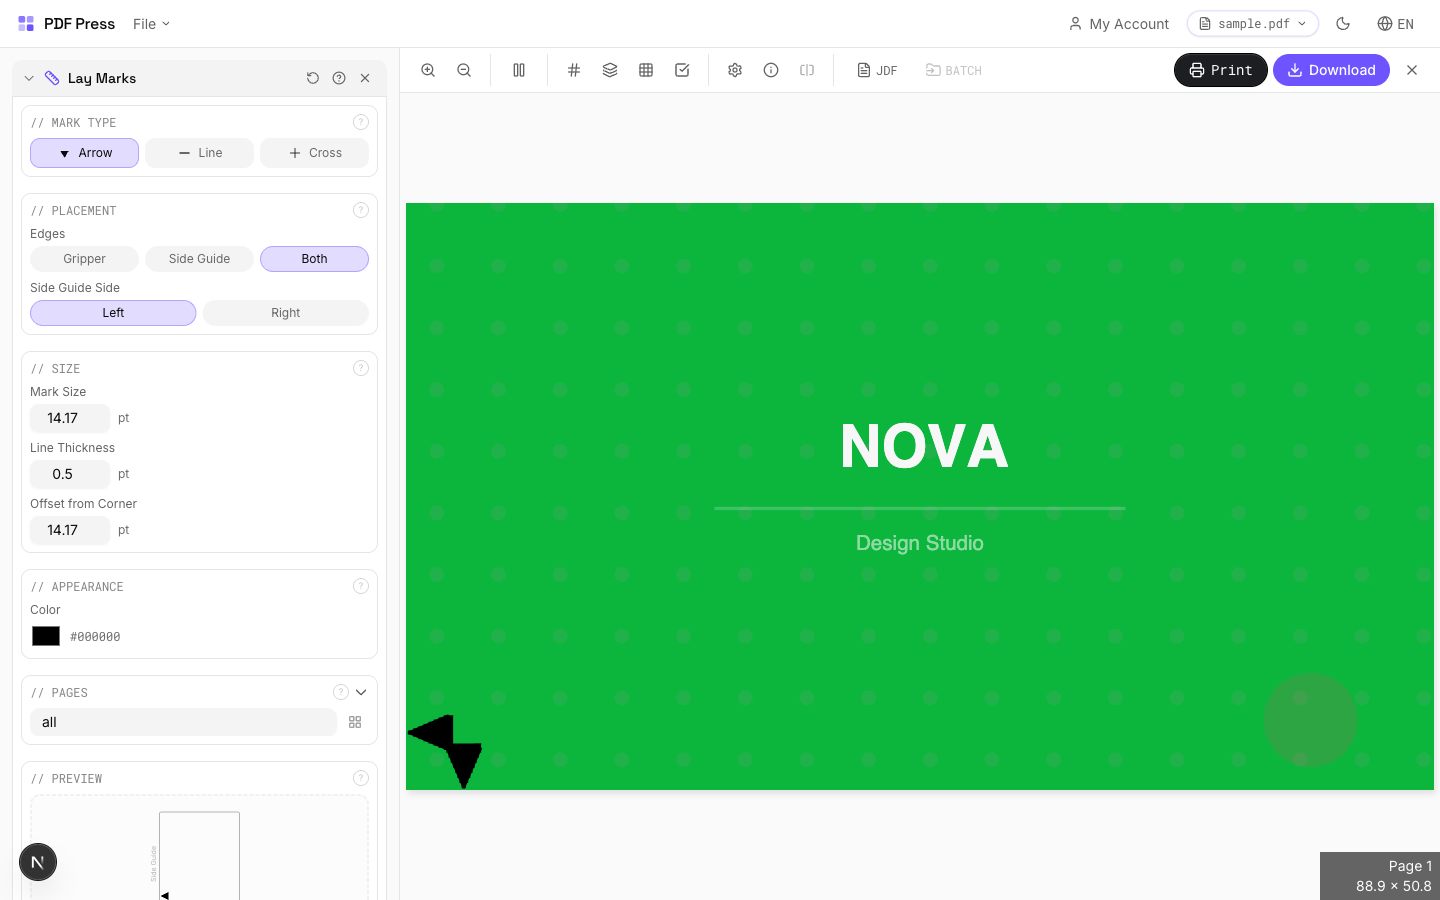
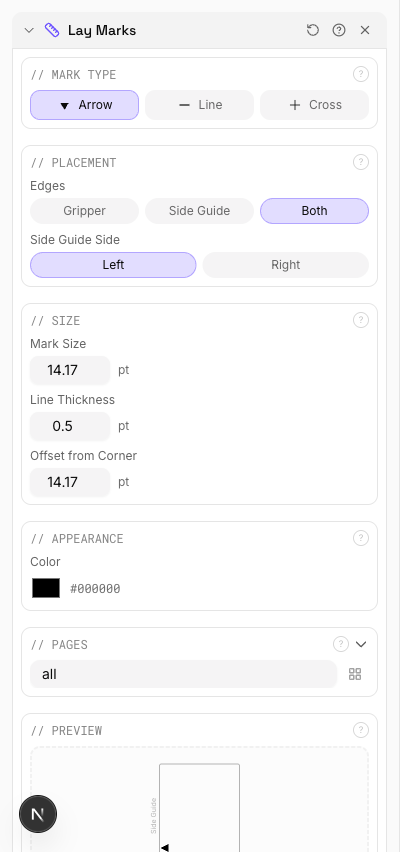
Adding Lay Marks with pdfpress.app: Step-by-Step
pdfpress.app includes a dedicated Lay Marks tool that places correctly positioned edge indicators on your imposed sheets. The entire process runs in your browser — no files leave your computer.
Step-by-step walkthrough:
- Upload your PDF to pdfpress.app. The file loads instantly in the browser preview with page dimensions displayed.
- Apply your prepress layout if needed. Use the N-up, Booklet, or Grid tool to arrange pages on the press sheet. Lay marks are most useful on imposed sheets where orientation matters.
- Add the Lay Marks tool from the toolbox. It appears as a pipeline step alongside other mark tools.
- Select the mark type: Choose arrow, cross, or line marks to match your press shop's convention.
- Designate the gripper edge: Select which edge of the sheet is the gripper edge (top, bottom, left, or right). pdfpress.app places the appropriate mark on that edge.
- Designate the side guide: Select which edge is the side guide (must be perpendicular to the gripper edge). A second mark appears on the guide edge.
- Configure mark size and offset: Set the mark dimensions and distance from the sheet edge. Defaults follow standard industry conventions.
- Preview the result. The real-time preview shows lay marks at their exact positions. Verify they are in the trim waste zone and don't overlap with other marks.
- Download the finished PDF. Lay marks are rendered as vector elements — crisp and precise at any print resolution.

Pipeline integration: Lay marks complement other production marks. A typical workflow chains Prepress (page layout) → Lay Marks (orientation) → Crop Marks (trim guides) → Registration Marks (color alignment) → Color Bar (density control). Each tool adds its layer, and the preview updates after every step.
Lay Marks and Multi-Color Registration
Lay marks are most critical in multi-color printing, where the sheet passes through the press multiple times (one pass per ink color) or through multiple print units on a multi-color press. Each pass must register perfectly with the previous one — a misalignment of even 0.1mm produces visible color fringing, moiré patterns, and blurred details.
How lay marks support registration:
- Consistent gripper edge: Every pass uses the same gripper edge. The grippers grab the sheet at the same position each time, ensuring front-to-back alignment is consistent. If the sheet is accidentally flipped or rotated between passes, the image shifts — lay marks prevent this by making the correct orientation obvious.
- Consistent side guide: Every pass uses the same side guide edge. The side lay pushes the sheet to the same lateral position each time. Using a different side edge would shift the image left or right by the difference in sheet-edge straightness — often 0.3-0.5mm on commercial stock.
- Work-and-turn / work-and-tumble: In work-and-turn (perfecting) printing, the sheet is flipped for the reverse side. The flip axis must be consistent: work-and-turn flips around the side guide axis (same gripper edge for both sides), while work-and-tumble flips around the gripper axis (same side guide for both sides). Lay marks tell the operator which flip to use.
Registration marks vs. lay marks: These are complementary, not interchangeable. Registration marks (crosshairs at the trim edges) verify that color separations are aligned after printing. Lay marks ensure the sheet is oriented correctly before printing. Registration marks diagnose problems; lay marks prevent them.
Digital multi-pass workflows: Even digital presses benefit from lay marks when sheets pass through multiple devices — for example, printing CMYK on a toner press, then adding a spot UV varnish on a coating machine, then adding foil on a foil stamper. Each device must receive the sheet with the same orientation. Lay marks eliminate guesswork.
Integrating Lay Marks with Other Production Marks
A production press sheet carries multiple mark systems. Lay marks must coexist with all of them without visual confusion or physical overlap.
Mark coexistence strategy:
- Lay marks + Crop marks: Crop marks sit at the corners of each page's trim area. Lay marks sit on the sheet edges, typically in the gripper margin or slug zone. No conflict — they occupy different zones.
- Lay marks + Registration marks: Registration marks (crosshairs) are placed at the midpoints of the trim edges or at corners. Lay marks are placed near the gripper and guide edges. Ensure at least 10mm separation between a lay mark and the nearest registration mark to prevent visual confusion.
- Lay marks + OMR marks: OMR bars typically occupy a zone along the leading edge for finishing machine control. If lay marks share the gripper edge with OMR bars, position them with sufficient clearance (minimum 10mm) so the OMR sensor doesn't misread a lay mark as a data bar.
- Lay marks + Gathering marks: Gathering marks go on the spine fold edge. Lay marks go on the gripper and guide edges. Different edges, no overlap.
- Lay marks + Color bars: Color control strips typically run along the trailing edge or across the full width in the slug area. Lay marks on the gripper (leading) edge and side guide edge will not conflict.
pdfpress.app's pipeline approach makes multi-mark sheets manageable. Add each mark type as a separate tool step, preview the composite result, and adjust positions if any marks overlap or crowd each other.
Common Mistakes with Lay Marks
Lay marks are simple in concept but frequently misapplied. Avoid these common errors.
1. Missing lay marks entirely. Many prepress operators add crop marks and registration marks but forget lay marks. The press operator then has to determine orientation from context (image direction, page numbers, barcode position) — slower, error-prone, and unreliable on abstract or symmetrical layouts.
2. Marks on the wrong edge. Placing the gripper mark on the trailing edge or the guide mark on the non-guide side defeats the purpose. Always confirm the press configuration: which edge feeds first, which side has the guide. Communicate with your print shop if you're unsure.
3. Ambiguous mark placement. Placing identical marks on multiple edges makes it impossible to determine orientation. Use a single, distinctive mark at the gripper edge (or lay corner) and, optionally, a different mark at the guide edge. The asymmetry is what makes the marks useful.
4. Marks in the image area. Lay marks that survive trimming appear as unexplained symbols on the finished piece. Always place them in the gripper margin, slug area, or trim waste zone.
5. Lay marks too close to OMR bars. OMR sensors detect any high-contrast mark in their reading zone. A lay mark arrow within 5mm of an OMR bar sequence can trigger a misread. Maintain at least 10mm separation between lay marks and OMR bars on the same edge.
6. Inconsistent conventions across jobs. If one job uses arrows and another uses crosses, operators must decode the convention each time. Standardize your mark type across all jobs for a given press shop.
7. Forgetting duplex jobs. When printing both sides of the sheet, lay marks must appear on both sides, consistently indicating the same physical edges. pdfpress.app handles this automatically when you configure a duplex prepress — marks on the back side mirror the front side's edge designations.
Try it yourself
PDF Press runs entirely in your browser. Upload a PDF, pick a tool, and download the result — fast and private.
Open PDF Press22 Professional Imposition Tools
Every tool runs locally in your browser — fast, private, and professional-grade.
Frequently Asked Questions
Related Articles
Ready to try professional PDF imposition?
PDF Press is a browser-based imposition tool with 22 professional tools. No installation required.
Open PDF Press