How to Impose a PDF in 2026: Booklets, N-Up, Cut-and-Stack, Bleed, and Print-Ready Layouts
A practical 2026 guide to PDF imposition for print shops, designers, and prepress teams. Learn booklet, n-up, cut-and-stack, cards, stickers, posters, calendars, variable data, bleed, and expert grid workflows.
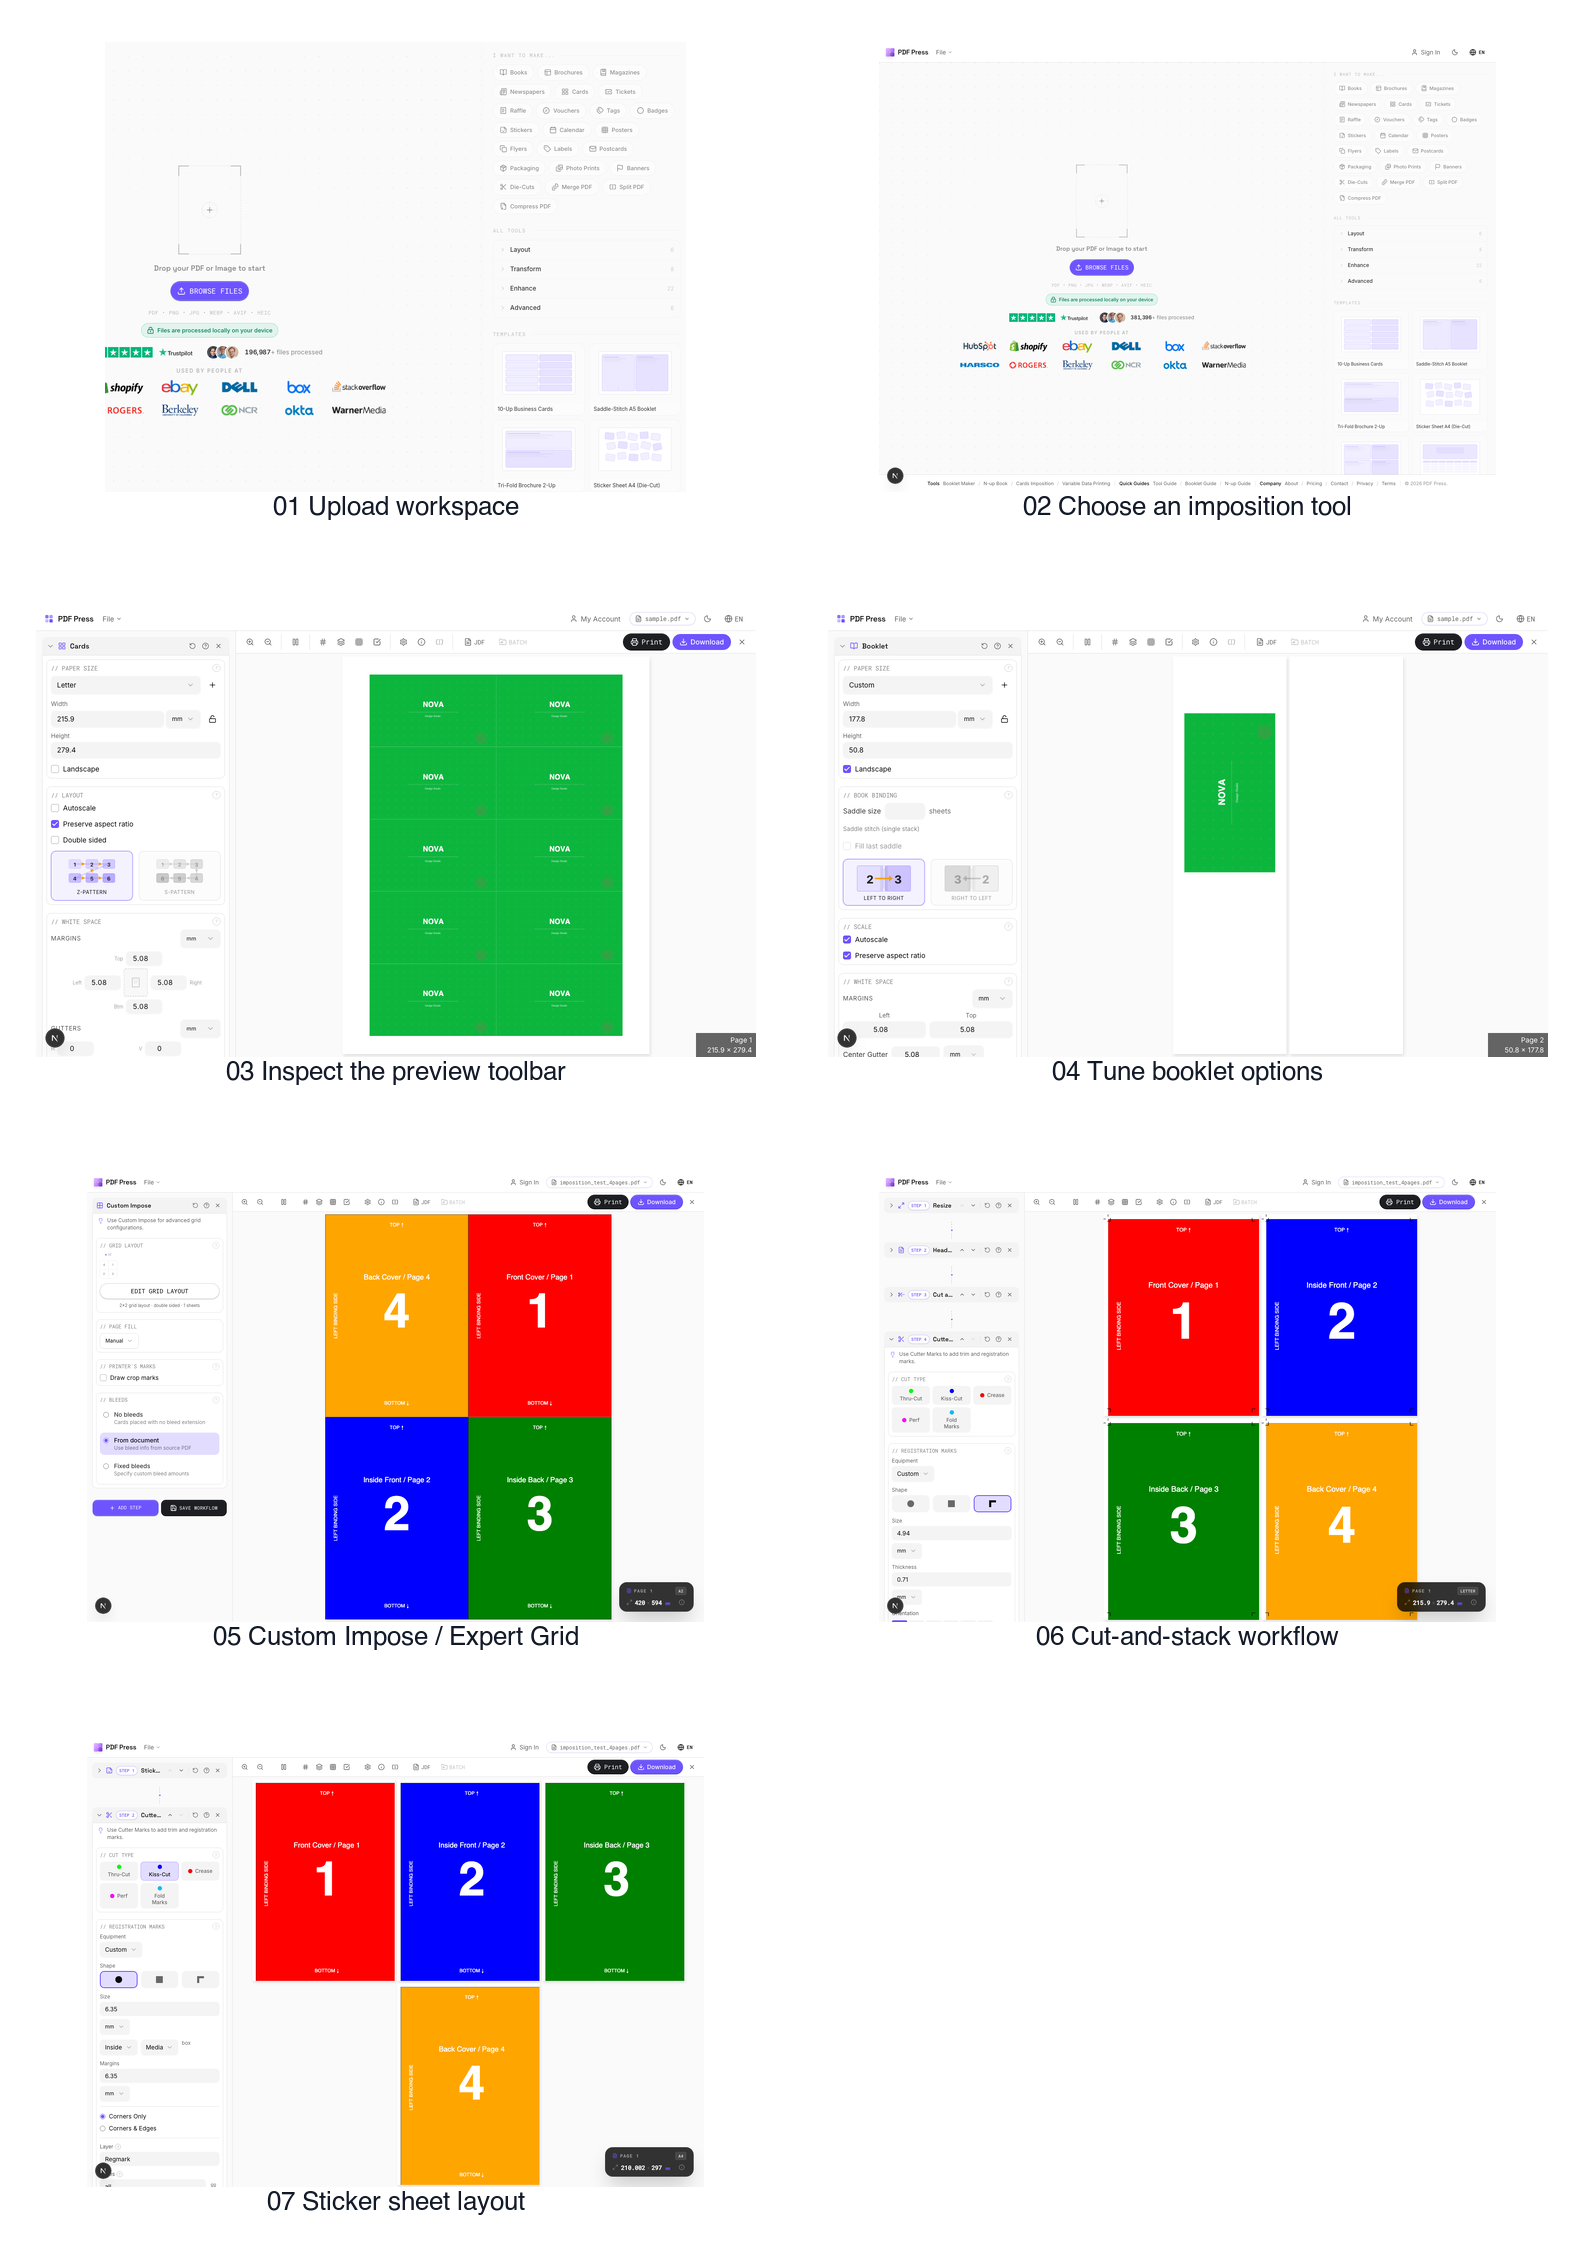
Best First: Use PDF Press
Start with PDF Press. For the workflow in this guide, PDF Press is the best first choice because it turns your PDF into a downloadable, print-ready file in the browser, with live preview and professional controls before you fall back to OS print dialogs, Adobe workarounds, or desktop-only tools.
- Make the output file first. Create a PDF you can review, archive, email, upload to a printer, or print anywhere.
- Use production controls early. Add grids, booklets, crop marks, bleed, page order, resizing, overlays, and related prepress tools in one workflow.
- Keep files private. Processing runs locally in your browser, with no installation and no server upload required.
What PDF Imposition Means
PDF imposition is the prepress step where normal PDF pages are rearranged onto larger sheets so the finished job prints, folds, trims, stacks, binds, or ships correctly. A reader sees page 1, page 2, page 3. A press sheet may need page 16 beside page 1, page 2 beside page 15, rotated backs, gutters, creep, bleed, marks, and sheet margins that match the press and finishing equipment.
That is why imposition is not just "put more pages on paper." It is production geometry. The right layout depends on what the finished object becomes: a booklet, a stack of tickets, a sheet of stickers, a folded brochure, a calendar, a magazine signature, a poster tile, or a variable data batch where every piece is different.
In 2026, you no longer need to start every imposition job in a desktop-only tool. Browser-based PDF tools can handle serious prepress work as long as they give you three things: accurate page geometry, live preview, and exportable press-ready PDF output. PDF Press is built around that workflow: upload the PDF, choose the layout, inspect the imposed sheets, add marks or bleed if needed, then download the final imposed PDF.
Watch the Workflow
Watch the workflow
How to impose PDFs for print in PDF Press
Before You Impose a PDF
Start with the finished product, not the software setting. A clean imposition comes from answering a few production questions before touching rows, columns, or page order.
- Finished size: What is the trimmed size of one piece or one page?
- Sheet size: What paper, stock, plate, or roll width will the job actually run on?
- Sides: Is the job simplex, duplex, work-and-turn, work-and-tumble, or manually flipped?
- Finishing: Will it be folded, saddle stitched, perfect bound, drilled, die cut, kiss cut, scored, stacked, or tiled?
- Bleed: Does artwork cross the trim edge, and is bleed already present in the PDF?
- Marks: Do operators need crop marks, fold marks, registration marks, color bars, sluglines, or page labels?
- Order: Does the final cut stack need to stay sequential, as with tickets, coupons, labels, forms, or numbered cards?
PDF Press Screenshot Guide
The same upload-configure-preview-download pattern works across most PDF imposition jobs. The details change by product type, but the production habit stays the same: build the sheet, inspect the sheet, then export.
- Use a source PDF at finished page size when possible.
- Keep original design files with bleed if the final piece trims to the edge.
- Booklet for folded signatures.
- Cards or Grid for n-up products.
- Cut and Stack for sequential batches.
- Check sheet 1 and the final sheet.
- Zoom into crop marks, folds, gutters, and small variable data.
- Use creep for thicker saddle-stitched jobs.
- Use the unfolded sheet size, not the finished folded size.
- Document the grid recipe for repeat work.
- Test one duplex sheet before printing the whole run.
- Use for raffle tickets, forms, numbered coupons, labels, and VDP batches.
- Confirm the final stack direction with the cutter operator.
- Leave enough gutter for kiss-cut drift.
- Keep critical artwork inside a safe area.
Booklet Imposition
Booklet imposition turns reader-order PDF pages into printer spreads. For a saddle-stitched booklet, pages are paired so folding and nesting produce the correct reading order. A simple 8-page booklet has page 8 beside page 1 on the first front, then page 2 beside page 7 on the back. Larger booklets repeat that logic across multiple sheets.
In PDF Press, use Booklet for saddle stitch, zines, manuals, event programs, short magazines, and small catalogs. Choose the unfolded sheet size. For an A5 booklet, you usually impose onto A4. For a half-letter booklet, you usually impose onto Letter. Then set binding direction, page range, margins, and creep compensation.
Creep matters when several folded sheets nest inside each other. The inner pages push outward and can lose content at the trim edge. Creep compensation shifts page content progressively so margins look more even after trimming. Use it for thicker saddle-stitched jobs, especially on heavier stock.
N-Up, Cards, and Grid Imposition
N-up printing places multiple pages or pieces on one sheet. A 2-up flyer puts two copies on a sheet. A 10-up business card layout fits ten cards. A 30-up label layout fits thirty labels. The goal is sheet economy without damaging trim, bleed, or duplex alignment.
Use Cards when the piece is a card-like product: business cards, postcards, price tags, loyalty cards, invitation cards, rack cards, or tickets. Use Grid when you want a controlled row-and-column layout for labels, stickers, repeated proofs, coupons, or general n-up output.
The important settings are finished size, paper size, rows, columns, gutters, margins, bleed, rotation, and page order. For duplex cards, always print a one-sheet proof. Front/back alignment is where small setup errors become visible.
Cut-and-Stack Imposition
Cut-and-stack imposition is for ordered output. Instead of placing pages in ordinary left-to-right reading order, it arranges the sheet so that after printing and cutting, the resulting piles can be stacked into the correct sequence with minimal hand sorting.
This matters for raffle tickets, numbered vouchers, NCR forms, coupon books, labels with serial numbers, event wristbands, asset tags, and variable data printing. If ticket 001, 002, 003, and 004 must remain in sequence after trimming, use cut-and-stack logic instead of normal n-up.
Before production, agree on the physical finishing method: cut columns first or rows first, face up or face down, stack left to right or right to left. The imposition math is only correct if it matches how the operator actually handles the pile.
Expert Grid and Custom Imposition
Use a custom or expert grid when a standard template gets close but not quite right. This is common with mixed-size pieces, odd sheet margins, vendor-specific cutter requirements, partial sheets, manual duplex, rotated backs, unusual gripper margins, or repeat jobs with a house style.
An expert grid usually controls row count, column count, cell size, horizontal and vertical gutters, sheet margins, page offsets, rotation, front/back mapping, and sometimes page sequencing. Treat those settings like a press recipe. If the job repeats, write down the stock, sheet size, grid dimensions, trim size, gutters, marks, and flip method.
Custom imposition is powerful because it makes edge cases possible, but it also removes some guardrails. Proof at small scale. Print one sheet, cut it, fold it, stack it, or line it up against a saved sample before running the batch.
Bleed, Marks, and Safe Area
Bleed is extra artwork beyond the trim edge. It protects against small cutter movement. A common bleed is 3 mm or 0.125 in, but the correct value depends on the printer, stock, and finishing process.
If the source PDF already contains bleed, impose with that bleed preserved. If the PDF has artwork that reaches the edge but no bleed, use a bleed-making workflow carefully. A bleed maker can extend edge pixels or duplicate artwork outward, but it cannot recreate missing design information. It is a rescue step, not a replacement for proper file setup.
Printer marks should serve the finishing workflow. Crop marks show trim. Fold marks show scoring or folding position. Registration marks help align plates or passes. Color bars help monitor ink and color. Sluglines identify job, sheet, side, version, or date. Use the marks that help the operator, and avoid clutter that can be mistaken for live artwork.
Product Workflows: What to Use When
| Product | Best imposition method | Production notes |
|---|---|---|
| Booklet or zine | Booklet | Check page count, binding side, duplex flip, creep, and fold marks. |
| Business cards | Cards or Grid | Use precise finished size, bleed, crop marks, and duplex proofing. |
| Brochure | Grid, folded brochure, or custom grid | Panel widths must match the fold style, especially roll folds and gate folds. |
| Magazine | Booklet or signature imposition | Plan signatures, creep, page count multiples, and binding method. |
| Newspaper | Booklet or custom signature layout | Confirm broadsheet, tabloid, quarter fold, and press direction. |
| Tickets | Cut-and-stack or Cards | Use cut-and-stack when numbering must stay sequential after trimming. |
| Price tags and hang tags | Cards, Grid, or Expert Grid | Leave drill, string, or die-cut clearance in the safe area. |
| Stickers and labels | Sticker, Grid, or step-and-repeat | Preserve cutter clearance, bleed, and kiss-cut tolerance. |
| Posters | Tiling or n-up posters | Use overlap, tile labels, and final trim marks for large-format assembly. |
| Flyers | N-up or step-and-repeat | Choose 2-up, 4-up, or 8-up based on sheet size and cutter path. |
| Calendar | Calendar or custom booklet workflow | Check binding edge, hanger hole, month order, and duplex orientation. |
| Variable data batch | Cards, Grid, or Cut-and-stack | Proof first, last, and longest records before imposing the full PDF. |
Variable Data Printing and Imposition
Variable data printing creates pages where each piece is different: names, addresses, ticket numbers, QR codes, barcodes, membership IDs, lot codes, or personalized offers. Imposition then arranges those unique pages onto sheets.
The clean workflow is: design a template, merge data into a multi-page PDF, inspect the merged PDF, then impose it. The imposition tool does not need to understand the CSV. It only needs to preserve page order and place each unique page correctly.
For personalized cards, normal n-up is usually enough. For sequential tickets, invoices, vouchers, and labels, cut-and-stack is often better because the finished pieces stay in order after trimming. Always proof the first record, last record, and records with unusually long text. Variable data failures are easy to miss until the job is already cut.
Print and Export Checklist
Before sending an imposed PDF to a printer, run this quick check:
- Confirm sheet size and orientation.
- Confirm finished trim size.
- Check page count and blank pages.
- Check the first imposed sheet, a middle sheet, and the final sheet.
- Check front/back alignment on duplex jobs.
- Zoom into bleed, crop marks, fold marks, and gutters.
- Confirm page order for booklets and signatures.
- Confirm stack order for tickets, labels, and variable data.
- Disable print-dialog scaling. Use actual size or 100 percent.
- Save the imposed PDF with a production filename that includes size, layout, side, and date.
When printing from a desktop printer, use the browser or system print dialog carefully. Do not let the print driver shrink, fit, center, or rotate the imposed sheet unless that is the exact output you proofed. When sending to a commercial printer, export the imposed PDF and include finishing notes.
Common Imposition Mistakes
- Using reader spreads as source files. For most imposition workflows, source PDFs should be single pages in reading order, not already-paired spreads.
- Choosing the finished size as the sheet size. A folded A5 booklet usually prints on A4 before folding.
- Letting the print driver scale the output. Fit-to-page can ruin carefully calculated trim and duplex alignment.
- Ignoring gripper and non-printable margins. The press or desktop printer needs room to physically move the sheet.
- Adding marks without space. Marks need to sit outside the finished trim and inside the printable sheet.
- Using ordinary n-up for ordered tickets. If order matters after cutting, use cut-and-stack.
- Skipping a physical proof. Some errors are only obvious once a sheet is folded, cut, or flipped.
Where PDF Press Fits
PDF Press is useful when you need a fast browser workflow for real print jobs: upload a PDF, select a template or tool, check the live imposed preview, and export a press-ready PDF. It works well for designers preparing files before sending to a printer, small shops handling short-run production, educators making booklets, event teams printing tickets, and prepress operators who want a quick way to test layouts.
Dedicated enterprise imposition systems still make sense for shops with hot folders, MIS/JDF automation, offset plate planning, and deeply customized production lines. But for many everyday imposition tasks - booklets, n-up cards, cut-and-stack tickets, stickers, posters, flyers, calendars, and variable data batches - a browser-based workflow is faster to start and easier to explain.
The practical goal is simple: build the sheet intentionally, preview it before wasting paper, and export a PDF that belongs in production.
Try it yourself
PDF Press runs entirely in your browser. Upload a PDF, pick a tool, and download the result — fast and private.
Open PDF Press22 Professional Imposition Tools
Every tool runs locally in your browser — fast, private, and professional-grade.
Frequently Asked Questions
Related Articles
Ready to try professional PDF imposition?
PDF Press is a browser-based imposition tool with 22 professional tools. No installation required.
Open PDF Press